What if the best sign that a robotic welding cell will fit your workshop isn’t the robot’s specifications, but how it handles your real parts and production workflow? Use a robotic welding cell installation checklist to assess whether your welds, part variation and production volumes suit automation, and how the cell will work with existing equipment and fixtures. Those practical details can make the difference between a considered upgrade and a difficult transition.
This checklist helps Australian manufacturers assess readiness and plan each stage with confidence. You’ll find practical prompts for evaluating parts and welds, preparing workshop space, comparing cell approaches and planning integration, safety and handover. We’ll also cover how operator training and no-code teaching software can help your team teach weld paths, run jobs and refine them over time. From the first fit assessment to the final handover, the focus is on connecting the cell to the people and processes that keep your production moving.
Key Takeaways
- Use the robotic welding cell installation checklist to assess real parts, weld types, batch sizes and workshop conditions before selecting hardware.
- Map the interfaces between the robot, welding equipment, fixtures, controls and workshop utilities to make integration needs visible early.
- Compare turnkey and customised cell approaches against your production workflow, responsibilities and application-specific risk assessment.
- Plan installation as a sequence, keeping site readiness, team responsibilities and production changes clear to the workshop crew.
- Set handover around sample jobs and safe operation, and ensure operators can load parts, teach or adjust paths and manage common interruptions.
Robotic welding cell installation checklist: assess workshop readiness first
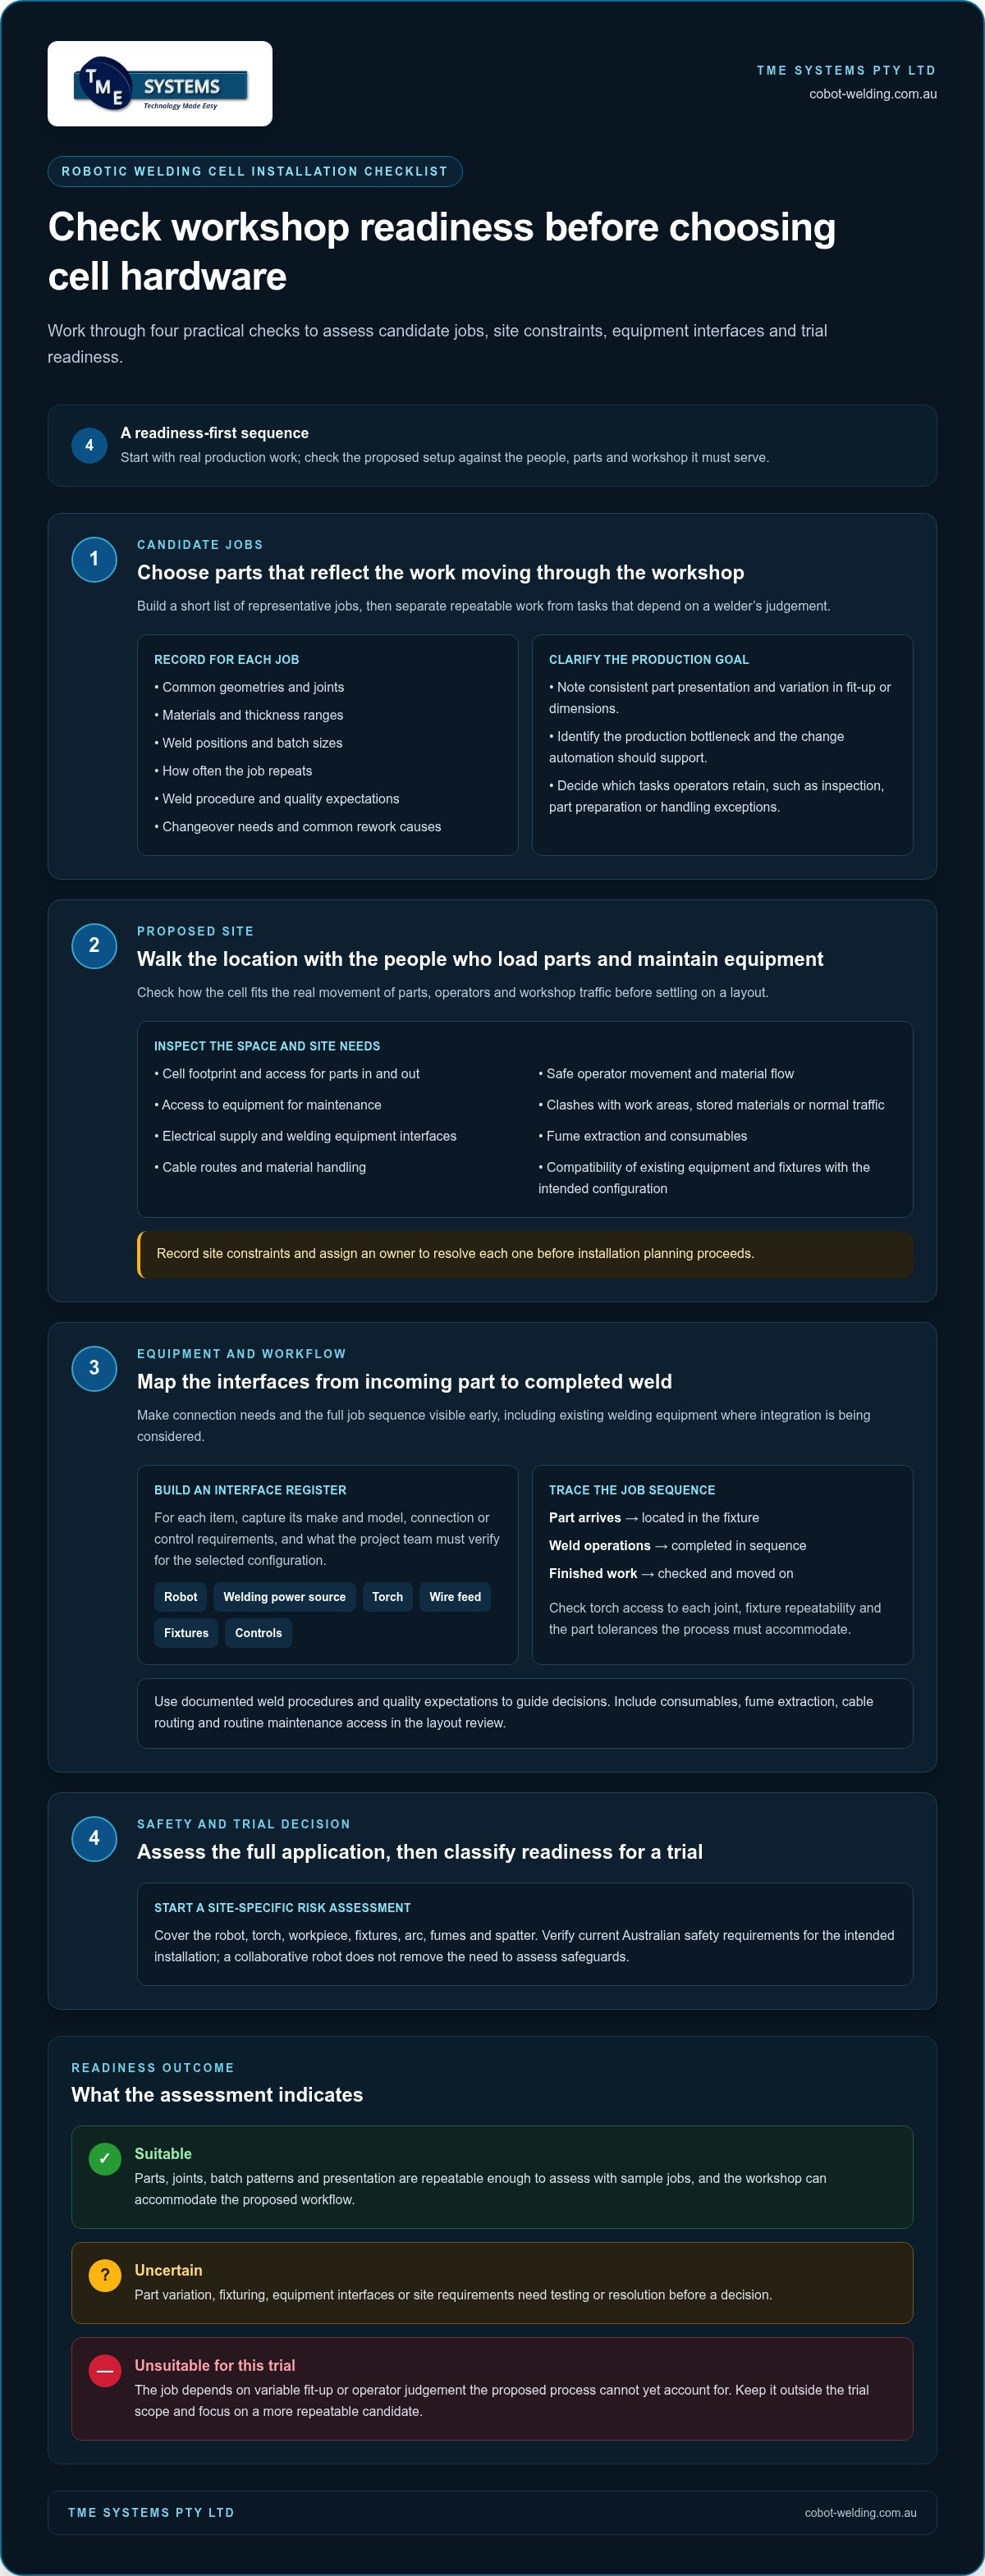
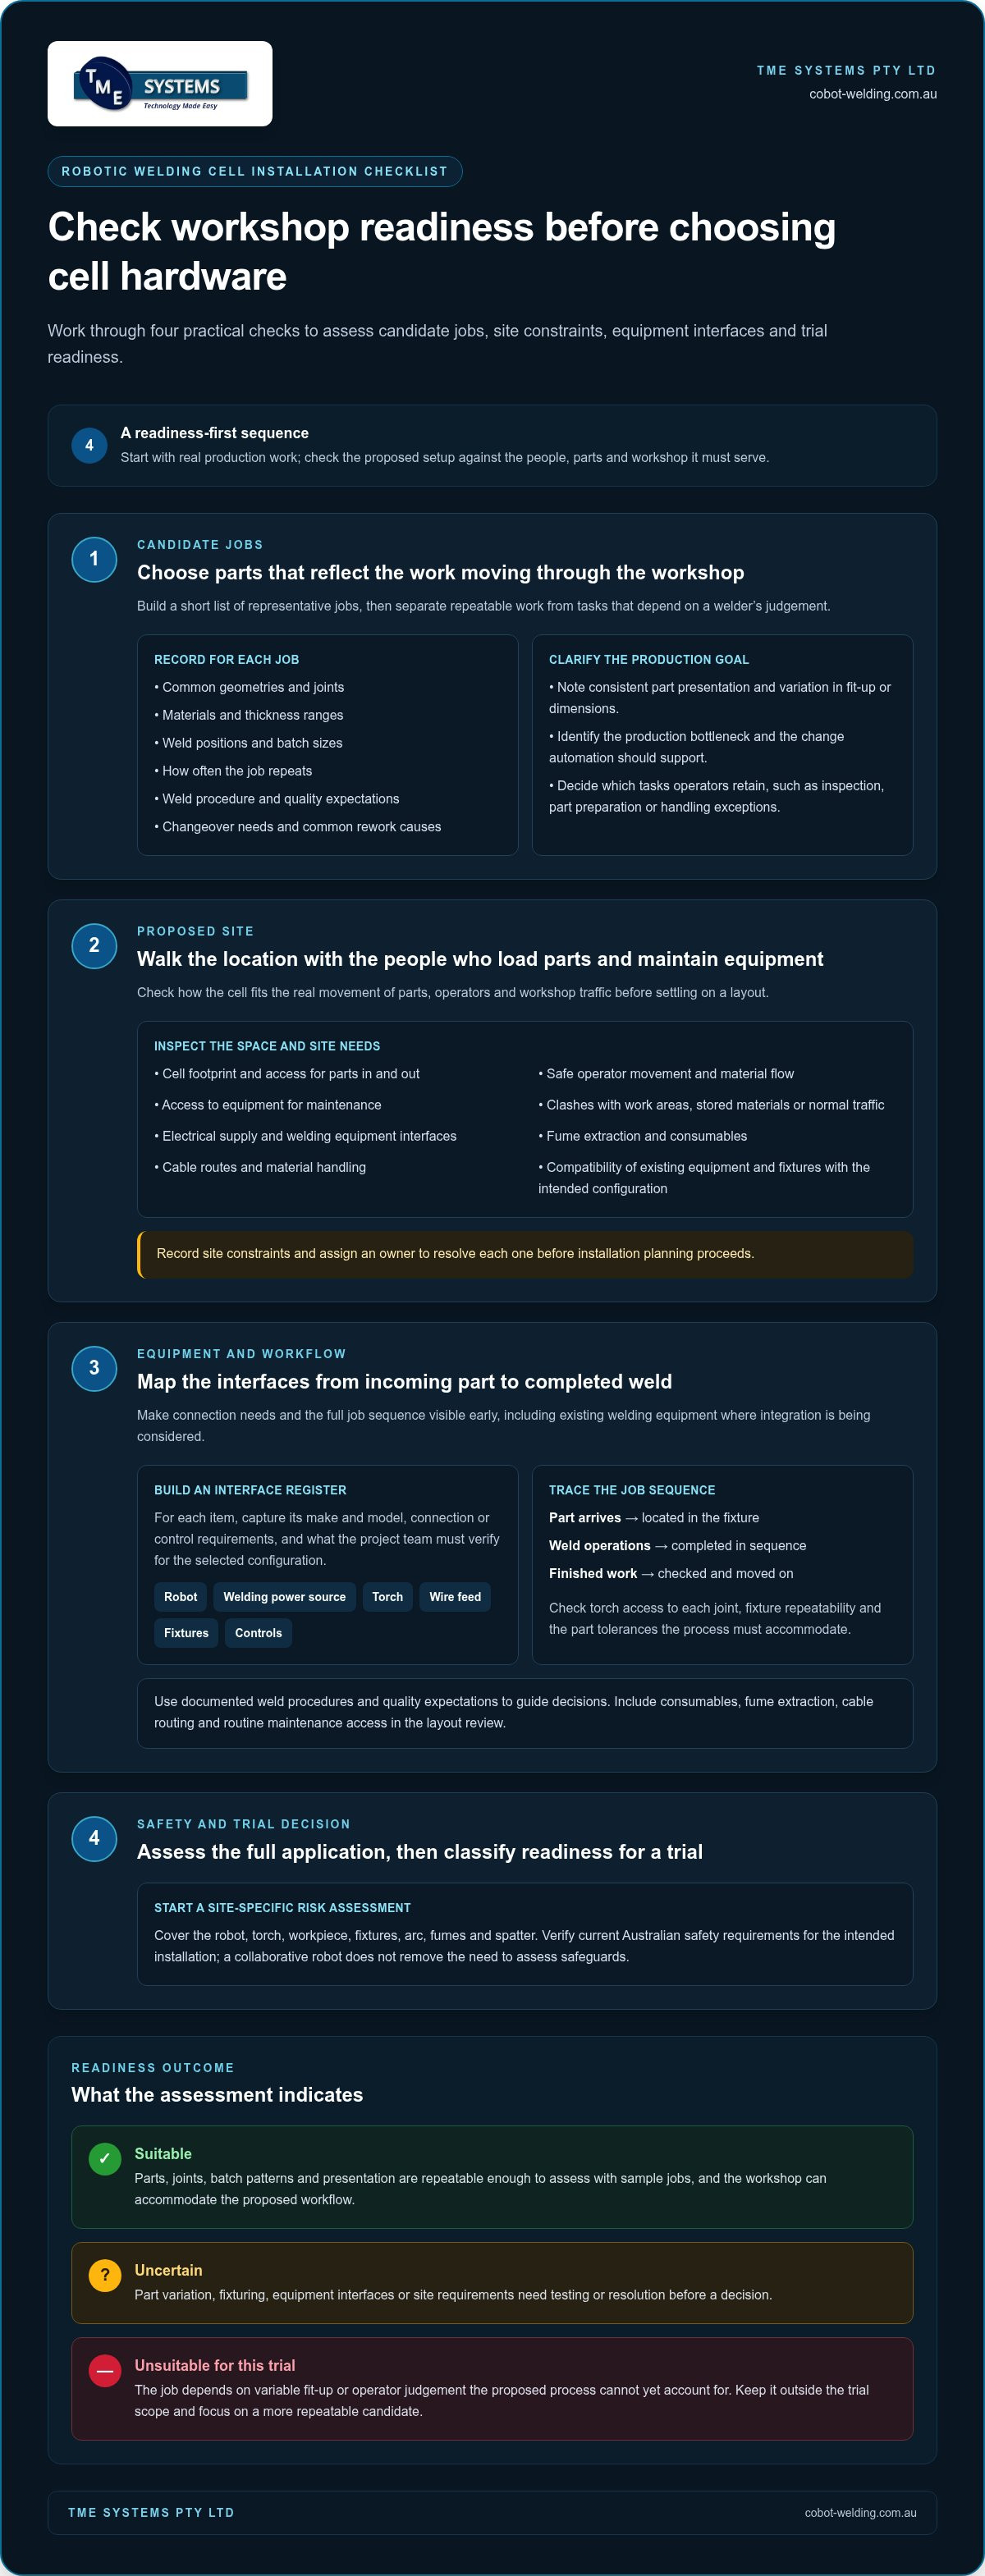
Assess the work and workshop before choosing cell hardware. A robot’s reach or payload won’t tell you whether it can handle your parts, weld positions, fixtures and production rhythm. Use this first stage of the robotic welding cell installation checklist to identify candidate jobs and constraints, then test uncertain cases with representative parts. For background on the process and common applications, see Robot welding.
Which parts and welding jobs should you assess?
Build a short list of jobs that reflects what actually moves through your workshop. Include common geometries and joints, each material and thickness range, weld positions, batch sizes and how often the job repeats. Note which parts can be presented consistently, and where variation in fit-up or component dimensions is common.
For each candidate, record the current weld procedure, quality expectations, changeover needs and typical causes of rework. Separate repeatable jobs, where parts and weld paths are consistent, from variable work that relies on a welder’s judgement. That distinction helps show which tasks may suit a trial and which should remain operator-led. Also identify the production bottleneck and the change you want automation to support, such as freeing a skilled welder for work that needs more judgement. Decide which tasks operators should retain, including inspection, part preparation or handling exceptions.
Is the workshop ready for a robotic welding cell?
Walk the proposed location with the people who load parts and maintain equipment. Check the cell footprint, access for bringing parts in and out, safe operator movement, material flow and space to reach equipment for maintenance. Look for clashes with existing work areas, stored materials and normal workshop traffic before settling on a layout.
List site requirements to validate against the selected configuration: electrical supply, welding equipment interfaces, fume extraction, consumables, cable routes and material handling. Existing welding equipment and fixtures may form part of an integrated setup, but assess compatibility for the actual configuration. Record constraints and assign an owner to resolve each one before installation planning proceeds.
Start a site-specific risk assessment covering the full welding application, including the robot, torch, workpiece, fixtures, arc, fumes and spatter. Verify current Australian safety requirements for the intended installation rather than assuming a collaborative robot removes the need for safeguards.
Readiness summary for a trial:
- Suitable: Parts, joints, batch patterns and presentation are repeatable enough to assess with sample jobs, and the workshop can accommodate the proposed workflow.
- Uncertain: Part variation, fixturing, equipment interfaces or site requirements need testing or resolution before a decision.
- Unsuitable for this trial: The job depends on variable fit-up or operator judgement that the proposed process cannot yet account for. Keep it outside the trial scope and focus on a more repeatable candidate.
Technical and people requirements to confirm before robotic welding cell installation
Once candidate jobs and the proposed work area are clear, map how every part of the cell needs to work together. A practical robotic welding cell installation checklist should include both equipment interfaces and the people who will operate, supervise and maintain the system. Clear records help expose gaps before they become installation delays or production issues.
What equipment and workflow interfaces need checking?
Create an interface register for the robot, welding power source, torch, wire feed, fixtures and controls. For each item, record its make and model, connection or control requirements, and the information the project team needs to verify for the selected configuration. Include existing welding equipment where it may be integrated. Use documented weld procedures and quality expectations to guide decisions; the American Welding Society (AWS) standards can provide useful welding reference material, alongside applicable Australian requirements.
Then map the job from start to finish: how parts arrive, how they’re located in the fixture, the sequence of weld operations, how the completed work is checked and where it goes next. Check torch access to each joint, fixture repeatability and the part tolerances the process must accommodate. A path that looks straightforward on screen may be difficult to reach once the part is clamped.
Document supporting needs against the intended layout, including consumables, fume extraction, cable routing and access for routine maintenance. Assign an owner to resolve each open interface or site requirement before installation planning is locked in. For broader context on cell approaches and operator-led teaching, explore collaborative robot welding cells.
How should operators and safety planning shape the setup?
Bring experienced welders into fixture reviews, path-teaching discussions and production trial planning. They can flag awkward loading, difficult joints and quality checks that may not be obvious from drawings alone. Their input also helps shape a process that supports skilled judgement rather than expecting operators to work around an unsuitable setup.
Write down who loads and unloads parts, teaches or adjusts weld paths, checks output, manages consumables and responds to interruptions. Name the supervisor responsible for production coordination and the maintenance contact for routine care and fault escalation. Operator training and no-code teaching software can help the team teach weld paths and refine jobs without writing complex code.
Finally, define access zones, emergency arrangements and safe operating procedures with the people responsible for site safety. Review risks across the full application, not just robot movement, and have project safety stakeholders verify the controls against current Australian requirements before installation.
Compare robotic welding cell options against your parts and production
Compare cell approaches against the jobs you want to run, not a feature list alone. A turnkey cell may bring more of the equipment and integration scope together, while a tailored integration can be shaped around existing welding equipment, fixtures and production processes. The right fit depends on what needs to be supplied, connected, configured and tested, and which responsibilities stay with your workshop team.
Turnkey or tailored integration: what changes?
With either approach, make the scope visible. Record which components are included, how robot and welding equipment interfaces will be handled, what fixtures and controls are involved, and who is responsible for installation, testing and workflow changes. TME Systems integrates collaborative welding cells with existing equipment and production processes, configuring the project around the intended application.
Fixture choice matters too. Fixed fixtures can suit a repeatable part family, while adaptable setups may better support varied parts or frequent changeovers. Assess how reliably each option locates the workpiece, how much operator adjustment it needs and whether the torch can reach the required joints.
How should you compare operator control and flexibility?
Consider who will teach weld paths and adjust jobs as production changes. Traditional robot programming may rely more heavily on specialist programming skills. No-code teaching software lets welders and operators teach paths without writing complex code, supporting operator-led adjustments. Include onboarding in the comparison, so the team can build confidence with the selected approach rather than treating training as an afterthought.
A collaborative robot’s label doesn’t establish that a task is safe for collaborative operation. Assess the complete application, including the robot, workpiece, tooling and how people interact with the cell. The project’s risk assessment should guide safeguards and operating arrangements.
Use this comparison prompt with your project team:
- Stable parts and repeat runs: Would a fixed fixture simplify consistent loading and positioning?
- Several part types or regular changeovers: How quickly can fixtures and teaching be adjusted between jobs?
- Existing welding equipment to retain: Which interfaces need integration, and what does the selected configuration require?
- Operators need to refine jobs: What training and teaching method will let them adjust paths confidently?
- People work near the cell: What does the application risk assessment require for safe operation?
Bring representative parts and planned workflow into a demonstration or production trial. That gives the team a practical way to compare loading, fixture changes, teaching and weld outcomes before settling the scope. Use the robotic welding cell installation checklist to capture decisions, open questions and project responsibilities alongside the preferred option.
Installation checklist: plan the cell, integration, testing and handover
A clear installation sequence keeps decisions visible from site preparation through production trials. Use this stage of your robotic welding cell installation checklist to track what’s ready, who owns each task and what needs to be resolved before routine production begins. TME Systems’ welding system integration considers existing equipment and production processes as part of the cell setup.
What should happen before equipment arrives?
Confirm the approved layout and document the agreed interfaces, utilities, extraction arrangements and access requirements. Prepare representative parts, fixtures and consumables for the planned trials. Let the production team know the installation timing, affected workflows and who is responsible for site preparation, coordination and decisions. If a requirement changes, record the change and its owner rather than relying on a verbal handover.
What should the installation and trial checklist cover?
Work through the sequence with the integration team and workshop leads. Keep the project plan, open issues and trial records together so the team can see what has been checked and what still needs attention.
- 1. Confirm scope and layout: Review the approved cell location, equipment scope, interfaces and responsibilities.
- 2. Verify site readiness: Check that required utilities, extraction, access and material movement arrangements are in place.
- 3. Install and integrate: Confirm equipment placement and connections against the agreed design. Check guarding and other risk controls, and record any changes to documented integration points.
- 4. Run representative jobs: Use the agreed sample parts, fixtures and weld-quality criteria. Review weld outcomes, repeatability, torch access, part handling and operator usability. Judge results against the criteria agreed for the project, not an assumed universal threshold.
- 5. Resolve and retest: Log each issue, assign an owner and record the corrective action and retest outcome before moving to routine production.
Keep a useful record of each successful job: the part and fixture setup, weld path changes, relevant process settings and the outcome of the trial. This gives operators a reference they can follow, while leaving room to refine jobs through controlled, documented adjustments. Make expected production changes clear to the workshop team, including any revised loading, checking or material-flow steps.
For project-specific integration planning, discuss robotic welding cell integration with TME Systems.
Commissioning and operator handover: confirm the cell is ready for production
Commissioning isn’t complete just because the cell powers up. The team needs to confirm that agreed jobs run as intended, safety controls are in place and operators can manage normal production tasks. Close the robotic welding cell installation checklist with documented results, clear responsibilities and a practical handover, not a verbal assurance that everything is ready.
What belongs in a practical commissioning sign-off?
Use the project’s agreed sample jobs and acceptance criteria. Record the parts and fixtures trialled, approved job settings, observed weld outcomes and any limitations the team has agreed to. Check equipment interfaces, operator access, safety controls and required documentation against the project scope.
- Trial evidence: Note the job run, weld outcome, repeatability observations and any adjustment made.
- Safe operation: Record checks against the project’s risk controls and operating procedures.
- Open actions: Give each unresolved issue an owner, a required action and a retest step.
- Production decision: State which jobs are ready for routine use and any conditions that must be met first.
If a trial exposes a problem, keep it visible until it’s resolved and retested. For example, if a part shifts in its fixture, record the affected job and the fixture change required, then repeat the trial and document the result. Don’t treat an informal note or an unverified adjustment as sign-off.
How can training support a confident handover?
Have operators practise loading and positioning parts, teaching or adjusting paths, running approved jobs and responding to common interruptions. With no-code teaching software, welders can teach paths without writing complex code. TME Systems provides operator training and onboarding, including supervisors and maintenance staff, so everyone understands routine checks, issue-reporting steps and who to involve when a fault or process change needs attention.
Leave the team with usable records: operating instructions, approved job settings, fixture details, routine maintenance tasks and escalation paths. Make sure operators know how to record refinements so successful changes can be repeated and reviewed.
A representative-parts demonstration is a practical next step if you’re still assessing fit. TME Systems offers mobile demonstrations using parts from your workshop to show how a cell and teaching approach can suit the work before implementation planning.
Take the next step with your workshop in mind
A confident installation starts with your real parts, weld requirements and production workflow, not robot specifications alone. This robotic welding cell installation checklist helps you assess workshop readiness, map equipment and people requirements, compare cell approaches and plan commissioning around agreed trial jobs.
Keep operators involved from the start. Their input can shape fixtures and workflow, while practical training helps them teach or adjust weld paths and run jobs with confidence. Integration, onboarding and clear handover records connect the equipment to the people who’ll use and maintain it.
A mobile demonstration using representative workshop parts can help your team see how robotic welding may fit your work. No-code teaching software also gives operators a practical way to teach weld paths without writing complex code.
Discuss a robotic welding cell for your workshop with TME Systems and plan a practical next step around your parts and production workflow.
Frequently Asked Questions
What should a robotic welding cell installation checklist include?
A robotic welding cell installation checklist should cover job suitability, workshop readiness, equipment interfaces, safety planning, installation tasks, production trials and operator handover. Start with representative parts, weld types, materials, batch patterns and quality expectations. Then document fixtures, existing welding equipment, utilities, extraction, responsibilities and site constraints. Finish by recording trial outcomes, approved job settings, outstanding actions, operator training and maintenance arrangements so the team has a practical reference for production.
How do I know if my workshop is ready for a robotic welding cell?
Your workshop is ready to plan a cell when the target jobs, workflow and site requirements are understood well enough to assess together. Check that representative parts can be presented consistently, then review floor space, access, material movement, power, extraction and maintenance access. Involve operators and supervisors in the review. If key details such as part variation, fixturing or equipment interfaces remain uncertain, use a practical trial to help resolve them before finalising the installation scope.
Can a robotic welding cell work with existing welding equipment and fixtures?
Yes, a robotic welding cell can be integrated with existing welding equipment and fixtures when the selected components and interfaces suit the application. Record equipment details, controls, torch and wire-feed requirements, fixture repeatability and part tolerances. Then assess the planned configuration using representative parts and jobs. TME Systems’ welding system integration considers existing equipment and production processes, with technical compatibility assessed against the specific project configuration.
What safety checks are needed before installing a welding cobot in Australia?
Start with a site-specific risk assessment of the whole welding application, not just the cobot. Consider the robot, torch, workpiece, fixtures, operator access, arc radiation, fumes, spatter and material handling. Determine the safeguards and operating procedures required for the actual task and layout. Project safety stakeholders should verify the risk controls against current Australian requirements before installation and commissioning. A collaborative robot label alone doesn’t establish that an application is safe to operate.
How do you test a robotic welding cell before production?
Test the cell with agreed sample jobs, representative parts, fixtures and weld-quality criteria. Record each job’s settings, weld outcomes, repeatability observations, operator access and any adjustments made. Check that the equipment interfaces and safety controls work as intended for the project. Log issues with an owner and a retest step, then document the result. Move towards routine production only when the agreed acceptance requirements and any conditions for use are clear to the team.
Do operators need robot programming experience to use a cobot welding cell?
Operators don’t necessarily need traditional robot programming experience to teach and adjust weld paths. No-code teaching software is designed to let welders and operators teach paths without writing complex code. They still need practical onboarding to load parts, run approved jobs, make permitted adjustments and respond to common interruptions. Include supervisors and maintenance staff in handover as well, so responsibilities, routine checks and issue escalation are understood across the workshop team.
How long does robotic welding cell installation take?
Installation timing depends on the project scope and site readiness, so there isn’t one timeframe that suits every cell. The work may involve confirming layouts and interfaces, preparing utilities and extraction, integrating equipment, completing safety checks, running production trials and training operators. Delays can arise if requirements or responsibilities are unclear. A documented project sequence, named task owners and prepared sample parts help the workshop team coordinate each stage and understand what must happen before production use.