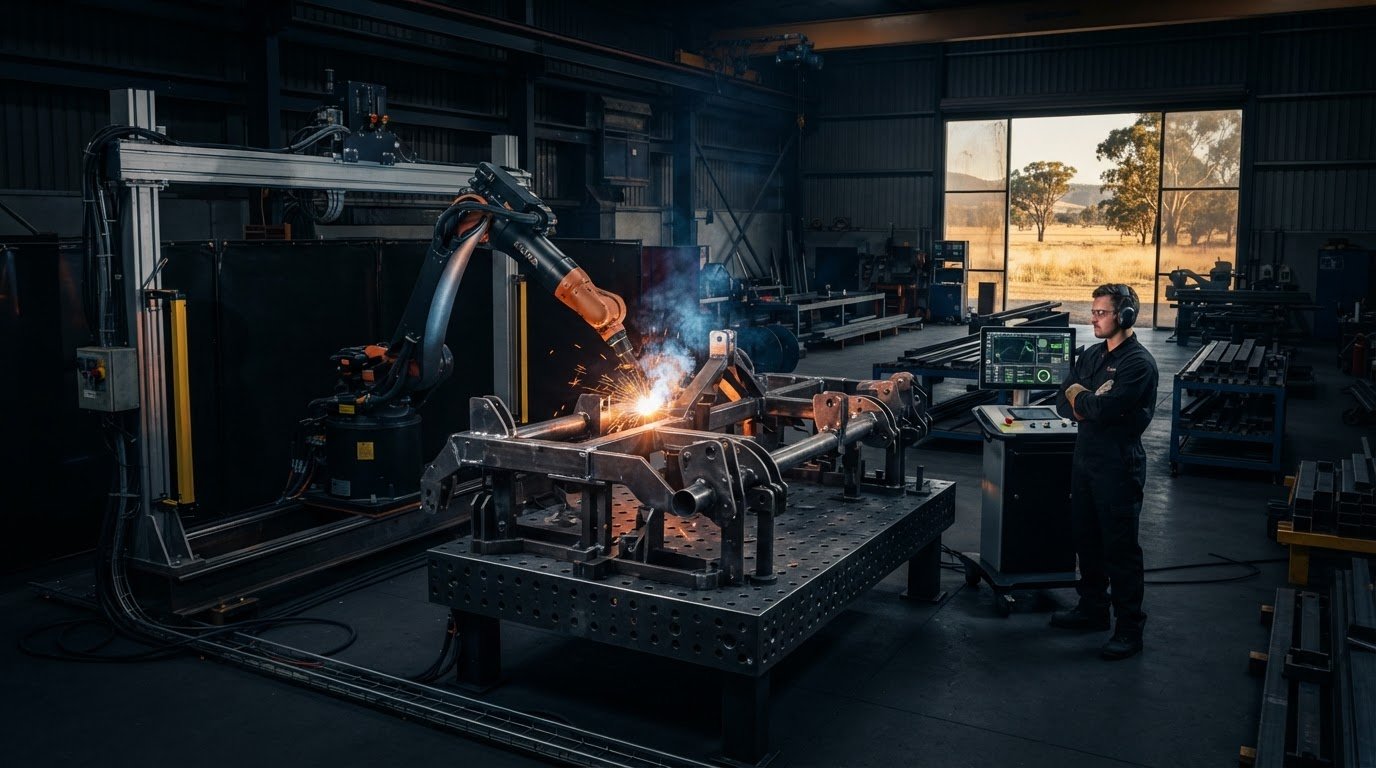
The most advanced welding cell isn’t automatically the right choice for a farm equipment workshop. With parts that vary in size, geometry, material and batch frequency, automated welding for agricultural equipment needs to be designed around the work, not the other way round.
If weld quality and output vary between operators, shifts or repeat jobs, improving consistency is a practical goal. But automation can feel difficult to adopt when traditional robot programming and cell integration seem like a steep learning curve. The key question is which approach can improve repeatability while keeping varied jobs manageable for the people on the floor.
This guide compares manual welding, collaborative robot cells and industrial robotic systems, focusing on task suitability, part variation, production needs and operator involvement. You’ll also learn how operator-led path teaching, integration with existing workflows and a mobile demonstration can help shape a realistic next step. The aim isn’t to automate every weld. It’s to find where automation fits your parts, production and team.
Key Takeaways
- Identify jobs suited to automated welding for agricultural equipment by looking for repeatable welds, manageable part presentation and clear quality requirements.
- Understand how preparation, fixturing, path teaching and inspection fit into a robotic welding process.
- Compare manual, collaborative and industrial robot welding against your parts, production flow, operator involvement and available floor space.
- Use a five-step assessment to document candidate jobs, weld details, part presentation, workflow and the measures that matter.
- See how operator-led teaching, system integration and a mobile demonstration can help shape a practical automation project.
Where automated welding for agricultural equipment can solve real production challenges
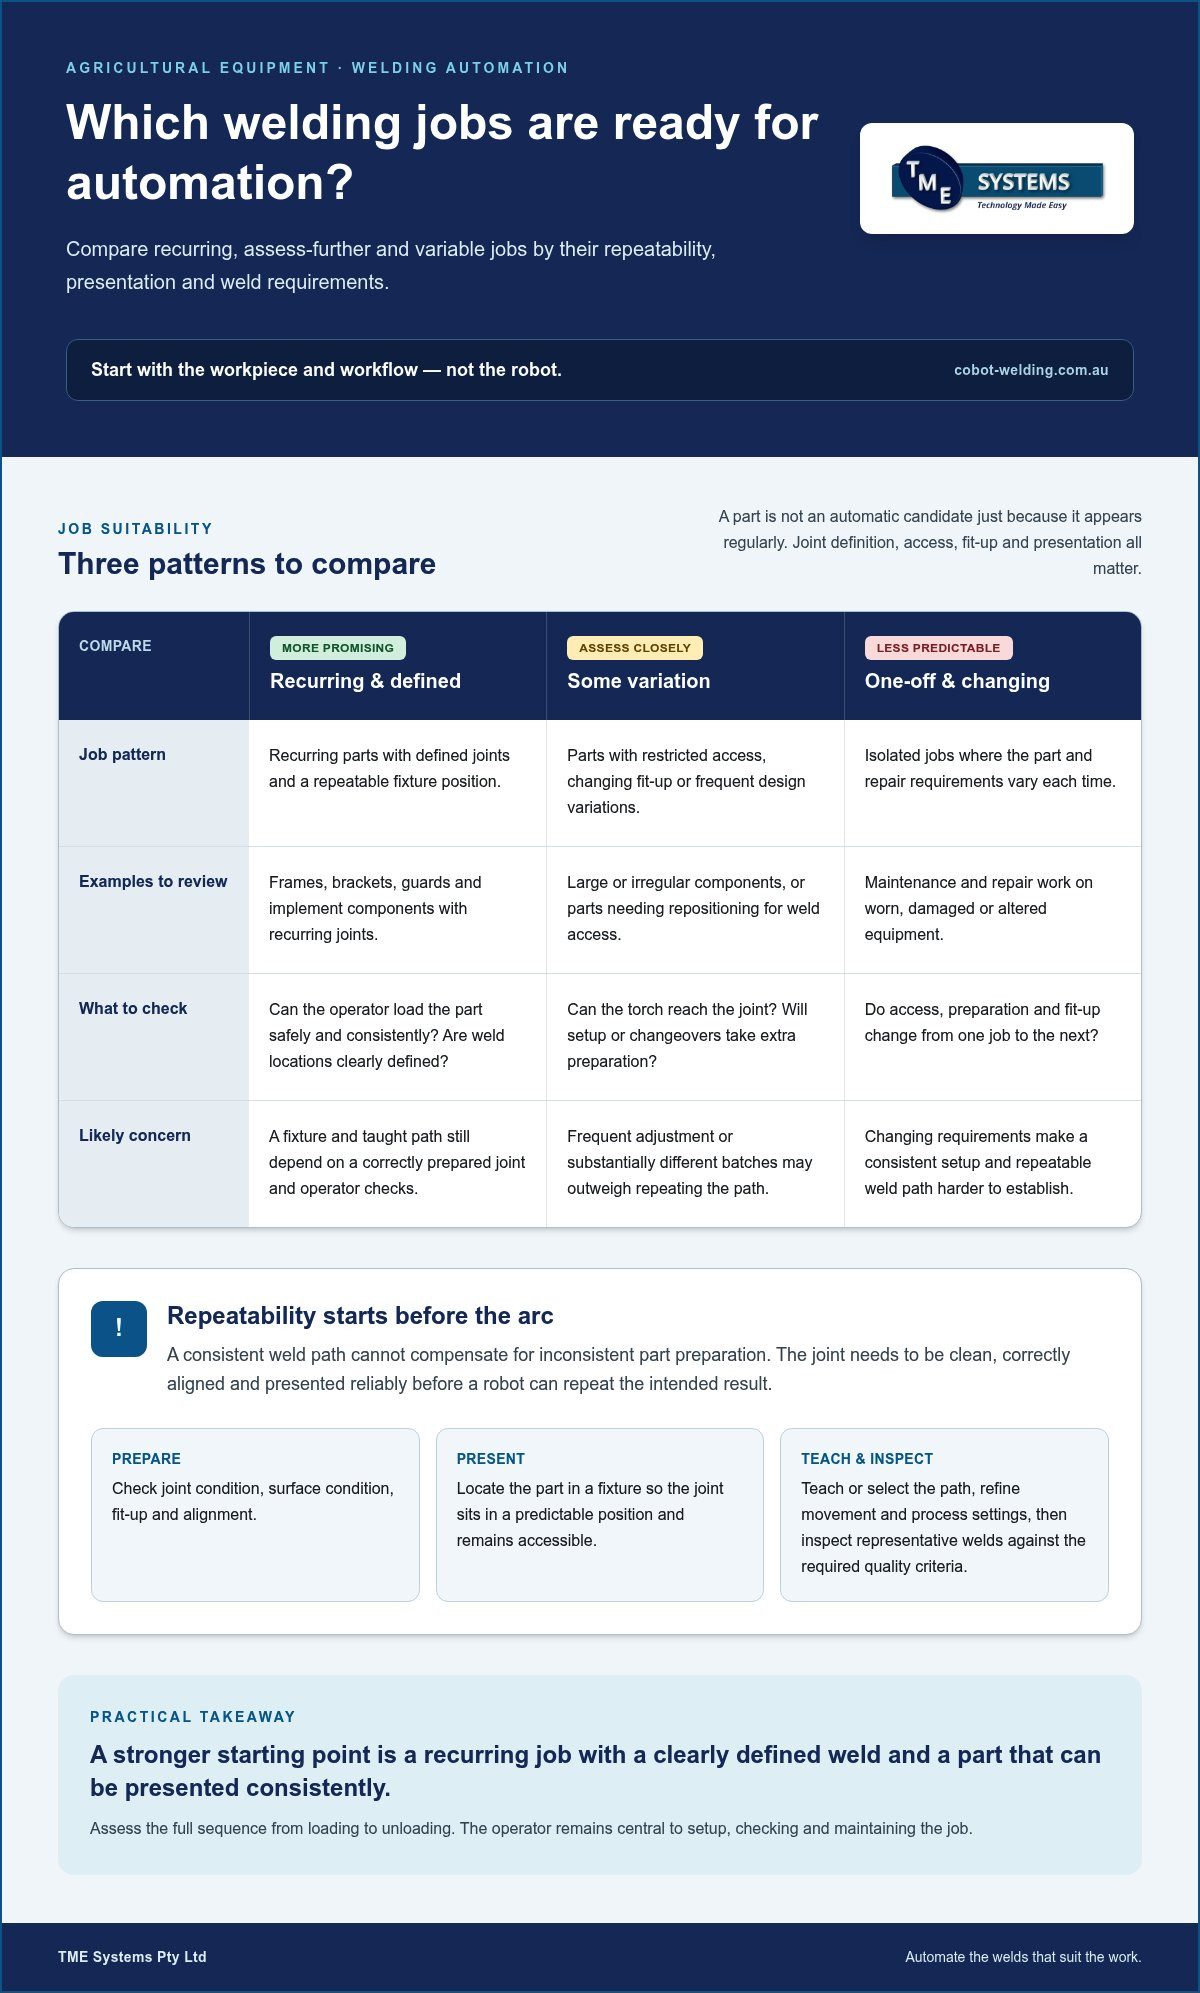
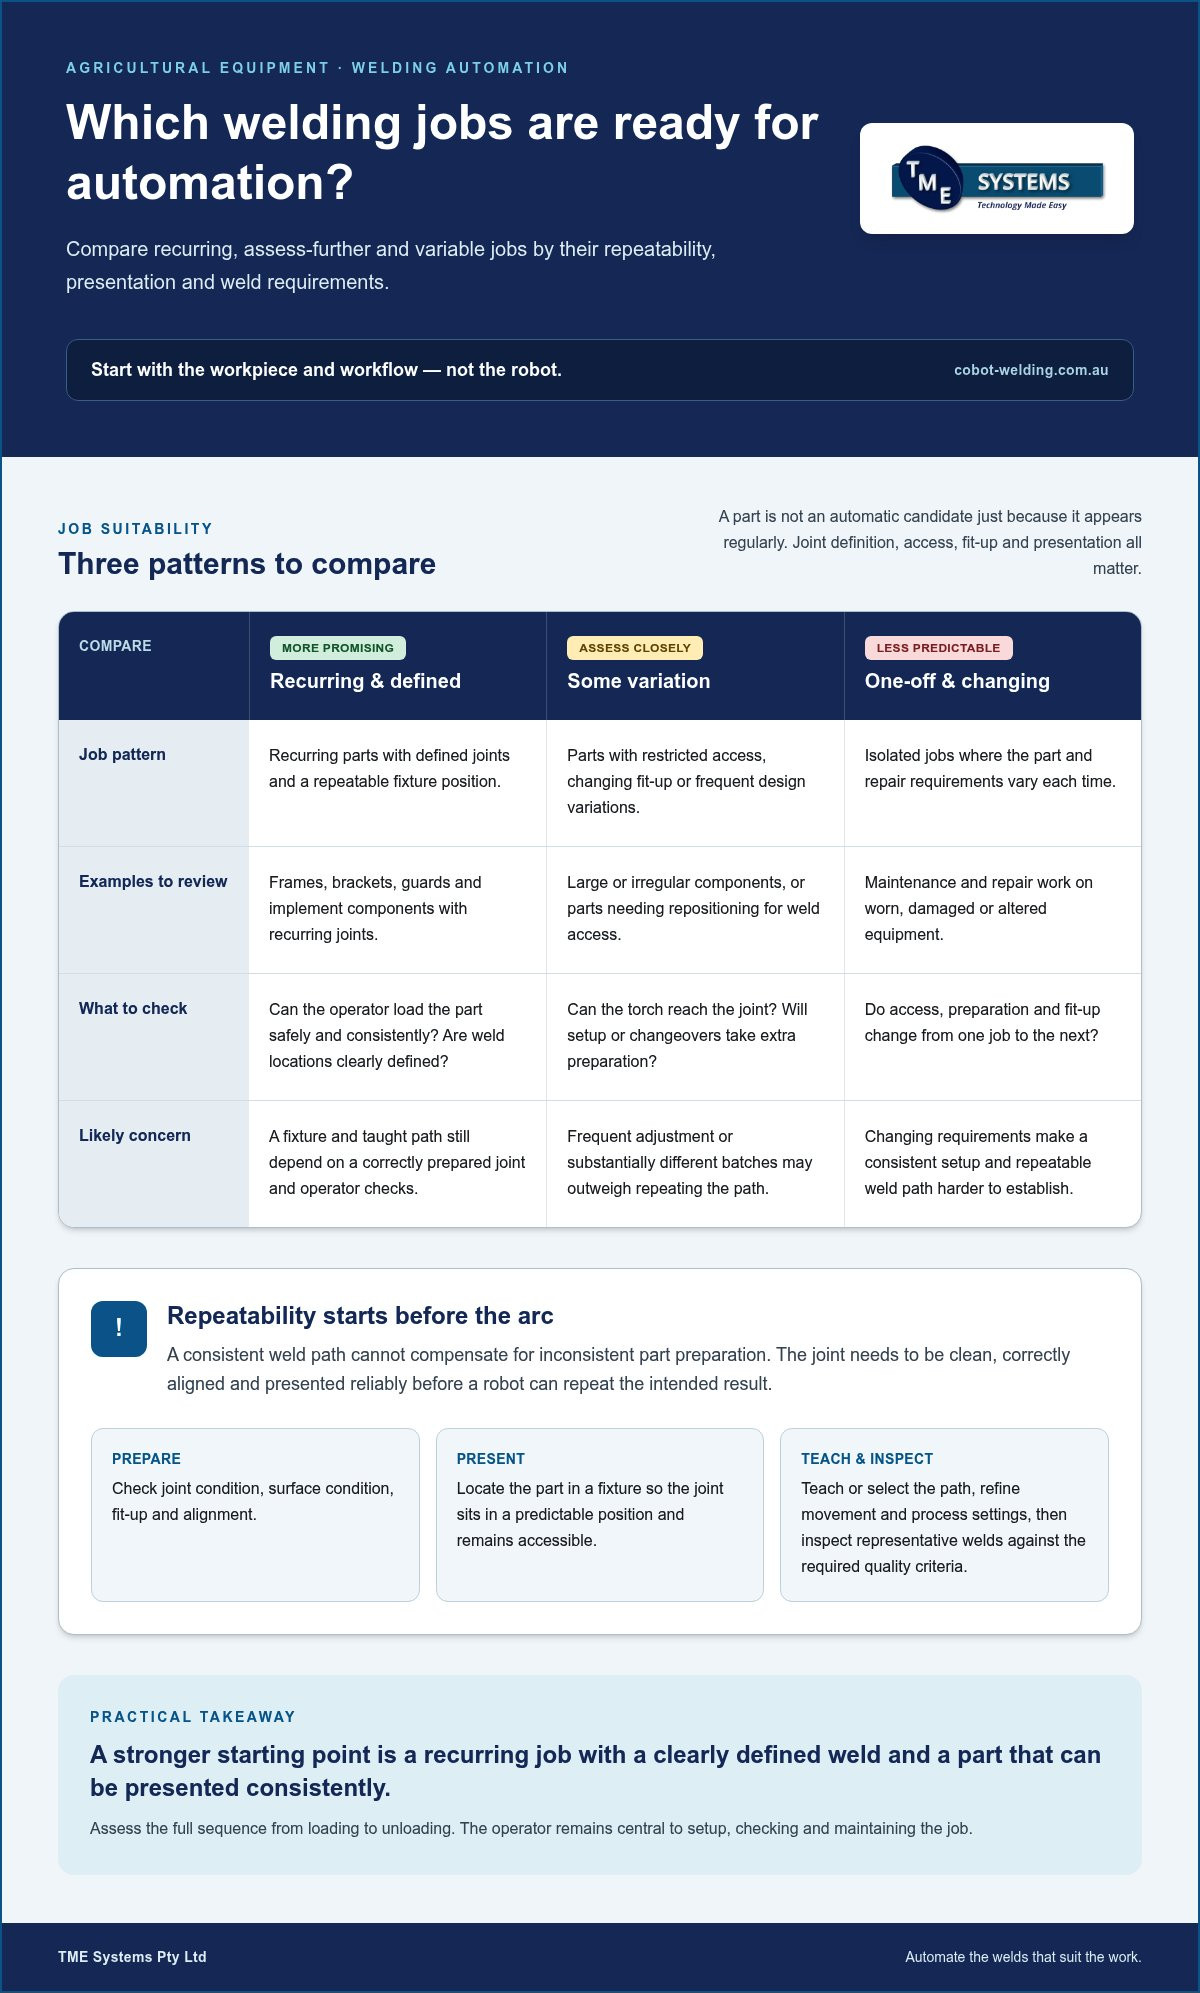
Agricultural equipment parts don’t arrive in one standard shape or batch size. A workshop may handle frames, brackets, guards and implement components, each with different geometry, weld access and production volume. Fit-up and presentation can vary even within a recurring job. The practical question is which welds are repeatable enough to automate, and which still need a welder’s judgement and flexibility.
Start with the job, not the robot. Review how often the part is made, how clearly the weld locations are defined and whether the workpiece can be positioned consistently. Consider the quality requirements as well. A recurring joint where placement and appearance need to be consistent may be a stronger candidate than a one-off weld with changing access or fit-up. Robot welding provides a general overview of how robots can carry out programmed welding tasks, but the part and workflow determine whether that approach makes sense in your workshop.
Quotable takeaway: Agricultural equipment welding is a practical automation candidate when the job recurs, the part can be presented consistently and the weld path is clearly defined.
Which agricultural equipment jobs may suit welding automation?
Frames, brackets, guards and other implement components are worth assessing when they include recurring joints and can be loaded into a stable position. These examples aren’t automatic candidates: weld length, access, joint condition and production frequency all matter. A fixture can locate a part against repeatable reference points, helping maintain its position for a taught weld path. The operator still plays a key role in setting up and checking the job.
Before selecting a part, review the sequence from loading to unloading. Can the operator present it safely and consistently? Can the torch reach the joint without awkward repositioning? If the part needs frequent manual adjustment or each batch is substantially different, the time spent preparing and changing the setup may outweigh the benefit of repeating the weld path.
- More promising: recurring parts with defined joints and a repeatable fixture position.
- Needs closer assessment: parts with restricted access, changing fit-up or frequent design variations.
- Less predictable: isolated jobs where the part and repair requirements vary each time.
What makes agricultural equipment welding more demanding?
Large or irregular components can make access difficult, while weld positions may require repositioning the part or using suitable tooling. Fabrication variation can also affect how joints meet from one component to the next. Dirt, coatings or other surface conditions may need attention before welding, and inconsistent fit-up can change the gap or alignment the weld must bridge. Account for these preparation steps when assessing the whole job.
Separate production work from maintenance and repair. A production run may repeat the same part and joint often enough to justify a fixture and taught path. A repair job may involve worn, damaged or altered equipment, with weld access and preparation changing from case to case. Automation can still be relevant to a mixed workshop, but a well-defined recurring job is usually a more practical starting point than assuming every weld belongs in a cell.
How a robotic welding process handles agricultural equipment parts
Robotic welding coordinates a programmed weld path with a robot, welding equipment and a workpiece held in a known position. For agricultural parts, the setup is built around the joint and how the component can be presented, rather than assuming every frame or implement follows the same pattern. A robot can repeat a taught movement, but results still depend on preparation, fit-up, suitable process settings and operator oversight.
A typical job starts with preparing the joint and checking the component against the intended setup. The operator or production team locates the part in a fixture, teaches or selects the weld path, then refines the movement and welding parameters for the application. The process is run on representative parts, with welds inspected against the required quality criteria. Changes in joint location, part fit or surface condition may call for adjustments before the job is repeated.
A consistent weld path cannot compensate for inconsistent part preparation: the joint must be clean, correctly aligned and presented reliably before the robot can repeat the intended result.
How part presentation and fixturing affect weld repeatability
A fixture locates components so the joint sits in a predictable position and remains accessible to the torch. For a recurring bracket or frame assembly, locating faces, stops or clamps can help the operator load each part in the same orientation. That supports a repeatable path and reduces reliance on estimating joint position by eye. It doesn’t correct a poorly prepared joint or remove the need to check the finished weld.
Fixture design should suit the part family and expected changeovers. Tooling for one stable production job may differ from tooling intended to accommodate related components. Large or irregular assemblies need a project-specific assessment of robot reach, torch access and how the part can be loaded, secured and repositioned. These details determine whether the cell can handle the real workflow, not just a drawing of the part.
How operators teach and refine an automated weld path
Teaching a path means showing the robot where the weld begins, how it follows the joint and where it finishes. The operator can then refine the torch movement and adjust welding parameters to suit the job. No-code teaching software is designed to let operators make path and parameter changes without writing traditional robot code. Training and clear job instructions still matter, especially when changeovers are part of daily production.
This operator-led approach can make repeat jobs easier to set up and adjust, while keeping the people who know the parts involved in the process. TME Systems’ no-code robot welding software guide explains how accessible teaching can support that workflow. If you’re assessing a candidate job, a mobile welding demonstration can help your team consider part presentation and path teaching using a practical example.
Cobot, industrial robot or manual welding: compare the fit for agricultural equipment
Choosing between manual welding, a collaborative robot and an industrial robot depends on the job pattern, not just the part. A recurring assembly with a stable setup presents a different challenge from a one-off repair or a large component with changing weld access. For automated welding for agricultural equipment, compare how each approach handles the work your team actually runs.
| Factor | Manual welding | Collaborative robot welding | Industrial robot cell |
|---|---|---|---|
| Job repeatability | Depends on the welder’s technique and the setup. | Can repeat a taught path when parts are presented consistently. | Can repeat a programmed process within an engineered setup. |
| Part variation | Adaptable to varied jobs and changing access. | Best assessed against the range of parts and changeovers. | Often suited to a defined part and production process. |
| Operator involvement | The welder performs and judges the weld. | An operator prepares parts, teaches or selects paths, and oversees the task. | Operators load, monitor and manage the cell according to its workflow. |
| Production flow | Can suit short runs, repairs and varied work. | May support recurring welds alongside operator tasks. | Can suit a dedicated, engineered production process. |
| Cell footprint | Uses the existing welding work area. | Depends on cell layout, tooling and safeguarding. | Depends on the robot, workpiece, tooling and cell design. |
Collaborative operation doesn’t mean the welding application is automatically safe to work around. The robot, torch, workpiece and cell layout all need consideration, along with a suitable risk assessment and safeguards for hazards such as the welding arc, fumes and hot spatter. Safeguarding and operator procedures depend on the specific application.
When a collaborative welding cell may suit the job
A cobot cell may suit a recurring job where an operator can prepare or load the next part while the system carries out a taught weld task. If jobs change, accessible teaching can help trained operators adjust paths between parts without traditional robot programming. It isn’t a universal fit: reach, payload, cycle requirements, tooling and safeguarding depend on the cell configuration and workpiece.
When manual welding or an industrial robot may be the better fit
Manual welding can remain practical for highly variable, one-off jobs where the welder needs to respond to changing access, fit-up or repair conditions. An industrial robot may suit a dedicated, engineered cell with a defined production flow, but volume alone doesn’t settle the choice. Part size, presentation, changeover needs and integration with the workshop all matter. The collaborative robot welding cell buying guide provides further context for assessing a cobot approach.
Assess your agricultural welding jobs before choosing an automated system
Before comparing systems, build a clear picture of the work you want to improve. Assessing automated welding for agricultural equipment against real parts and production conditions helps prevent an evaluation from being based on an unusually easy sample. Start with a recurring job, then document the weld, how the part is handled and what currently causes delays, rework or inconsistent results.
A representative part and a clearly defined weld are the foundation of a useful automation assessment.
Use this five-step checklist to prepare:
- Select jobs: Choose recurring parts that reflect the range of sizes, fit-up and batch patterns you expect, not just the simplest example.
- Document welds: Gather drawings, material details, joint preparation, weld length, weld positions and inspection expectations.
- Review part presentation: Record how components are loaded, located and secured, including any repositioning needed for access.
- Map the workflow: Trace parts through preparation, welding, inspection and downstream operations. Note hand-offs and waiting points.
- Define measures: Record current quality, rework and production flow, then decide what a worthwhile improvement would look like for your workshop.
Choose representative parts and define success
Pick a job that reflects normal production variation. If a family of components differs in fit-up or access, include samples that show those differences. Note the weld length, joint access, expected inspection and variation between parts. Compare current outcomes, such as recurring rework or interruptions, with the result you want. Set practical evaluation criteria with the people who prepare, weld and inspect the parts.
Drawings are useful, but they don’t show every shop-floor condition. Include representative production samples so the assessment reflects actual fit-up and handling. If the sample is unusually clean, well aligned or easy to reach, it may give an incomplete picture of the job. A sound assessment tests the expected range, including ordinary variation, rather than relying on one ideal component.
Check workflow, operator involvement and safety needs
Map where a cell could sit in the production flow and how parts would reach it. Identify who prepares and loads components, teaches or adjusts jobs, manages changeovers and checks weld outcomes. This helps show whether automation supports the existing team or creates a bottleneck elsewhere. Include safeguarding and a project-specific risk assessment in the planning. Requirements depend on the application and workplace.
Bring operators and supervisors into the assessment early. Their knowledge of awkward handling, common fit-up problems and inspection points can sharpen the job definition. TME Systems’ welding system integration considers the welding equipment and existing workflow, while operator onboarding supports the people who will run and refine the process. A mobile demonstration can also help assess a representative part before settling on a system design.
Gather your drawings, production samples and current quality notes, then discuss a welding automation assessment with TME Systems as a practical next step.
Plan an agricultural equipment welding automation project with TME Systems
A practical automation project starts with a real production job and the people who know it best. TME Systems supplies collaborative robot welding cells, no-code teaching software and welding system integration for Australian manufacturers. For automated welding for agricultural equipment, the aim is to shape the cell around the selected part, welding equipment and factory workflow, rather than expecting the workshop to adapt to a generic setup.
That means looking beyond the robot arm. Part presentation, tooling, welding equipment, operator tasks and the route parts take through the workshop all affect how a cell fits into production. Assess the proposed approach against the job’s actual requirements. A demonstration can help make those practical details easier to discuss before a project moves towards integration.
From job assessment to an integrated welding cell
Begin with a representative job, its drawings and production samples. Review the joint, part presentation and required welding sequence, then consider how a collaborative cell could fit alongside existing equipment and processes. TME Systems’ integration work considers the welding system and factory workflow together, so decisions about setup and operator involvement are grounded in the job rather than in the robot alone.
A mobile demonstration offers a way to see a proposed welding approach in practice and discuss how the part might be presented or taught. It can help the team explore questions that drawings may not resolve, such as access to a joint or the handling steps around welding. The mobile welding robot demonstration guide outlines this kind of practical assessment. For further detail on planning the wider project, see the welding system integration guide.
Prepare operators to run and refine automated welding jobs
Operators shouldn’t be treated as an afterthought. Their experience with part variation, joint preparation and quality checks can inform the setup, while onboarding helps them learn how to operate the system and manage its day-to-day tasks. With no-code teaching software, operators can teach weld paths and adjust parameters without writing traditional robot code. This can make job changes more accessible while keeping skilled staff involved in refining and overseeing the process.
Useful onboarding should connect the controls to the actual work: how to load and locate the part, select or teach the right path, make permitted adjustments and check weld outcomes. Clear responsibilities for setup, changeovers and inspection help the team use the system consistently. The cell still needs appropriate oversight, and operators remain central to recognising when a part or weld condition differs from the expected job.
If you’re ready to move from a candidate part to a practical project discussion, discuss an agricultural equipment welding application with TME Systems.
Turn a suitable welding job into your next step
The next move doesn’t need to be a commitment to automate an entire workshop. Choose one production job your team understands, then use it to shape a practical evaluation: what should the system handle, how will operators work with it, and what evidence would help you decide whether to proceed? A clear decision framework keeps the project grounded in your workshop’s needs.
For automated welding for agricultural equipment, the path from evaluation to production should account for both the cell and the people using it. TME Systems can support that process through welding integration, operator onboarding and a mobile demonstration. No-code software enables operators to teach weld paths and adjust parameters, keeping their knowledge part of the process as jobs are refined.
Bring a representative job and your team’s practical questions into the discussion. Discuss an agricultural equipment welding application with TME Systems and take a considered first step towards automation that fits your operation. Your workshop’s experience is a strong place to start.
Frequently Asked Questions
Is automated welding suitable for agricultural equipment manufacturers?
Yes, it can suit manufacturers with recurring welds, provided the workpiece, joint and production pattern are assessed realistically. The decision depends on more than output volume: part access, fit-up, preparation and inspection expectations matter too. Compare a repeat production task with a variable repair job. Automated welding for agricultural equipment is worth evaluating when the target weld and desired result are clearly defined.
Can a cobot weld different agricultural equipment parts?
Yes, a cobot cell can be set up for different parts, but each part or part family needs an appropriate setup. Changes to joint location, fixture position or torch access may require a different taught path, tooling adjustment or changeover process. An early check is whether the parts share locating points or can use a common fixture. The cell’s reach, payload and configuration also affect suitability.
How much of the welding process can be automated?
The welding task can be automated to different degrees, depending on the equipment and workflow. A project might automate torch movement along a taught weld path while people prepare joints, load parts and inspect finished work. Other setups may also coordinate positioning or handling. Map each process step separately. Deciding what stays with the operator and what the system performs helps define a practical scope without assuming the entire workflow must be automated.
What agricultural equipment welding jobs are best to automate first?
Start by comparing jobs that recur regularly and have clear acceptance criteria. A useful candidate has a weld sequence the team can describe, parts that can be loaded in a known orientation and a manageable number of variations. Also consider whether the task currently creates a bottleneck or repeated quality checks. Rank candidates by how well they meet these conditions, then assess the strongest one using real production parts.
Does a welding cobot replace experienced welders?
No, a cobot supports a welding task; it doesn’t replace the judgement and experience workers bring to production. Skilled welders can help identify joint preparation issues, teach or refine paths and recognise when a part differs from the expected condition. They may also focus on work that needs flexible decision-making. Involving experienced staff in planning and trialling the application keeps practical workshop knowledge central to the process.
What information should I prepare before assessing welding automation?
Prepare drawings, material details, joint specifications, weld positions and representative parts from normal production. Include notes on variations in fit-up, access and batch patterns, plus examples of current inspection findings or rework. A simple workflow sketch showing where parts are prepared, welded and checked can help reveal handling constraints. Bring the operators’ observations too, especially where setup or changeovers differ between shifts or product variants.
Does automated welding guarantee consistent weld quality?
No. Automation can repeat a programmed movement, but that alone doesn’t guarantee an acceptable weld. Results still depend on joint preparation, part alignment, surface condition, suitable process settings and checks during production. Establish how welds will be inspected and how the team will respond to a part that falls outside the expected setup. Trialling representative parts and reviewing the results helps determine whether the process meets the required quality criteria.