What if teaching a welding robot didn’t mean learning to write code? The teach pendant is the hands-on interface operators use to move the robot, teach weld paths and adjust a job. Its controls can feel unfamiliar at first. If you’ve searched “teach pendant for welding robots explained”, you’re likely looking for a practical picture of how it fits into day-to-day welding and whether there’s a simpler way to teach a task.
That uncertainty is understandable. Operators need to set up a repeatable weld path and make adjustments, while manufacturers need a workflow that suits the part, production run and people using the cell. A conventional pendant may be the right fit. Guided or no-code teaching can also suit some jobs.
This article explains what a pendant does, how operators use it to teach and refine weld paths, and which capabilities and workflow details to check with a robot supplier. It compares pendant teaching with guided approaches, so you can assess what suits your welding task and your team’s experience.
Key Takeaways
- Learn what a teach pendant can control, and why its functions depend on the robot, controller and welding cell configuration.
- See the general steps an operator follows to establish a weld path, while checking the manufacturer’s instructions for the exact controls.
- Compare pendant, guided and no-code teaching workflows to find an approach that fits your operators and welding task.
- Use a practical pre-teaching checklist to consider the workpiece, torch, fixtures, access and site safety procedures.
- Get teach pendant for welding robots explained, then assess your options using representative jobs, changeover needs and a hands-on demonstration.
What is a teach pendant for a welding robot, and what does it control?
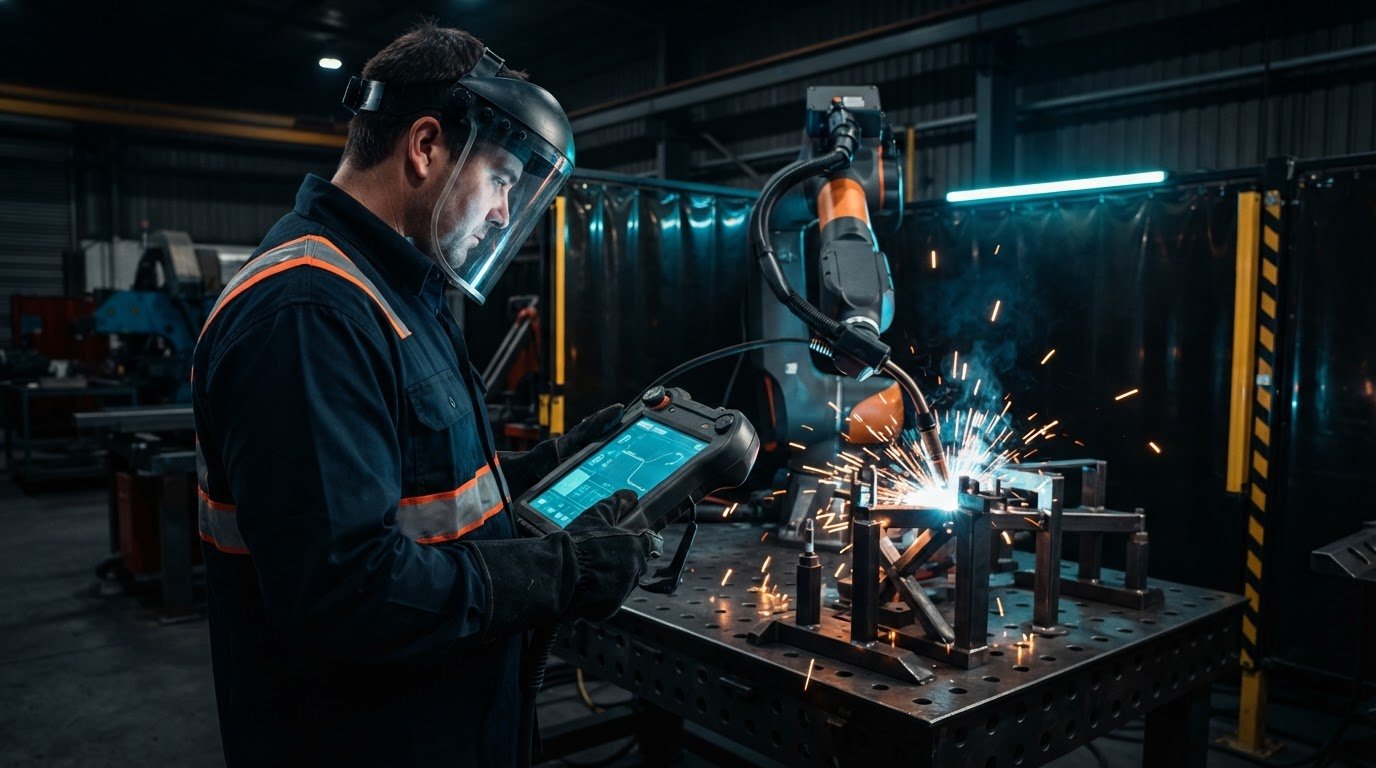
A teach pendant is a handheld interface an operator uses to monitor and control a robot system. Depending on the setup, it can be used to move the robot, teach positions and adjust configured instructions.
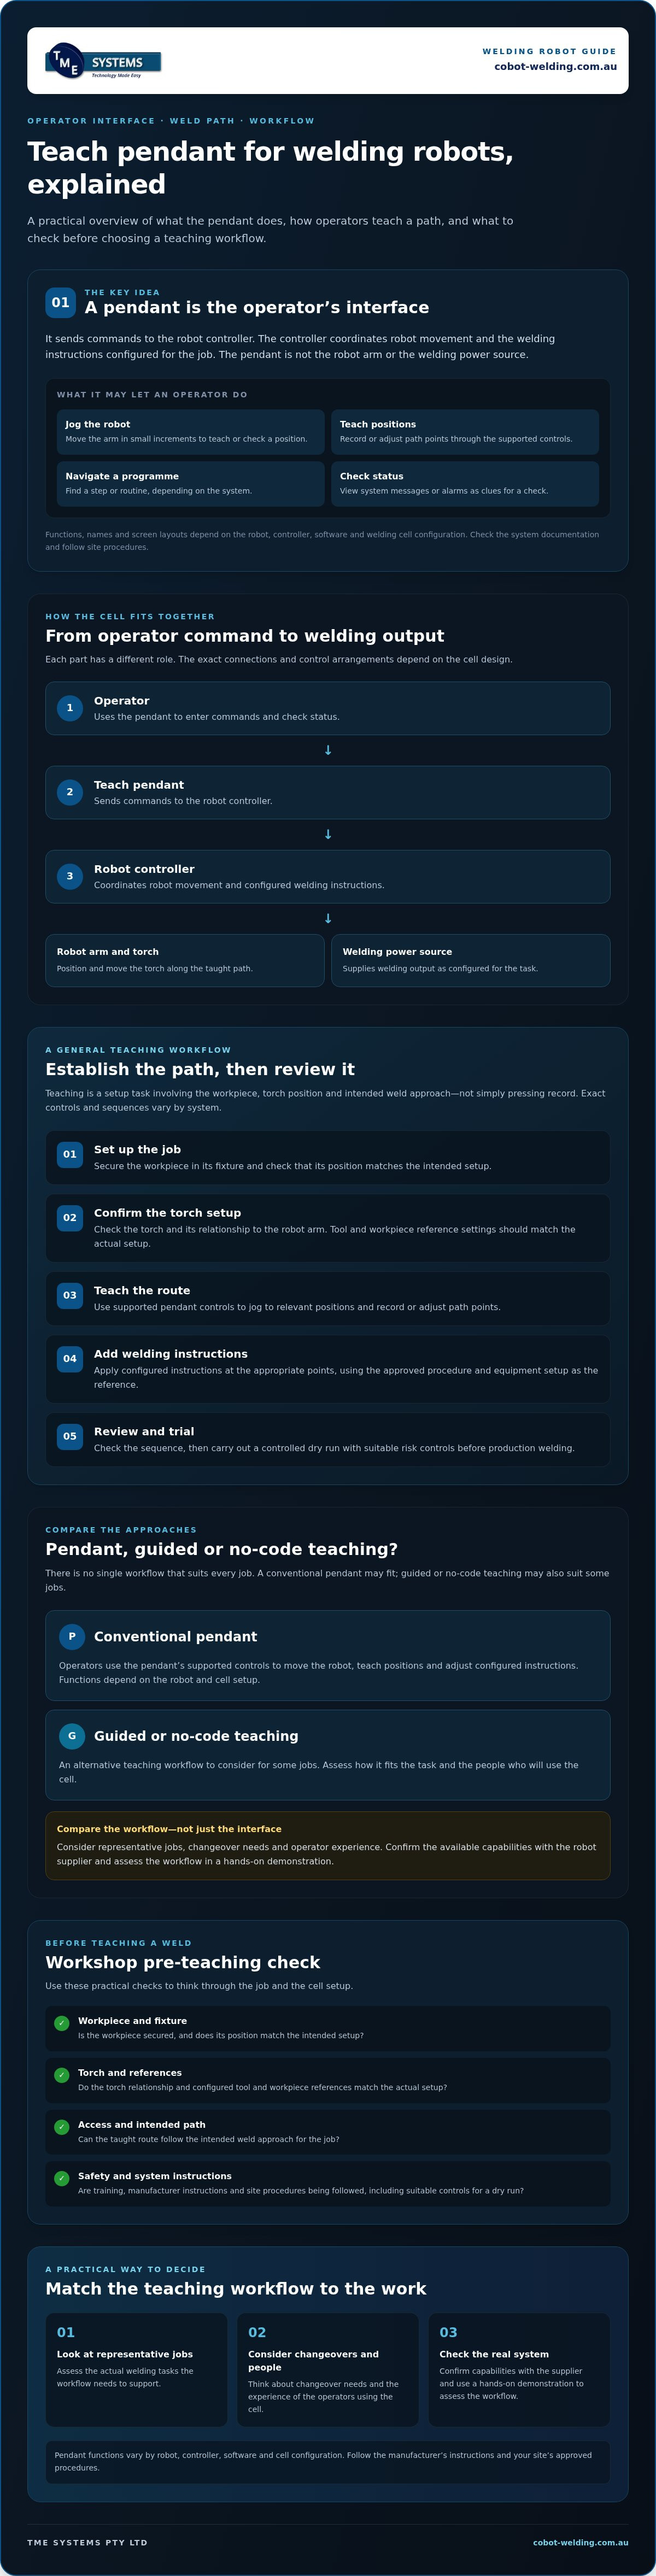
It’s the operator’s point of contact with the robot, not the robot arm or the welding power source itself. The pendant sends commands to the robot controller, which coordinates movement and configured welding instructions across the cell. The controller and welding equipment then carry out their respective roles.
For anyone looking for teach pendant for welding robots explained in plain terms, the key point is that a pendant is an interface, not a universal control panel. Its functions and screen layout depend on the robot, controller, software and welding cell configuration. Industrial robots are used for tasks such as welding, but the specific controls vary by system.
Which controls and information might a welding pendant provide?
Depending on the model and setup, a pendant may let an operator jog the robot, select an operating mode, view system status and navigate a programme. Jogging moves the arm in small increments while an authorised operator teaches or checks a position. Programme navigation can help locate a step or routine, but function names and availability vary between manufacturers. Check the robot and controller documentation for the controls on your system.
Status messages and alarms can point an operator towards a check, such as confirming the system state or identifying a condition that is preventing a cycle from proceeding. Treat them as clues, not a diagnosis. Follow the manufacturer’s instructions and site procedures before taking action.
How does a pendant fit into the welding system?
Think of the pendant as the operator’s interface to the controller. The controller coordinates robot motion and the welding instructions configured for the job. The torch, attached to the robot arm, follows the taught path. The welding power source supplies the welding output. How these components connect and are controlled depends on the cell design.
Operator → uses the pendant to enter commands and check status
Teach pendant → sends commands to the robot controller
Robot controller → coordinates robot movement and configured welding instructions
Robot arm and torch → position and move the torch along the taught path
Welding power source → supplies welding output as configured for the task
The diagram shows the basic roles, not every cable, signal or safety device in a real cell. Before teaching or adjusting a weld, confirm the system layout and pendant functions using the cell documentation and appropriate training.
How operators use a teach pendant to teach a welding robot
Teaching a weld is a practical setup task, not simply a matter of pressing record. An appropriately trained operator needs to relate the robot’s movements to the workpiece, torch position and intended weld approach. The exact controls and sequence depend on the robot and controller, so follow the manufacturer’s instructions and the cell’s approved procedures.
A general workflow may look like this:
- Set up the job: Secure the workpiece in its fixture and check that its position matches the setup the robot is intended to follow.
- Confirm the torch setup: Check the torch and its relationship to the robot arm. The system’s tool and workpiece reference settings need to match the actual setup.
- Teach the route: Use the pendant’s supported controls to jog the robot to relevant positions and record or adjust path points.
- Add the welding instructions: Apply the configured instructions at the appropriate points, using the approved procedure and equipment setup as the reference.
- Review and trial: Check the sequence, then carry out a controlled dry run with suitable risk controls before production welding.
What happens when an operator jogs and records a weld path?
Jogging means moving the robot in controlled increments to reach a teaching position. The operator may move the torch to positions along the joint, then record or adjust those points through the controller’s supported interface. Depending on the system, the programme may include approach and departure moves as well as the weld path. Coordinate systems and point-recording methods vary. Confirm how the robot interprets each movement rather than assuming the pendant works like another model.
How are the taught path and weld settings checked?
Review torch orientation as well as position. Check that the approach and departure moves suit the joint, and that the torch and robot have clearance from the workpiece, fixtures and other equipment throughout the sequence. The Fabricator’s guidance on how to program a welding robot like a pro discusses practical considerations such as torch angles and efficient movement.
Next, check the configured welding instructions against the approved welding procedure and equipment setup. A dry run lets the operator observe the robot’s movement without production welding, but it doesn’t replace risk controls or site procedures. Once the sequence has been checked, run a controlled trial and inspect the result before relying on the newly taught programme.
This is the hands-on workflow behind teach pendant for welding robots explained: establish the setup, teach and review the motion, then verify the result. If you’re assessing a cell and teaching workflow for your workshop, explore collaborative robot welding options alongside your team’s training needs.
Teach pendant vs guided teaching: what changes for welding operators?
The main difference is how the operator interacts with the robot and how much of the setup is handled through the controller’s interface. A teach pendant can suit operators who need direct access to robot functions. Guided or no-code interfaces may make it easier for production staff to teach a path or adjust a job, depending on the system.
Neither approach removes the need to set up the workpiece and torch correctly, check the weld instructions or understand safe operating procedures. The best fit depends on the job, the people who’ll use the cell and the support available for setup and onboarding. That’s the practical context behind teach pendant for welding robots explained.
| Consideration | Teach pendant | Guided or no-code interface |
|---|---|---|
| How paths are taught | Operators use the controller’s supported controls to move the robot and record or adjust positions. | Operators follow the teaching workflow provided by the specific guided tool or software. |
| Who may use it | Often suited to staff familiar with the robot controller and its functions. | May make path teaching more accessible to production operators, subject to training and system design. |
| What to assess | Access to the required robot functions, staff experience and the support needed to manage the controller workflow. | How well the guided workflow supports the actual job, changeovers and adjustments. |
These are general distinctions, not guarantees about every product. Capabilities vary by robot, controller, software and configured welding cell.
When can conventional pendant teaching be a practical fit?
A pendant may suit a team that’s comfortable working directly with the controller, particularly when the job calls for access to its available robot functions. Consider how often products change, how frequently paths need updating, and whether trained staff are available to teach and review programmes. A stable, repeatable job may call for a different workflow from one with frequent variation. Compare these factors against the specific application rather than assuming one interface will improve output or weld quality.
When might guided or no-code teaching be worth assessing?
Guided interfaces can offer production operators a more approachable way to teach weld paths or adjust parameters, but they still require sound setup, training and technical judgement. TME Systems offers no-code teaching software for welding applications, as well as collaborative robot welding cells and operator onboarding. To explore the approach in more detail, look for the related pillar article, “No-Code Robot Welding Software: The Fabricator’s Guide to Accessible Automation”.
Assess the workflow using a representative welding job. Check how operators teach and refine a path, what support they need, and whether the interface fits the team’s experience and production needs.
What should a workshop check before teaching a weld with a pendant?
A reliable robot path starts with a reliable job setup. If the part shifts in its fixture or the joint varies between batches, the taught motion may no longer suit the workpiece. Before programming, check the physical setup, intended production task and controls that apply to the cell. This groundwork matters as much as knowing what the pendant buttons do.
Which job and setup details affect the taught path?
Use a pre-teaching check to catch issues that could affect access, torch position or repeatability:
- Workpiece: Check joint fit-up and expected part variation. Confirm how the workpiece is located for each cycle.
- Fixture: Make sure it holds the part consistently and doesn’t obstruct the torch’s route.
- Torch and consumables: Check torch clearances around the joint and confirm consumables are in suitable condition.
- Access and task: Consider the joint approach, nearby equipment and intended production sequence.
- Changeovers: Identify whether small-batch variation is likely to require frequent path edits.
Weld quality depends on more than the taught path. Consistent fit-up and repeatable positioning help the robot follow the intended joint, while welding instructions should be checked against a validated procedure for the job. Record key setup assumptions, such as fixture position or the part variant used, so operators can confirm them before rerunning the sequence.
How can teams approach pendant training and safe operation?
Knowing how to navigate an interface isn’t the same as being authorised to teach or change a production programme. Separate basic familiarisation from the training and approval needed for programme changes. Training should reflect the specific robot, welding cell and workplace procedures, including how staff check operating modes, guarding and the controls in place before teaching or running a job.
Start with a risk assessment for the actual cell and task. Confirm that guarding, operating modes and site procedures are appropriate before teaching, testing or welding. Don’t assume a particular safety standard applies. Verify current Australian standards and their relevance with authoritative sources and competent safety personnel before making compliance decisions.
For a broader training discussion, consult On-Site Cobot Welder Training: A Practical Guide for Australian Fabricators (2026). The right preparation makes teach pendant for welding robots explained more than a controls question: it connects the operator, setup and safe, repeatable work practice.
Assess how training and cell setup fit together with collaborative robot welding options.
Choosing a welding robot teaching workflow: practical next steps
The right interface is one your operators can use to teach, adjust and repeat the work your workshop actually does. Before comparing options, make a short list of representative jobs. Include parts that vary, how often changeovers happen, who will teach or review a path, and the weld outcomes each job needs to meet. This gives you a practical basis for assessing a pendant, guided interface or no-code workflow.
What questions should you ask before selecting an interface?
Use a real production task to check where operators can work independently and where they’ll need support. Ask prospective suppliers or integrators:
- Which tasks can operators teach, adjust, review and repeat themselves?
- How are programme revisions managed, backed up and restored?
- How are access permissions set, and who can approve changes to production programmes?
- What training is provided for operators who will use the interface and welding cell?
- Does the workflow suit your actual parts, batch sizes, changeover frequency and welding processes?
Don’t judge an interface by its feature list alone. A system can look straightforward in a presentation yet feel different when an operator is working around a fixture, checking torch access or adapting to a part variation. Ask to assess the workflow using a representative part and the people who’ll use it. Check not only how a path is taught, but also how it’s reviewed, adjusted and repeated.
How can a fabricator assess the workflow with practical support?
A mobile demonstration can help your team see how a teaching approach fits a representative application. Bring the details that shape the job, such as part variation, typical batches, changeover needs and the experience of the operators who’ll use the cell. Use the demonstration to identify questions about setup, teaching and onboarding, rather than treating it as proof of a particular production outcome.
Integration support can help assess how the teaching interface fits the wider welding cell and workshop workflow. TME Systems supplies and integrates collaborative robot welding cells, offers no-code teaching software for weld paths and parameter adjustments, and provides operator onboarding. These options may suit some workflows, but they aren’t a universal replacement for pendant teaching. The choice should follow the application and the team’s needs.
If you’re ready to assess a real job, Discuss a welding automation demonstration.
Put your welding workflow to the test
A teach pendant gives operators a hands-on way to interact with a robot, but the right teaching workflow depends on the controller, welding task and team. Match the interface to production needs, including part variation, changeovers and operator experience. Then assess it with a representative job, not just a list of features.
Good preparation matters too. A repeatable setup, suitable risk controls and training aligned with the specific cell help operators teach and review work with confidence. Guided or no-code teaching may suit some applications, while conventional pendant control remains a practical option for others. There’s no need to force a single approach across every job.
If you’re looking for teach pendant for welding robots explained to support a real decision, TME Systems offers no-code welding teaching software, operator onboarding, welding cell integration and mobile demonstrations. Discuss a welding automation demonstration to explore how a teaching workflow could fit your application.
Frequently Asked Questions
What is a teach pendant on a welding robot?
A teach pendant is a handheld interface an operator uses to monitor and control a robot system. Depending on the robot, controller and welding cell configuration, it may provide controls for moving the robot, navigating a programme or checking system status. It’s distinct from the robot arm and welding power source. The key idea behind “teach pendant for welding robots explained” is that the pendant is how an operator interacts with the system.
Do you need coding skills to use a welding robot teach pendant?
You don’t always need to write code to use a welding robot teach pendant, but you do need training in the specific robot and controller. Some tasks may involve using the pendant’s supported controls to teach positions or adjust a programme, while more advanced changes can require deeper programming knowledge. For technicians looking to build practical skills in industrial systems and robotics, explore Vocational Training and Technical Certification Courses. Guided interfaces and no-code teaching software may offer another workflow, but they still require suitable setup, training and technical judgement.
An appropriately trained operator typically sets up the workpiece and torch, then uses the pendant’s supported controls to move the robot to positions along the joint and record or adjust them. The programme may also include approach and departure moves, plus configured welding instructions. Exact controls and point-recording methods vary by system. Before production welding, review the path and settings, use suitable risk controls for a dry run, then trial and inspect the weld.
Can a welding robot be taught without a teach pendant?
Yes, some welding robots can be taught through guided interfaces or no-code teaching software rather than a conventional pendant workflow. The available options depend on the robot and configured cell. A guided approach may let an operator teach a path through a more accessible interface, but it doesn’t remove the need to confirm the workpiece setup, torch position, welding instructions and safe operating procedures. Check the system’s capabilities and training requirements before choosing an alternative.
Is a teach pendant the same as a welding robot controller?
No. The pendant is the operator’s interface, while the controller processes commands and coordinates robot movement with configured welding instructions. An operator may use the pendant to enter commands or review information, but it doesn’t replace the controller. The welding power source and torch also have separate roles in the cell. Their connections and control arrangements depend on the specific system, so consult its documentation for details.
What safety checks are needed before teaching a welding robot?
Before teaching, follow the site’s procedures and confirm the cell’s risk controls, guarding and operating mode are appropriate for the task. Check that the workpiece and fixture are secure, the torch has suitable clearances, and operators understand the system and their authorisation. Use a controlled dry run with suitable risk controls before production welding. Verify applicable Australian standards against current authoritative sources and seek competent safety advice rather than assuming a standard applies.
Is a teach pendant or no-code software better for welding?
Neither is automatically better. The suitable choice depends on the welding task, system capabilities and operators’ experience. A pendant may fit teams that need direct interaction with the controller, while no-code software may make teaching paths and adjusting parameters more accessible for some jobs. TME Systems offers no-code teaching software for welding applications, alongside operator onboarding and welding system integration. Compare workflows using a representative part and confirm what training and support each requires.