
Automation doesn’t have to start with a fixed production line. A cobot welding workstation combines a robot arm and welding equipment for tasks carried out alongside human operators, and can suit small and midsize manufacturers handling high-mix, low-volume work. Mobile systems can be mounted on carts and moved between workstations, giving teams another way to fit automation around the work already happening on the floor.
It’s reasonable to want a clear picture of what the technology will ask of your people and processes before considering a change. This article explains what a cobot is, how operators teach welding tasks and how a mobile or single-station setup compares with an industrial welding robot. You’ll also learn where cobots can support SMEs, what to consider when choosing a workstation and how human skill remains part of the process.
Key Takeaways
- Assess how welding tasks, part variation and operator skills could make collaborative automation a practical fit for your production floor.
- Keep protective equipment and fume extraction in the safety plan; automation doesn’t remove the need to manage welding hazards.
- Compare operator-led teaching with offline programming to understand how each approach fits your parts, workflow and team.
- Weigh a mobile setup against a dedicated station, then compare either option with an industrial robot based on production needs and workspace.
How cobot welding actually helps SMEs?
For SMEs handling high-mix, low-volume production, a cobot can repeat welding tasks while operators prepare parts or manage other work. A 6-axis arm can reach different weld positions, but its movement, torch and fixtures still need careful safety planning.
Collaborative robot safety protections
“Collaborative” describes a robot designed to work alongside people; it doesn’t mean every task is safe without separation. Assess the complete cell, including the arm’s reach, welding torch, workpiece, clamps and table. A fixture that holds one part securely may create a pinch point when another part is loaded.
Before production, map operator tasks around the robot’s movement: loading, positioning, starting a weld and removing the finished part. Identify where a person could enter the arm’s path or contact hot material. Process sensors such as seam tracking, edge detection and touch sensing guide welding, but are not automatically safety protections. Check which safeguards control access and motion.
Worker safety and fume extraction
Welding fumes remain a workplace concern when a robot performs the weld. Include fume extraction in the cell layout so it captures fumes at the welding point without obstructing the torch, robot path or operator access. The right arrangement depends on the weld position, part shape and how the workstation is used.
Personal protective equipment remains essential for operators, including during loading, setup and inspection. Before a run, confirm extraction is positioned for the actual joint, the workpiece is secure and the operator can reach controls without entering the robot’s working path. A change from a flat plate to a deep frame, for example, can alter access and extraction needs, so review both before resuming production.
What Is a Cobot Welding System and How Does It Work?
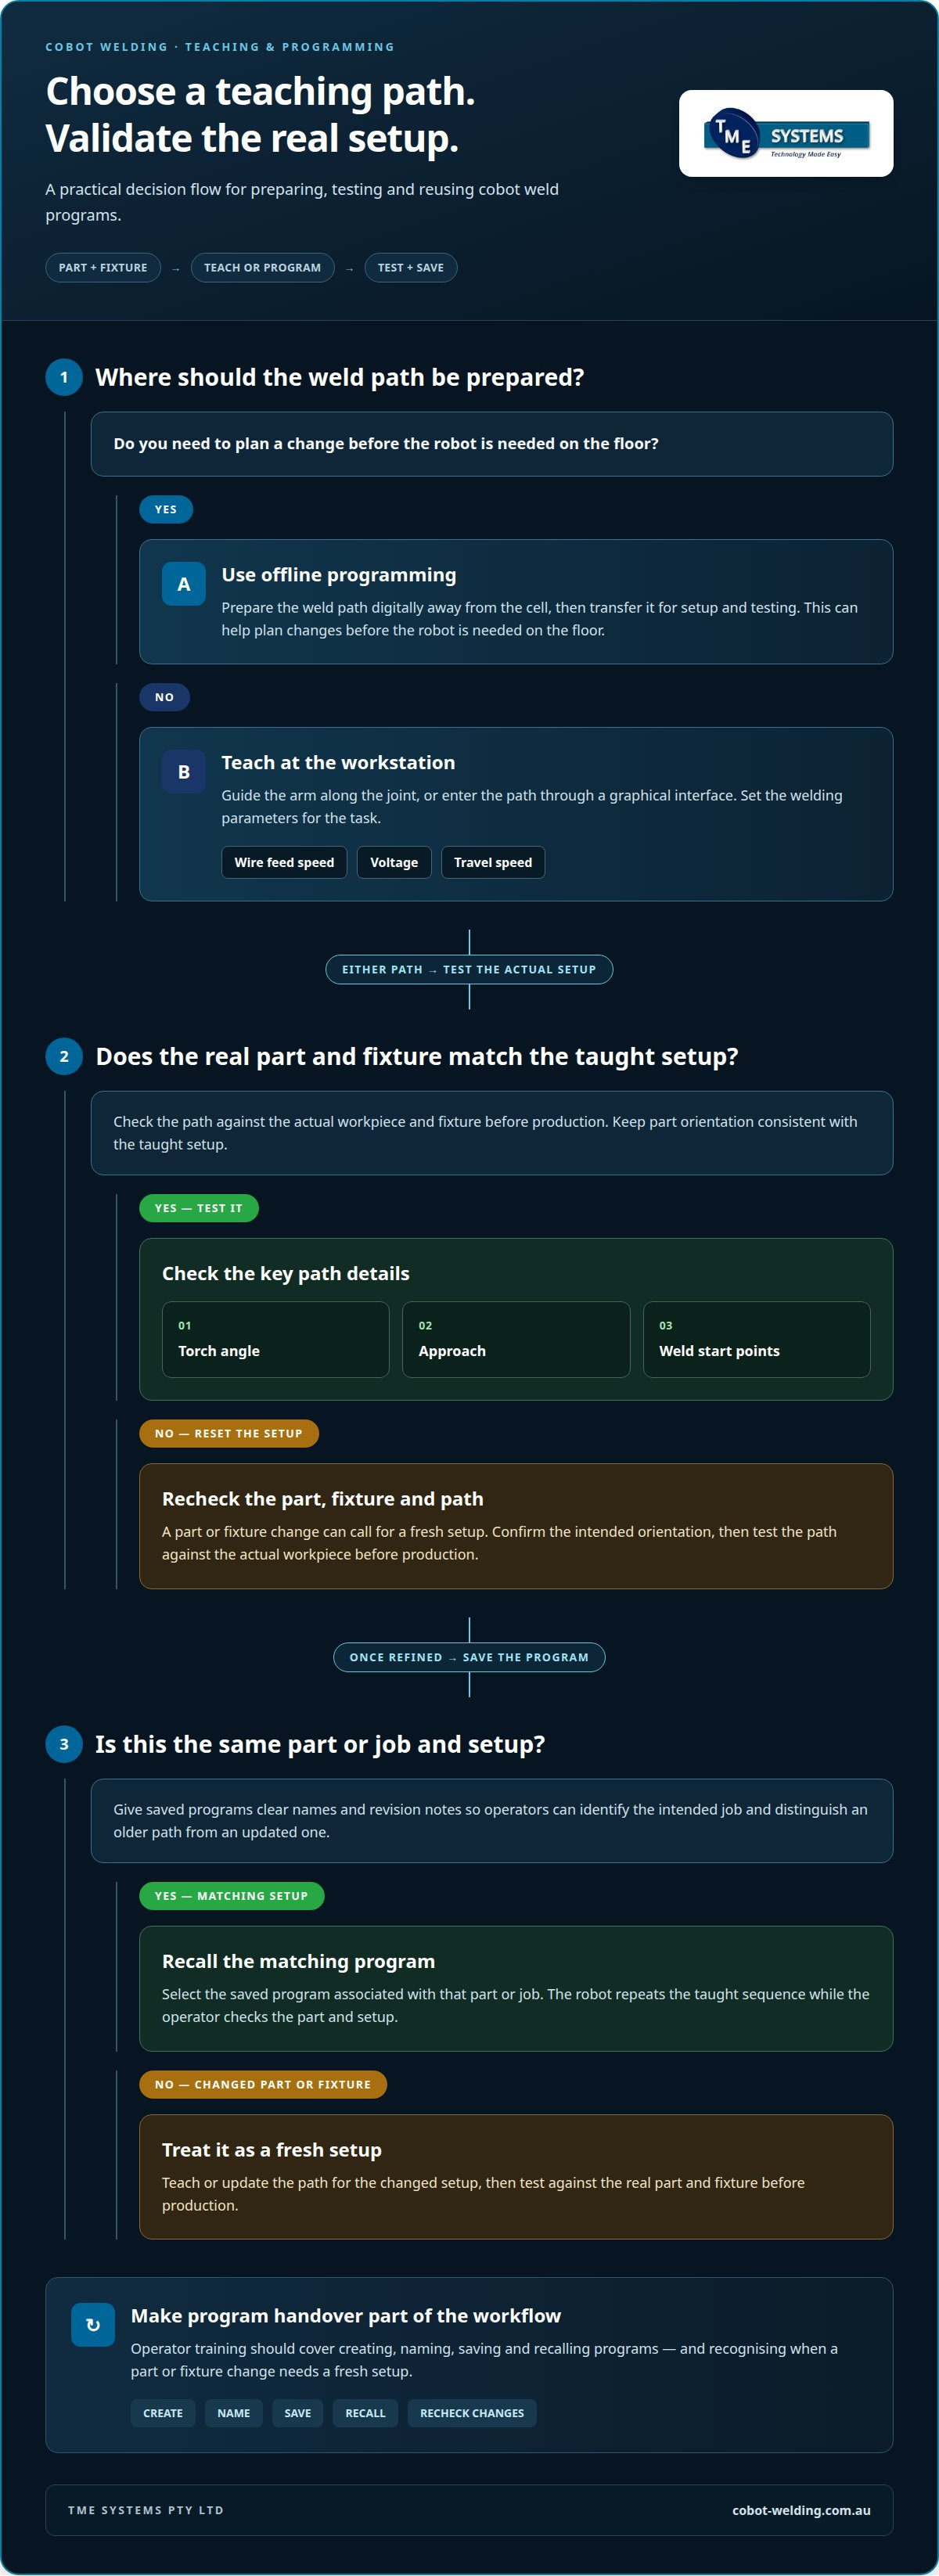
A cobot welding system combines a collaborative robot arm with welding equipment and an operator-led teaching process. The operator teaches the weld path and sets parameters, then the system repeats the task on matching parts.
Teaching and programming the cobot
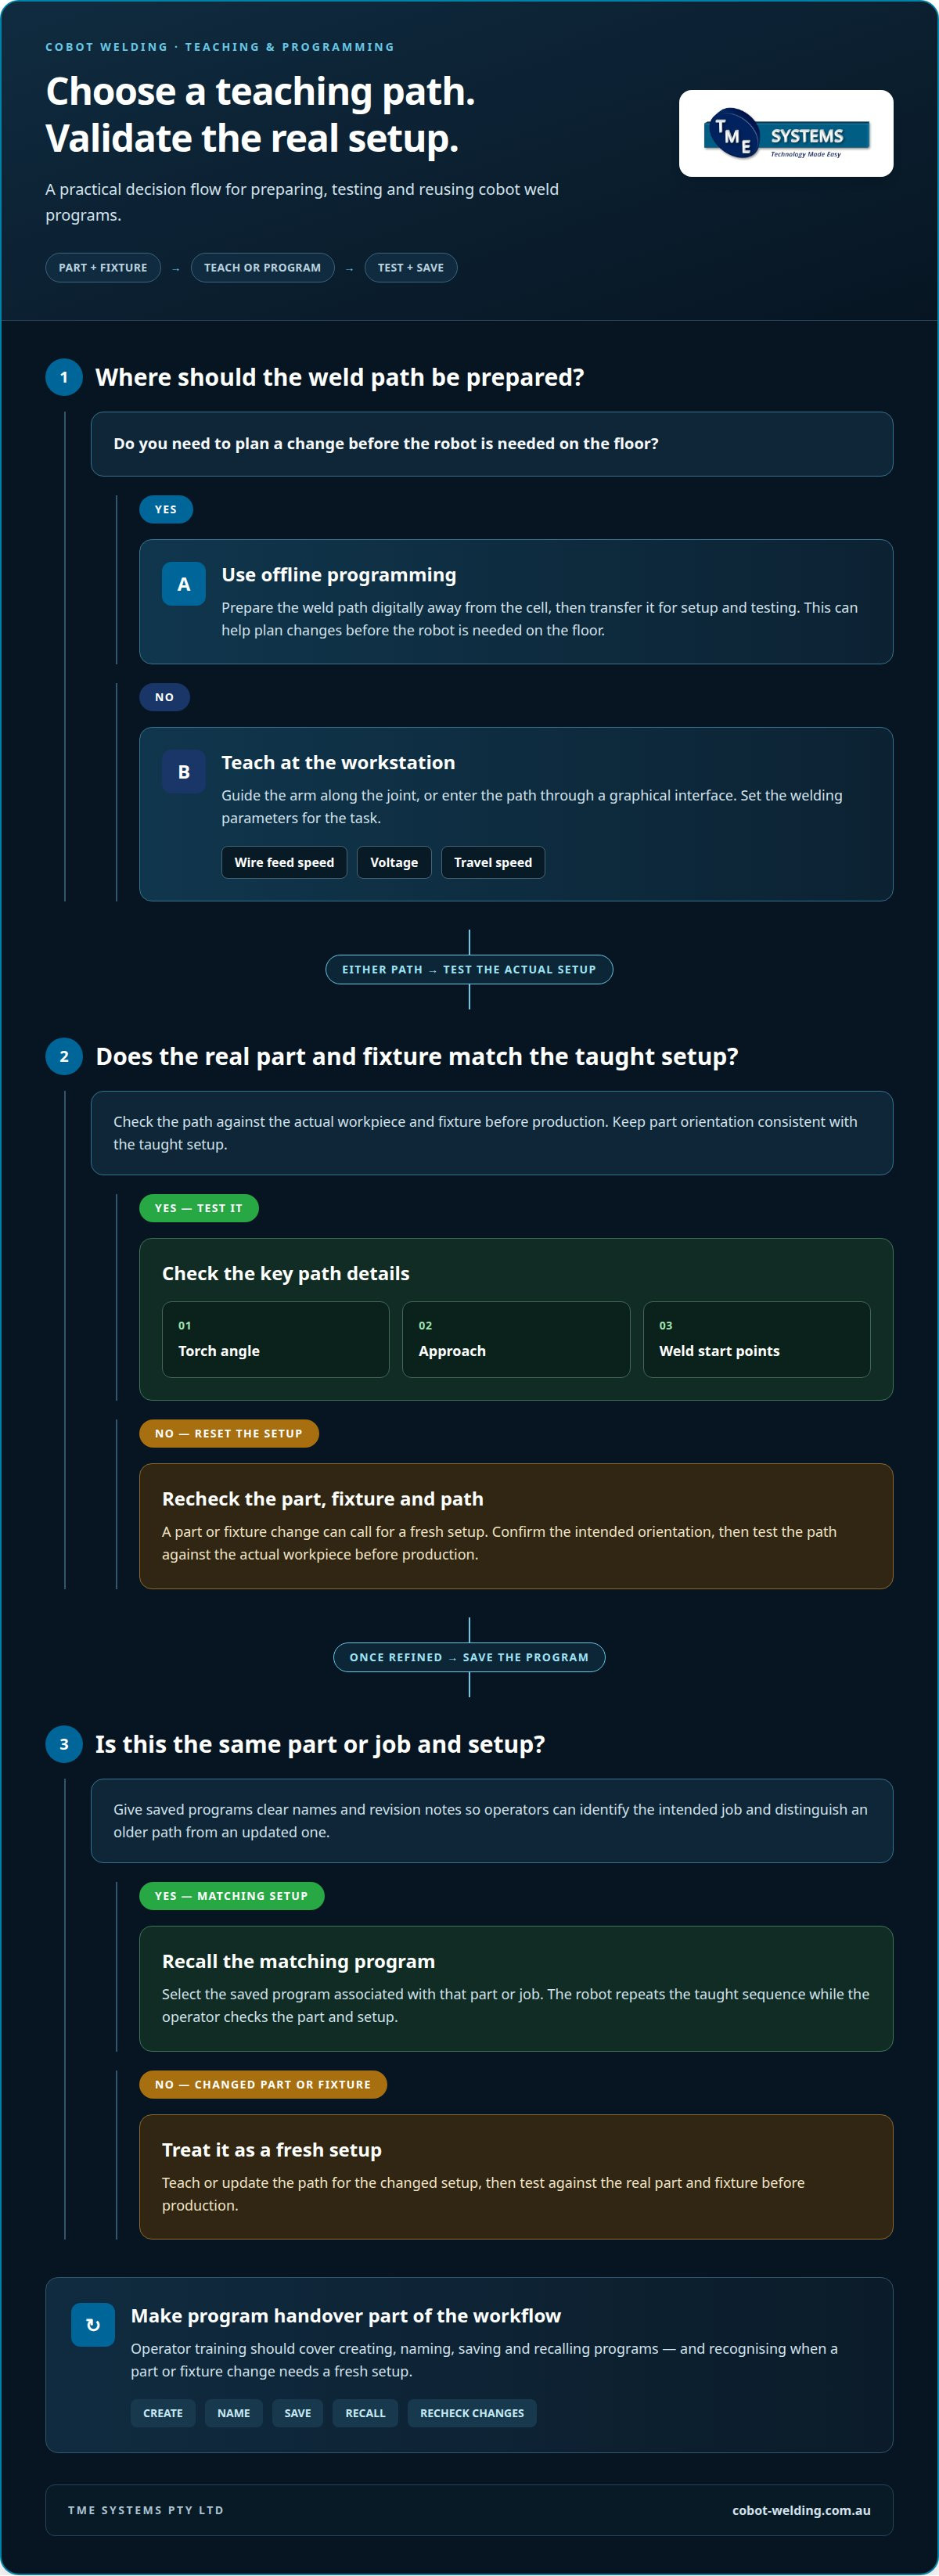
Teaching starts with the part, fixture and weld sequence. An operator guides the arm along the joint or enters the path through a graphical interface, then sets parameters such as wire feed speed, voltage and travel speed. The system can reuse that teaching for repeated tasks.
Offline programming takes a different approach: the weld path is prepared digitally away from the cell, then transferred for setup and testing. This can help plan changes before the robot is needed on the floor. Either way, test the path against the actual workpiece and fixture. Check torch angle, approach and weld start points before production.
For example, a team switching between two bracket designs can save a program for each part. Clear names and revision notes help operators select the intended job and avoid confusing an older path with an updated one. Keep the fixture and part orientation consistent with the taught setup.
Saving and recalling weld programs
After a weld sequence is taught and refined, save it as a program associated with the part or job. When production returns to that item, the operator recalls the matching program instead of rebuilding the path from scratch. The robot can then repeat the taught sequence while the operator checks the part and setup.
A tablet-based interface can make program selection and parameter adjustment more intuitive. In a no-code teaching workflow, operators enter settings and teach the required path through the interface. Training should cover creating, naming, saving and recalling programs, as well as recognising when a part or fixture change calls for a fresh setup.
To assess whether this approach suits your team, explore no-code cobot teaching software and consider how operators will teach, adjust and reuse weld programs.
Cobots compared with industrial welding robots
Choose between a cobot and an industrial robot by matching the system to production volume, part variation and operator tasks. The right fit depends on the whole cell, not the robot arm alone.
Robot types and industry applications
Industrial welding robots commonly work inside safety cells, while cobots can support operators working nearby. Cobots can handle repetitive, high-volume welds, leaving people to prepare parts and manage complex fit-ups. Automotive and component manufacturing, along with agricultural equipment production, are among the industries using cobot welders.
For Australian workplaces, assess the complete cell’s hazards, including robot access, welding arc and fumes. A collaborative label alone doesn’t establish that an installation is safe. Sence is a named collaborative welding robot; compare Australian options by cell configuration, teaching method and welding equipment.
Process and material capability depend on the selected welding machine, torch, parameters and joint setup. Match these to the parts and welds required, rather than assuming every workstation handles every material.
Space, power and ventilation needs
Map the arm’s reach, fixture, torch path and operator loading area on the workshop floor. A cobot cell still needs room for safe access and part handling, even if it does not require a large isolation cell. Power requirements depend on the selected robot and welding machine, so plan around the complete system.
Ventilation should capture fumes at the weld without obstructing the torch or operator. Part shape and weld position affect extraction placement. A deep frame, for example, can make access and fume capture different from a flat plate, so assess both during layout planning.
Productivity gains and return on investment
Estimate value from the specific welding tasks being automated. Compare current cycle times, changeovers, rework and operator time with the proposed workflow. Repeated welds may suit automation, while frequent part changes or complex preparation can affect utilisation.
Build the business case around measured production needs, not a generic productivity promise. Include setup, training, integration and ongoing operation in the assessment. A cobot is more likely to fit when its repeatable weld sequence and saved operator time address a clear production constraint.
Mobile and single-station cobot workstations
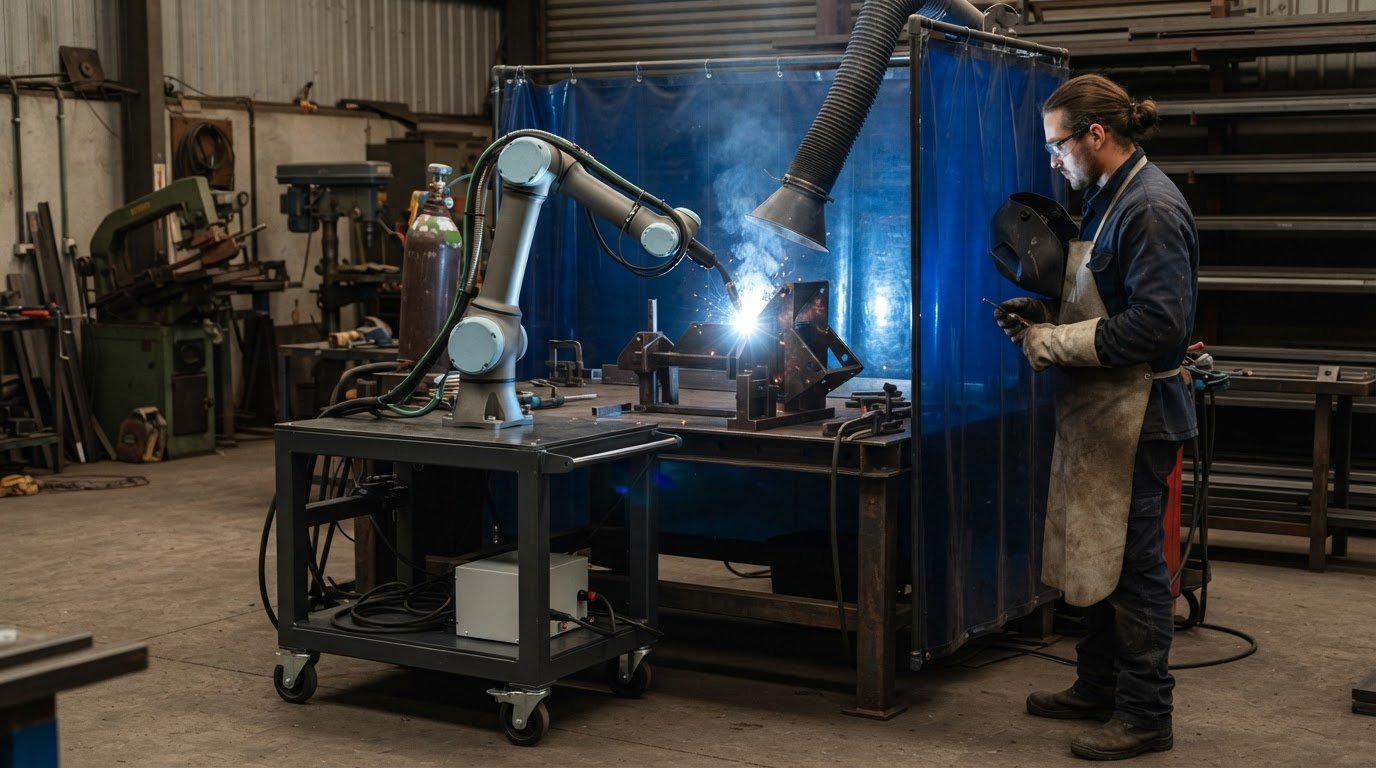
A mobile cobot welding system can be moved between workstations, changing where automation sits in production rather than tying the robot to one permanent point. A mobile setup may suit a workshop where several areas need repeatable welds, such as separate bays handling different jobs.
A fixed workstation keeps the robot, welding equipment and fixtures in a dedicated location. This can make sense when one product family returns regularly to the same production area. Operators can organise work around a consistent setup, with parts and fixtures arranged for that station.
The key choice is how often the work needs to move. If jobs shift between bays, a mobile system can bring automation closer to each task. If the same parts are welded in one area, a fixed station avoids moving the system unnecessarily. Compare the actual production route, not just the available floor space.
Movement brings practical challenges. Each relocation changes the robot’s position relative to the part, fixture and surrounding work area. After moving a system, operators need to position it and confirm the taught path matches the new setup. Repeatable results depend on consistent part placement and fixture orientation at each location.
Plan the route before choosing a mobile setup. Check where the system will travel and park, and how operators will load parts at each stop. A narrow aisle or shared work area, for example, may make frequent movement disruptive. A fixed station can be more straightforward when the production sequence already brings parts to one place.
Use a simple trial to compare both layouts: select a representative weld, place the workstation in the proposed position, then walk through loading, welding and unloading. This exposes handling or workflow issues before the layout becomes routine. A mobile cobot demonstration can help your team assess how a movable setup fits its production floor.
TME Systems: No-Code Teaching Software
TME Systems’ No-Code Teaching Software lets operators teach weld paths and adjust welding parameters without traditional programming. It helps teams build welding automation around operators’ existing knowledge, rather than making specialist coding the starting point.
TME Systems’ Collaborative Robot Welding Cells bring collaborative robots and welding equipment together, while its integration services connect the system with existing welding equipment, fixtures and production processes. The Mobile Demo System brings a portable welding cell to your site for a hands-on demonstration.
Consider these options when you’ve identified a repeatable welding task but need to work out how operators will teach it or where the equipment should sit. Contact TME Systems to discuss your welding automation needs and next steps.
Choose a practical first step
Move from general interest to a production-floor question: which weld would be a useful candidate for automation? Select a representative part and record its joint access, fit-up variation, fixture requirements and how operators handle it today. This gives your team a grounded starting point for assessing a cobot welding workstation against real work, rather than an idealised cycle.
Bring those details into a discussion about cell layout, operator involvement and how the setup could fit your production flow. TME Systems offers No-Code Teaching Software, Collaborative Robot Welding Cells, integration services and a Mobile Demo System, connecting the teaching process with the wider workstation decision.
Contact TME Systems about cobot welding to discuss your production requirements and next steps. A clear first task can make the path to automation easier to plan.
Frequently Asked Questions
What is a cobot?
A cobot is a collaborative robot designed to work alongside a human operator. In welding, it can be taught a path and repeat that task while a welder handles part preparation, fit-up or inspection. It still needs a suitable setup, process controls and risk assessment. “Collaborative” describes intended interaction, not automatic permission for people to work within every robot’s reach.
Occupational safety: How safe is cobot welding?
Cobot welding safety depends on the specific application, tooling, process and site risk assessment. A risk review should consider the robot’s movement, torch, workpiece, fixtures and the operator’s tasks, including loading and inspection. Protective equipment and fume extraction remain part of workplace safety. For example, changing a fixture can alter access and pinch points, so reassess the setup after significant changes.
What specific benefits do cobots offer SMEs?
Cobots can help manufacturers automate selected welding tasks without making specialist robot coding the starting point. No-code teaching lets operators set and adjust weld paths, while repeatable jobs can be run again. Assess a part family for stable fit-up, accessible joints, secure fixturing and enough repeat work. High-mix, low-volume welding can suit automation when the right part families are chosen.
What is a cobot welding workstation and how does it work?
A cobot welding workstation brings a collaborative robot and welding equipment together to automate a taught weld. An operator positions the part, teaches or selects its path, sets the required welding parameters and runs the task. The operator remains involved in preparing and checking work. For a new part, confirm its orientation and fixture match the taught setup before starting production.
What are the main components of a cobot welding workstation?
A typical setup brings together a collaborative robot arm, welding torch, welding power source, teaching interface and a fixture or work table. The fixture holds the part in position while the torch follows the taught path. Some systems also use a turntable or positioner to present different welds. Safety measures and fume extraction must suit the cell’s layout and work process.
How does cobot welding compare with manual welding and traditional robotic welding?
Manual welding gives a skilled welder direct control over each pass and can suit varied, hands-on work. A cobot can repeat a taught weld while the operator prepares parts or handles other tasks. Traditional industrial welding robots are often installed in safety cells for production tasks. The practical choice depends on job repeatability, part variation, operator workflow and the required production setup.