What if the best way to start welding automation isn’t choosing a robot, but proving one application first? De-risking your first welding automation project means testing whether a job can produce consistent welds, fit your workflow and work for the people who’ll use the system.
It’s sensible to be cautious. Part variation, fixture changes and setup time can weaken an otherwise promising business case. Even a well-chosen cell can disrupt production if operators aren’t involved in the transition. A first project needs to work on the workshop floor, not just on paper.
This stage-by-stage checklist will help you assess job suitability, identify repeatability issues and compare automation approaches before making a commitment. You’ll also learn how to set practical measures for weld quality and workflow, test assumptions with an application-focused demonstration, and plan integration and operator onboarding. With no-code teaching, operators can learn to teach weld paths and adjust parameters as the project takes shape. The aim is a realistic first move, supported by clear evidence for what comes next.
Key Takeaways
- Start with a job that’s repeatable enough to test. Check whether part variation, changeovers or fixture issues could undermine the case.
- Assess weld quality and production workflow separately. Each needs its own evidence.
- Compare manual process improvements, a collaborative robot welding cell and broader automation against your space, job mix and in-house capability.
- Use clear go, hold or refine gates to identify the evidence needed, who owns each decision and what happens next.
- De-risking your first welding automation project means planning for integration and operator onboarding, then scaling only when the results support it.
De-risking a first welding automation project starts with the right job
You may need more consistent welds, but production still has to get out the door. Choosing the first application carefully matters: a poorly matched job can add setup work and disruption instead of easing a bottleneck.
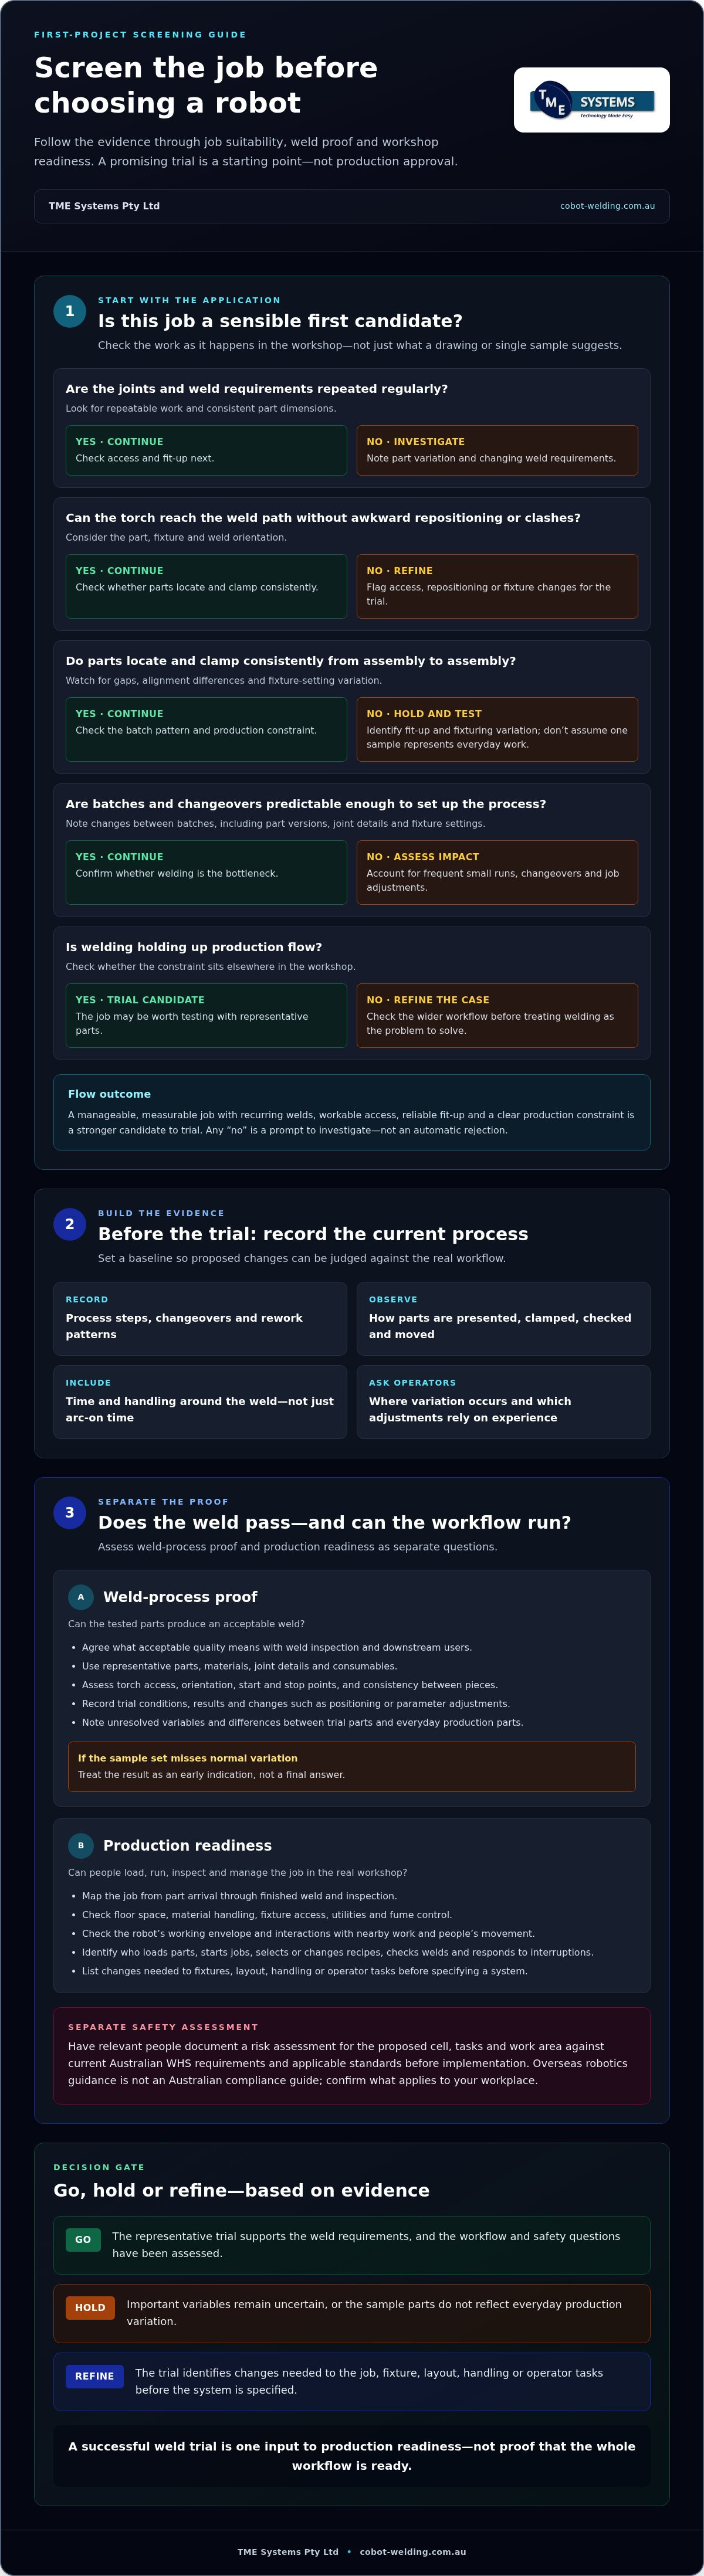
De-risking your first welding automation project means replacing assumptions with evidence at each decision point. Start by screening the work, not by choosing a robot. Check whether the job has:
- Repeatability: Are the same joints welded regularly, with consistent part dimensions and weld requirements?
- Access: Can the torch reach the weld path without awkward repositioning or clashes with the part or fixture?
- Fit-up: Do parts locate and clamp consistently, or do gaps and alignment vary from one assembly to the next?
- A workable batch pattern: Are batches and changeovers predictable enough to justify setting up the process?
- A clear bottleneck: Is welding holding up production flow, or does the constraint sit elsewhere in the workshop?
A sensible first job is manageable and measurable, not necessarily the most difficult weld in the shop. Robot welding can support repeatable production, but the process still depends on suitable parts, access and preparation. Use this checklist to narrow the options, then trial actual parts to assess the application.
Which welding jobs make sensible first candidates?
Look first at recurring weldments with repeatable joints and accessible torch paths. A frequently produced part may be a promising candidate if it can be located reliably and the weld sequence is straightforward. High part variation, frequent design changes and difficult fixturing aren’t automatic deal-breakers, but they need early attention. Test representative parts rather than assuming a drawing or single sample captures everyday variation.
Consider the batch pattern, too. Frequent small runs may involve more changeovers and job adjustments than a steady run of the same assembly. Note what changes between batches, including part versions, joint details and fixture settings. This helps show whether the job can fit the way work actually moves through your workshop.
Set a baseline before changing the process
Record the current process steps, changeovers, rework patterns and operator touchpoints. Observe how parts are presented, clamped, checked and moved through the workshop. Include the time and handling around the weld, not just arc-on time. Ask operators where variation occurs and which adjustments depend on their experience.
A first-project baseline is the agreed set of current-state measures, including process steps, changeovers, rework and operator involvement. Use it to judge whether a proposed change fits the workflow and delivers value.
Test weld, workflow and safety assumptions before specifying a system
A weld that looks right in a trial is encouraging, but it doesn’t prove the process is ready for production. Assess weld-process proof and production readiness separately. The first asks whether the system can make an acceptable weld on the tested parts. The second asks whether people can load, run, inspect and manage the job within the real workshop workflow.
For each trial, use representative parts, materials, joint details and consumables. Record what was tested, the conditions, the results and anything still uncertain. A trial provides useful evidence, but doesn’t establish how every part variation or production scenario will perform.
Prove the weld on representative work
Before testing, agree with the people responsible for weld inspection and downstream use on what acceptable quality means. Assess the sample parts for torch access, orientation, start and stop points, and consistency from piece to piece. Record any changes made during the trial, such as positioning or parameter adjustments, so the results can be understood and repeated.
Keep a record of unresolved variables, including differences between trial parts and everyday production parts. If the sample set doesn’t reflect normal variation, treat the result as an early indication, not a final answer.
Check the cell against the real workshop
Map the job from part arrival to finished weld and inspection. Check floor space, material handling, fixture access, utilities, fume control and the robot’s working envelope. Consider how the proposed cell interacts with nearby work and how people move around it. Identify who loads parts, starts jobs, selects or changes recipes, checks welds and responds when a run is interrupted.
A successful weld trial is one input to production readiness, not proof that the whole workflow is ready. Use the findings to identify changes needed to fixtures, layout, handling or operator tasks before settling on a system specification.
Safety needs its own documented risk-assessment process. Have the relevant people assess the proposed cell, tasks and work area against current Australian WHS requirements and applicable standards before implementation. The US OSHA robotics safety standards page offers background on robotics safety references, but it isn’t an Australian compliance guide. Confirm which requirements apply to your Australian workplace rather than relying on overseas guidance.
An application-focused collaborative robot welding cell discussion can connect trial observations with integration questions, including how existing equipment and factory workflows fit into the plan.
Compare automation approaches against your first-project risks
Once you’ve identified a candidate job, compare ways to address its production problem before settling on a system. A repeatable weld with a clear bottleneck calls for a different response from a job with frequent design changes or complex part handling. For de-risking your first welding automation project, weigh each approach against repeatability, changeover frequency, available space and the capability your team can support.
- Manual process improvement: Refining work instructions, part presentation or fixturing may address variation without introducing a robot. Consider this when inconsistent setup is the main issue, while recognising it won’t automate the weld itself.
- Collaborative robot welding cell: A focused cell may suit a recurring application where operators can load parts and manage job changes around the automated weld. The job mix, required production flow and available space still need to suit the cell configuration.
- Broader custom automation: A more integrated system may be worth assessing when the application depends on complex handling, several linked processes or changes across a production line. It also requires a wider scope to plan and coordinate.
There’s no universal winner. A high changeover rate may make a manual improvement or adaptable cell worth comparing, while tight floor space or limited in-house capability may affect how much integration support is needed. Use evidence from the job and workshop to guide the trade-off, rather than choosing the most automated option by default.
When a collaborative welding cell may suit the first step
A collaborative approach can support operator-led work, particularly where staff need to load parts, teach weld paths or adjust parameters as jobs change. No-code teaching software lets operators make those adjustments without traditional programming. The cell still needs to match the application’s pace, job mix and layout. Collaborative capability doesn’t remove the need for a documented, application-specific risk assessment or appropriate safeguards. The collaborative robot welding cells guide explores cell-level considerations.
When to consider a different level of automation
High part variation, difficult handling or dependencies between several production stages can point towards broader integration, or signal a need to refine the process before automating it. Compare a focused first cell with automating several linked tasks at once. The wider option may address more constraints, but it also means more interfaces and workflow changes to assess. The welding system integration guide outlines the scope involved. For a structured view of robotic arc-welding hazards, the American Welding Society’s AWS Risk Assessment Guide can inform the assessment alongside applicable Australian requirements.
Pre-investment checklist for go, hold or refine gates
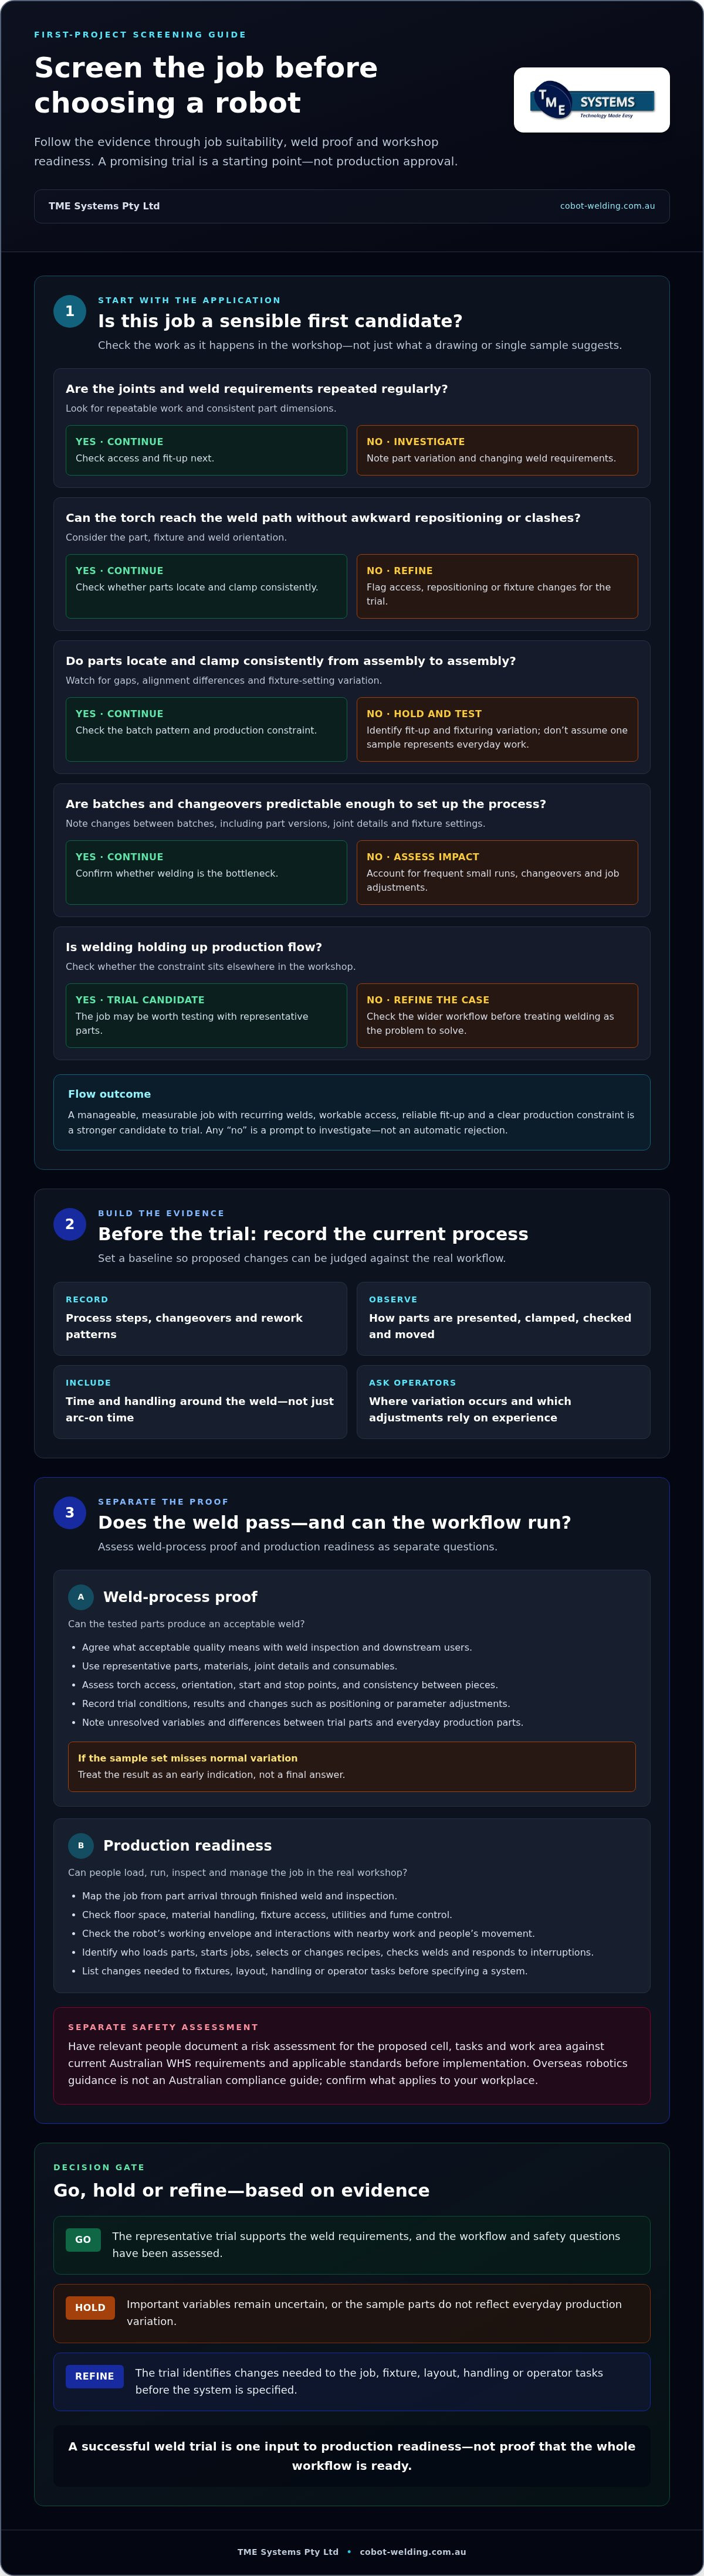
Decision gates help prevent a promising idea from becoming a premature specification. Use this checklist to organise evidence and assign ownership, not as a substitute for engineering design or a site-specific safety assessment. For de-risking your first welding automation project, pausing to resolve an open question is useful progress, not a failure.
The first-project readiness gates
- Gate one, select and baseline the job. The production lead nominates a repeatable application, records the current process and agrees with quality and operations on the outcomes that matter. Proceed if the job and intended result are clear; hold if the current process or objective is unknown; refine the candidate if its variation makes a fair assessment difficult.
- Gate two, check the application and workplace. The welding lead and relevant engineering or safety personnel review representative welds, part location, fixturing, workflow, safeguards and required connections to existing equipment. Proceed when the main technical and workflow questions are supported by evidence; hold for unresolved safety or integration questions; refine the layout or process where practical changes could address them.
- Gate three, prepare people and acceptance. The project owner agrees trial responsibilities, operator onboarding and acceptance criteria with operators, quality and production. Consider whether operators can teach or adjust jobs confidently; the no-code welding software guide explains how teaching and adjustment can fit into operator-led work. Proceed when roles and criteria are understood; otherwise, refine the training or trial plan before implementation.
Turn success measures into a controlled trial plan
Choose measures that match the problem you’re trying to solve. If consistency is the priority, agree how weld acceptance will be reviewed. If workflow is the concern, observe loading, changeovers, repeatable operation and inspection. Include operator readiness, such as whether staff can carry out agreed teaching or adjustment tasks. Set project-specific criteria with the people accountable for each outcome; there’s no universal target for every job.
Write down the trial parts, materials, process settings, review roles and how exceptions will be recorded and handled. Make clear which variations the trial covers and which remain untested. Review the evidence with operators and project stakeholders, then document a go, hold or refine decision and assign each follow-up action to an owner.
To test your application and assumptions before specifying a cell, explore collaborative robot welding options.
Plan a supported first welding automation project, then scale on evidence
A first cell is easier to adopt when the people who know the weld are involved from the outset. TME Systems supports Australian manufacturers through application review, welding system integration and operator onboarding, connecting trial findings with equipment compatibility and day-to-day workflow. This turns de-risking your first welding automation project into a practical sequence, rather than a one-off equipment decision.
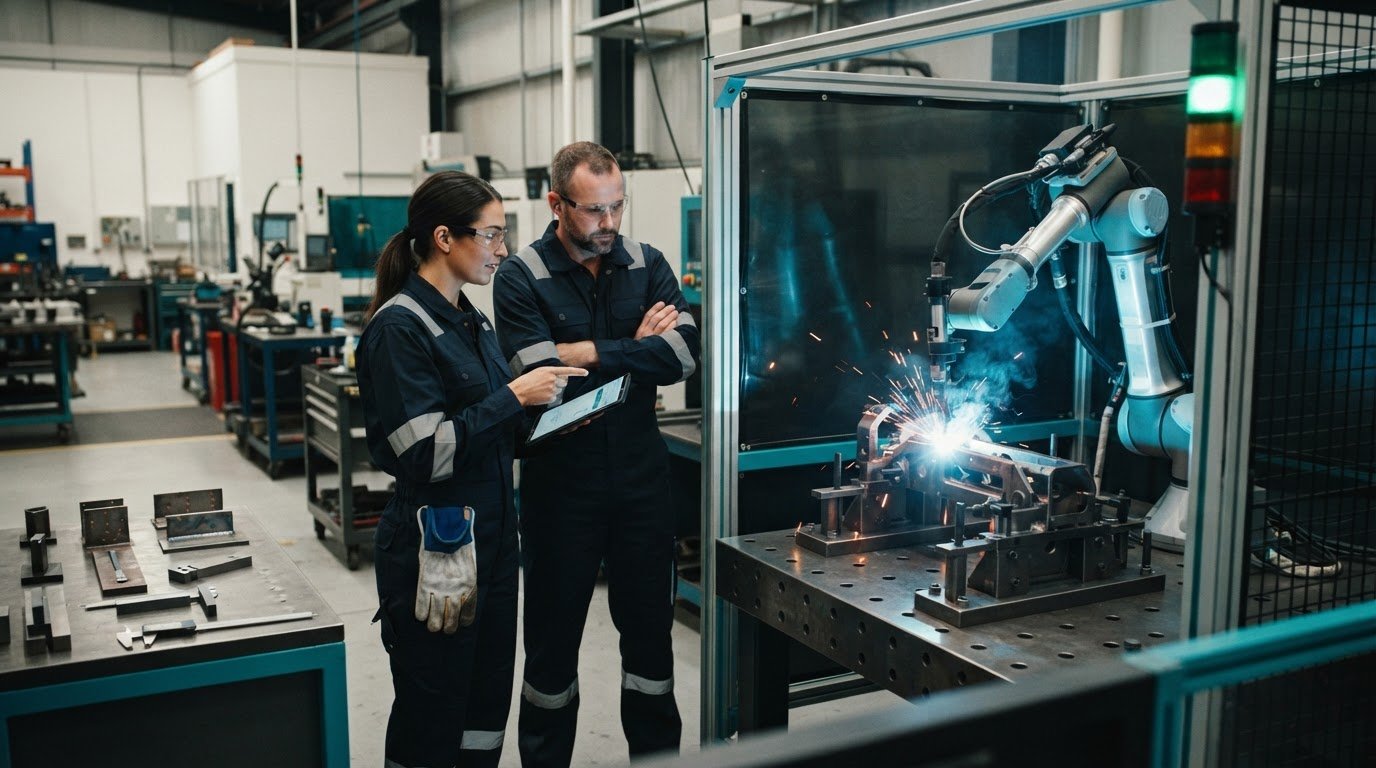
A mobile welding robot demonstration gives your team a practical way to observe an application and test assumptions using representative work. Bring the part and questions that surfaced during screening: how it’s located, where the torch needs access, what changes between jobs and what operators need to adjust. Use the demonstration to identify what fits and what needs refining, not as proof of every production condition.
Keep operators involved from trial to handover
Experienced welders understand the small process details that drawings can miss. Involve them in explaining joint variation, quality expectations, setup constraints and the adjustments that keep work moving. Plan onboarding around the tasks operators will actually perform, from loading parts and selecting a job to safe operation and knowing when to escalate an issue.
No-code teaching software lets operators teach weld paths and adjust parameters without traditional programming. That makes their process knowledge part of how the system is used. Present the robot as a tool that supports skilled staff and makes repeatable work easier to manage, not as a replacement for their judgement.
Scale only after the first application proves its case
Once the system is operating, review trial and early production evidence against the measures agreed before implementation. Look at weld acceptance, repeatable operation, changeover practicality and how well the workflow fits. Record what operators found straightforward, where they needed help and what required adjustment.
Capture lessons about fixtures, teaching, workflow and support before choosing another job. A second application may have different part variation, handling demands or changeover needs, so assess it on its own evidence rather than assuming the first cell’s results will transfer unchanged.
Bring a representative job, your workflow questions and the outcomes you want to achieve to a project discussion. Discuss your first welding automation project.
Make your first automation move with confidence
De-risking your first welding automation project starts with choosing a manageable job and gathering evidence before committing to a system. Test weld quality using representative work, assess how the process fits the workshop, and define clear go, hold or refine measures. A successful trial matters, but so do operator readiness and production workflow.
Keep experienced welders involved in the decisions. No-code teaching software can help operators teach weld paths and adjust parameters without traditional programming, while a mobile demonstration offers a practical way to assess an application. Integration and operator onboarding support the move from trial to production, with lessons from the first job informing what to automate next.
Bring a representative part, your workflow questions and the outcomes you want to achieve to a project discussion. Discuss your first welding automation project with TME Systems. A measured first step can give your team a sound foundation for what comes next.
Frequently Asked Questions
How do I know whether a welding job is suitable for automation?
A job is worth assessing if it has repeatable joints, accessible weld paths and parts that can be presented consistently. Check how often it runs, the batch pattern and how much setup or changeover it needs. Look for variable fit-up or awkward clamping, too. These factors help screen candidates, but don’t confirm suitability. Test representative parts and normal variations before deciding.
Can a collaborative robot weld different parts in small batches?
It may be feasible, depending on part variation, fixture design, path teaching and the effort required to change between jobs. A small batch can involve more setup than welding, so assess the actual job mix and how frequently parts or joint details change. Keep experienced operators involved in identifying practical adjustments. A trial with representative parts can help show what’s manageable and what needs refining.
What should a first welding automation project prove?
A first project should prove both that the weld meets agreed acceptance criteria and that the job fits into production. Assess repeatability across representative parts, practical loading and unloading, safe workflow and operator readiness. Before a trial, agree how each measure will be checked and who will review it. A successful weld alone doesn’t establish production readiness; the trial should also test surrounding tasks and hand-offs.
Do I need to change my existing welding equipment to automate?
Not necessarily. Compatibility depends on the existing power source, torch, controls, fixtures and welding application. An integration assessment can identify which equipment and workflow elements may work with a proposed cell, and where adjustments or additional integration are needed. Review these interfaces during planning rather than assuming every setup will connect as-is. The aim is to understand the scope before specifying the system.
How can operators learn to use a welding cobot?
Operators can learn through structured onboarding and hands-on practice with the tasks they’ll perform in production. Include safe operation, loading and unloading, job changes, teaching weld paths, adjusting parameters and responding to interruptions. Involving experienced welders helps make training relevant to actual process requirements. No-code teaching software supports operator-led path teaching and adjustments without traditional programming, while onboarding builds familiarity with the system and its workflow.
What safety checks are needed before a welding cobot project?
Complete a documented, application-specific risk assessment before implementation. It should consider robot movement, welding hazards, access to the work area, operator tasks, part handling and how the cell fits into nearby workflow. A collaborative robot isn’t inherently safe simply because it’s designed to work collaboratively. Verify current Australian WHS requirements and applicable standards for the specific application, and use the assessment to determine appropriate safeguards and operating procedures.
Should I run a demonstration before choosing a welding automation system?
A demonstration can help test weld and workflow assumptions using representative parts and agreed acceptance criteria. It gives your team a chance to observe access, path teaching and how the application may be handled, while noting unresolved variables. Treat the results as decision-making evidence, not a guarantee of production performance. A demonstration doesn’t replace integration planning, a review of the actual workplace or a site-specific safety assessment.