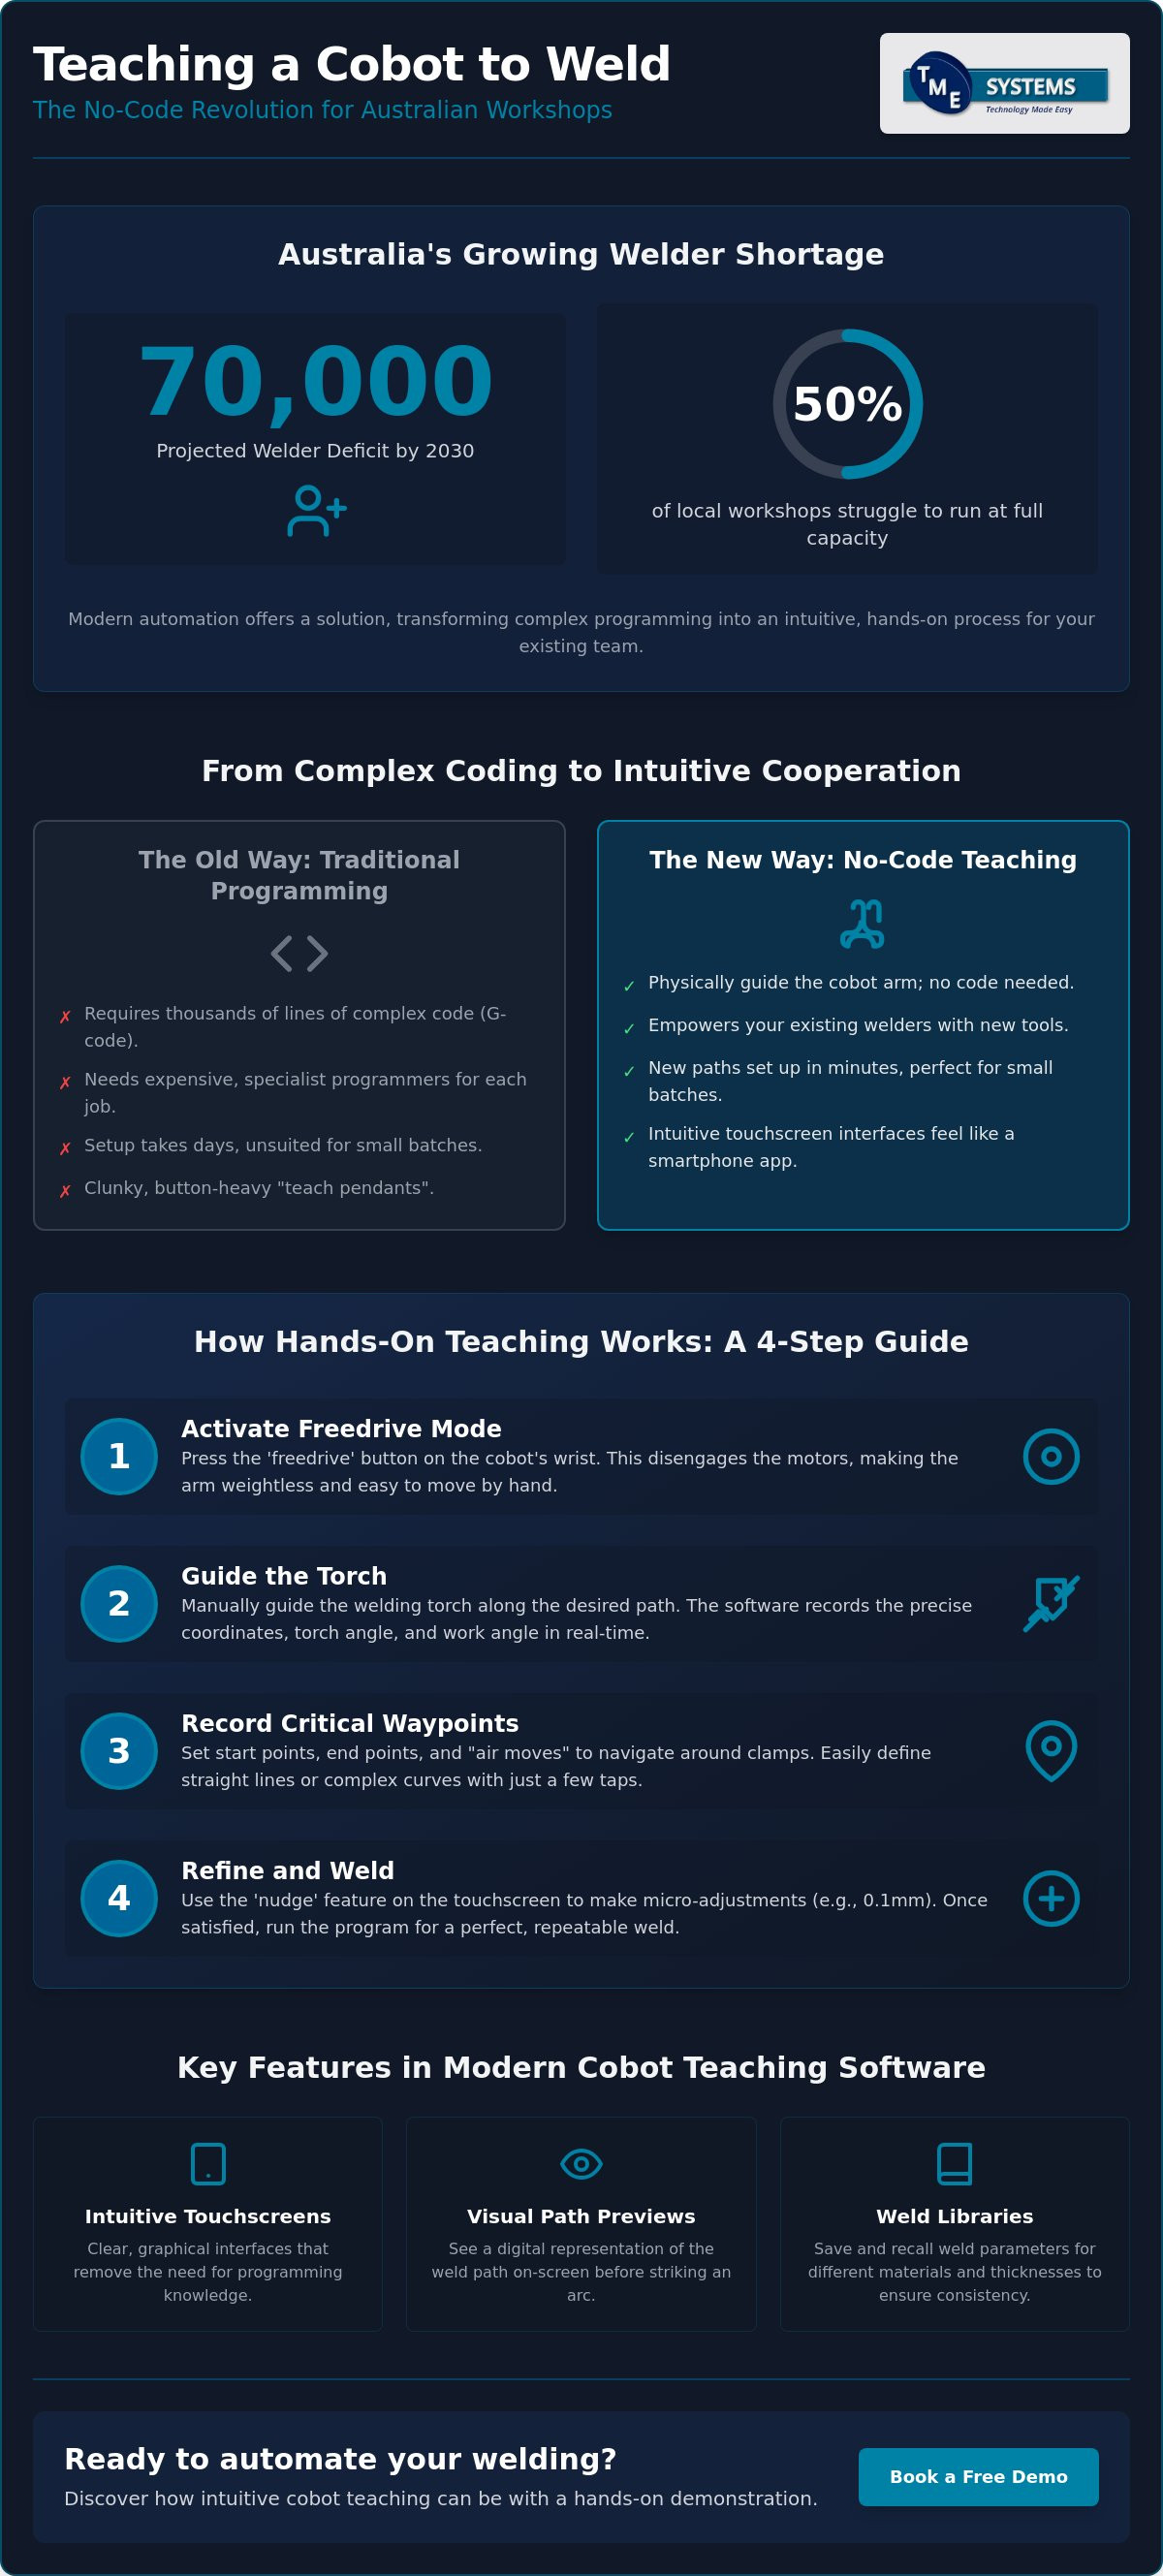
With Australia projected to face a deficit of 70,000 welders by 2030, half of our local workshops are already struggling to run at full capacity. You likely feel this pressure every day, particularly when the idea of teaching a cobot to weld feels more like a computer science project than a practical workshop task. It is a common worry that automation is too complex for a traditional floor or that you will need an expensive programmer just to handle small batches.
We agree that any new technology should feel like a tool, not a burden. The good news is that modern software now allows your existing team to guide a robot through complex paths without writing a single line of code. This guide explores the most intuitive solutions for 2026, focusing on how these systems can help you automate MIG and TIG welding with ease. We will look at the latest tools that ensure consistency across long shifts and help your business maintain its output without the constant stress of a labour shortage.
Key Takeaways
- Discover how no-code interfaces have made automation accessible for local workshops by removing the need for traditional programming knowledge.
- Master the lead-through method, where teaching a cobot to weld becomes a hands-on process of physically guiding the arm to record start and stop points.
- Learn to use visual path previews and weld libraries to ensure every bead is consistent, regardless of the shift or the operator.
- Evaluate the differences between proprietary and third-party software to select a tool that feels like a natural extension of your workshop equipment.
- Understand the role of integration specialists in organising your software setup to handle small batches and complex weld paths effectively.
What Does Teaching a Cobot to Weld Actually Mean?
For years, the word "robotics" suggested complex code and expensive specialists. In a modern workshop, teaching a cobot to weld has changed that definition entirely. Instead of typing syntax into a terminal, teaching is the process of physically showing the machine where to go. You are recording spatial points and welding parameters through an interface that feels more like a smartphone app than a computer science project. It is a translation of your existing skill into a digital format that the machine can repeat perfectly.
By 2026, no-code interfaces have become the baseline for Australian fabricators. With the national welder shortage projected to hit 70,000 by 2030, shops cannot afford to wait for a specialist programmer every time a new job comes in. Traditional industrial programming usually involves a "teach pendant" and thousands of lines of code. Collaborative teaching, however, relies on the intuition of the person who already knows how to weld. It preserves the welder's craft by automating the repetitive arm movement while keeping the human in control of the puddle logic and heat settings.
The Evolution of Robot Interaction
The way we talk to machines has shifted from "command" to "cooperation." Early industrial systems relied on G-code or proprietary languages that took months to master. Today, an operator-centric design philosophy dominates the industry. We have moved from clunky, button-heavy pendants to intuitive touchscreens and hand-guiding. This shift means the term "programming" is becoming obsolete. When you use a collaborative robot (cobot), you are not writing software; you are simply refining a tool to do exactly what you want it to do.
Why Teaching Beats Coding for Small Batches
For many Australian SMEs, the biggest hurdle to teaching a cobot to weld was always the setup time. If a job only has ten or twenty parts, you cannot spend two days coding a robot to do it. Teaching provides a massive advantage in "time-to-weld" efficiency. You can set up a new path in minutes by moving the arm to the start and end points. This allows for rapid iteration on the fly. If the fit-up is slightly off, you adjust the point on the screen and get back to work immediately. It removes the high cost of entry and makes automation a viable option for the varied, small-batch work that defines our local industry.
Lead-Through Programming: The Hands-On Teaching Method
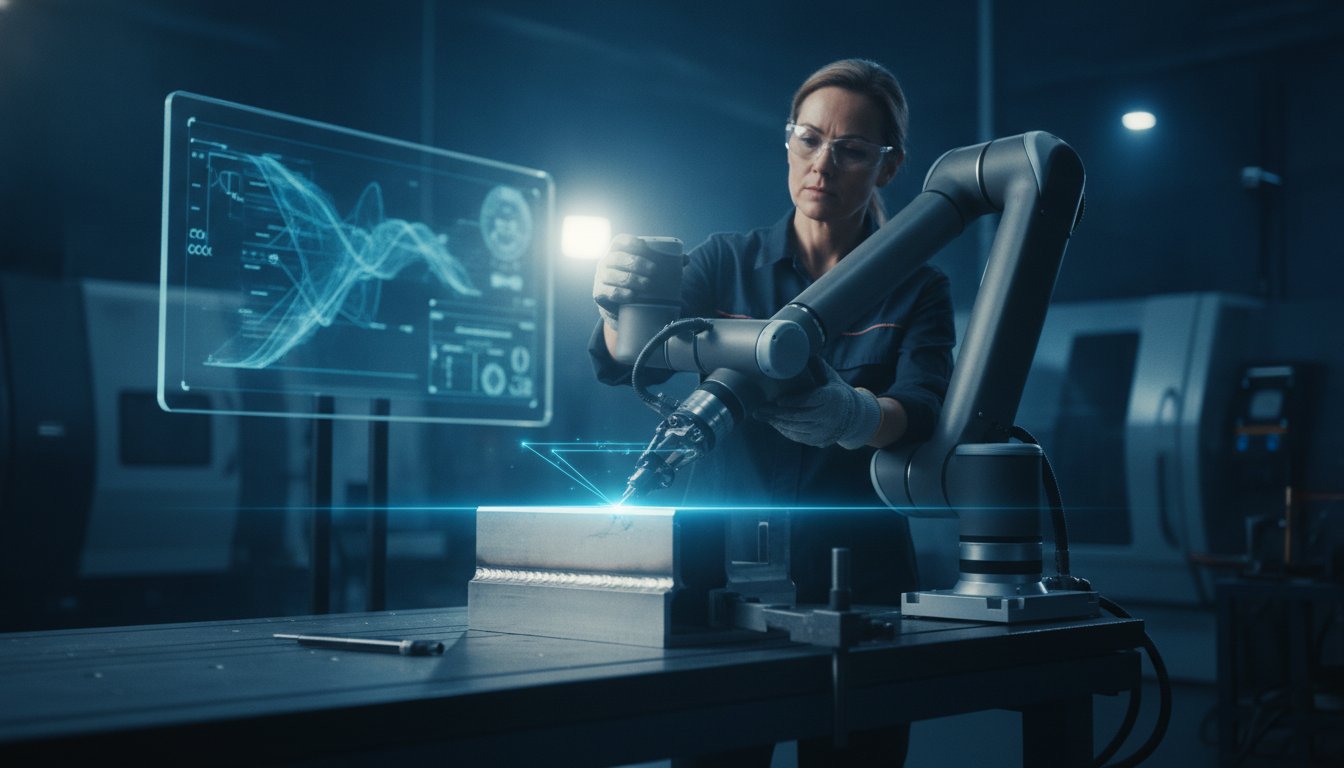
Lead-through programming is the most direct way of teaching a cobot to weld because it relies on your physical intuition. To start, you simply press the "freedrive" button. This button, often found on the robot's wrist or the control pendant, disengages the motors and makes the arm feel weightless. You then manually guide the torch along the joint. While you move, the software is busy in the background, recording the precise coordinates and the orientation of the torch head.
You aren't just teaching a line in space. You're teaching the torch angle and the work angle simultaneously. If you tilt the torch to manage the heat or the puddle, the software captures that specific rotation. This data is converted into a digital path that the cobot can repeat with sub-millimetre accuracy. While you work, it's worth referencing global safety benchmarks like OSHA safety standards to ensure your setup remains compliant and your team stays safe during these hands-on interactions.
Recording Critical Waypoints
A successful weld path is built from specific waypoints. You begin by setting an approach point, which is a safe "home" position where the robot waits. From there, you guide it to the start point where the arc strikes. It's equally important to teach "air moves." These are paths the robot takes to navigate around clamps, jigs, or the workpiece itself without making contact. Modern software allows you to toggle between linear moves for straight beads and circular moves for radii, simply by recording three points along an arc.
Haptic Feedback and Precision
Modern cobots offer haptic feedback, which means the arm can provide slight resistance or assistance to help you stay on track. This makes the teaching process feel more like using a precision tool and less like wrestling with a machine. If your hand-guiding isn't perfectly steady, you don't need to start over. Most interfaces include a "nudge" feature. This allows you to select a recorded point and move it by 0.1mm increments on the touchscreen. Your manual skill is what defines the quality of the weld; the software just ensures that skill is captured accurately. If you'd like to feel this for yourself, our mobile demo system can show you exactly how intuitive the process has become.
Comparing Top Software for Robotic Welding Paths
Choosing the right interface is just as critical as selecting the robot arm itself. While many fabricators focus on the reach and payload of the hardware, the software is what actually determines how often the machine stays in the "run" position. In the Australian market, the shift toward no-code robot welding software has changed the game. It allows shops to move away from rigid, line-by-line programming and toward a visual, block-based system. When you are teaching a cobot to weld, the software should act as a bridge between your hands-on experience and the robot's digital brain.
Evaluating these systems requires a practical mindset. During a live demonstration, don't just watch the salesperson. Take the pendant yourself. If you can't figure out how to add a weld point or adjust a travel speed within thirty seconds, the software is likely too complex for a busy workshop floor. You want a system that prioritises safe welding with a cobot while keeping the focus on the quality of the bead rather than the syntax of the code. This ensures that the transition to automation feels like adding a new tool to the bench, not a new department to the office.
Native Cobot Interfaces
Most manufacturers provide their own native interfaces. These are excellent for general-purpose tasks like pick-and-place or simple assembly. For basic fillet and butt welds, these built-in tools are often enough to get the job done. They offer a stable environment and direct control over the arm's joints. However, they can fall short when you need to manage complex multi-pass requirements or integrate specific power source settings. If your work involves highly repetitive, simple geometry, a native interface is a cost-effective starting point that requires minimal additional setup.
Advanced No-Code Welding Overlays
If your workshop handles diverse parts with varying tolerances, a specialised welding overlay is often the better choice. These software packages sit on top of the robot's operating system and add specialised welding logic. They include features like weave patterns, stitch welding, and touch sensing. These tools are designed to simplify automated welding path adjustment, allowing the cobot to compensate if a part isn't seated perfectly in the jig. When teaching a cobot to weld with these overlays, you aren't just giving it a path; you're giving it a set of rules to follow to ensure the weld stays in the joint every single time.

Key Features to Look for in No-Code Teaching Software
When you're evaluating different platforms, you need to look past the technical specs of the robot arm and focus on what your team will actually see on the screen. The best tools for teaching a cobot to weld are those designed by people who understand the reality of a workshop floor, not just software engineers. You want an interface that simplifies the complex without stripping away the control a skilled welder needs to produce a high-quality bead.
A visual path preview is one of the most critical features to look for. This allows the operator to see a 3D representation of the torch's movement on the pendant before the arc even strikes. It's a simple way to spot potential collisions with clamps or jigs, saving you from wasted scrap and damaged equipment. Similarly, weld library integration allows you to save "recipes" for different materials, such as aluminium or stainless steel. Instead of starting from scratch, you can pull up a proven 6mm fillet weld setting and apply it to a new path in seconds. This ensures consistency across every shift, regardless of which operator is at the bench.
Modern software also handles error detection with much more clarity than the cryptic error codes of the past. If a path requires the arm to move into a "singularity," which is a position where the robot's joints align in a way that limits movement, the software should alert you immediately. It should explain the issue in plain English and suggest a fix. Additionally, cloud connectivity has become a standard for 2026, allowing for remote troubleshooting and the ability to share proven weld paths across multiple cells in your workshop. If you want to see how these features can streamline your production, you can explore our range of collaborative robot welding cells today.
Intuitive Parameter Adjustment
Parameter adjustment should be tactile and immediate. High-quality no-code software uses sliders rather than code blocks to change travel speed, voltage, and wire feed speed. This allows a welder to use their intuition to fine-tune the process. You can even adjust these settings "on the fly" during a dry run, seeing exactly how the torch reacts to a change in speed. A clean, uncluttered UI is vital here; your team shouldn't have to dig through multiple menus just to adjust a gas pre-flow setting during a busy shift.
Safety and Collision Detection
Safety is a core part of the teaching experience. The software must allow you to set digital boundaries or "safety zones" that prevent the arm from moving into restricted areas. In Australia, these systems are designed to align with the AS/NZS 62061:2025 standard for functional safety, published on 9 May 2025. If an unexpected stop or e-stop occurs, the software should make it easy to recover the path. It should guide the operator through a safe restart procedure without losing the recorded coordinates, ensuring the workshop remains productive and compliant.
Implementing Cobot Teaching in Your Australian Workshop
Shifting to a collaborative workflow isn't just about the robot; it's about how you arrange your floor to support it. While previous sections focused on the software tools, the physical layout of your jigs and benches determines how smoothly those taught paths run. Working with welding system integration specialists ensures that your initial environment is set up correctly from day one. They take care of the background configuration, such as power source communication and safety parameters, so your team can focus on the actual welding logic. This professional setup is the foundation of a high ROI, as it allows for a seamless transition from manual work to automated production without the typical teething issues of new technology.
Upskilling Your Current Team
Your best "teacher" for the machine is already on your payroll. An experienced welder understands how a puddle behaves and how heat affects different joints. This makes teaching a cobot to weld a natural extension of their existing trade. The learning curve is fast; most shops see their first production welds within hours of unboxing the system. Identifying a "Cobot Champion" in your team helps drive this transition. This person becomes the internal expert who ensures the technology is used to its full potential, helping others gain confidence with the new equipment and refining the taught paths for maximum efficiency.
The TME Systems Pty Ltd Support Model
Local fabricators need local support that understands our specific industry standards and workshop realities. TME Systems Pty Ltd provides ongoing technical assistance and software updates to keep your systems running at peak performance across their decade-long lifespan. If you want to see how the software handles your specific parts before committing, our mobile demo system brings the technology directly to your door. You can get hands-on with the interface and experience exactly how intuitive the process has become on your own workshop floor. To get started, Book a mobile welding robot demonstration today.
Future-Proofing Your Workshop with Intuitive Automation
The shift toward collaborative automation in 2026 is no longer about replacing staff; it's about empowering your existing team to do more. We've seen how no-code interfaces and lead-through programming have removed the old barriers of complex syntax and high programming costs. By teaching a cobot to weld, you are simply giving your most experienced tradespeople a more efficient tool to manage repetitive batches and maintain consistency across every shift.
As an Australian-owned and operated integration specialist, we understand the specific pressures of our local manufacturing landscape. We provide specialised no-code software for rapid deployment and include comprehensive operator training to ensure your success is realised quickly. If you want to see how this technology fits onto your floor, Book a Mobile Welding Robot Demonstration to test it on your own parts. Taking that first step toward automation is a practical way to secure your workshop's output for years to come. We're ready to support you through every stage of the transition.
Frequently Asked Questions
Do I need to know Python or C++ to teach a cobot to weld?
No, you don't need any computer programming skills like Python or C++. Modern interfaces are designed specifically for tradespeople, using visual blocks and hand-guiding rather than lines of text. This means your best welder can become your best robot operator without ever touching a keyboard. The focus is on the quality of the weld, not the syntax of the code, making the transition to automation much simpler for traditional workshops.
How long does it take to learn the no-code teaching software?
Most operators can pick up the basics of no-code software in just a few hours. While a full day of training is standard to ensure total confidence, the intuitive nature of touchscreens means your team will be running their first beads before lunch. Because the software feels like a smartphone app, the learning curve is minimal compared to the weeks of training required for traditional industrial robots.
Can I teach a cobot to perform complex multi-pass welds?
Yes, you can certainly teach a cobot to handle multi-pass welds on heavy plates. The software allows you to define a root pass and then stack subsequent fill and cap passes using offsets. You can adjust the travel speed and voltage for each individual layer within the same programme. This ensures that even complex, high-strength joints are completed with the same consistency as a simple fillet.
What happens if the part placement isn’t perfect every time?
If your part placement varies, you can use built-in software features like touch sensing to find the joint. The cobot will touch the workpiece in a few spots to calculate the exact position before it starts the arc. This compensates for slight variations in the jig or the part itself. It ensures the weld stays exactly in the joint, even if the fit-up isn't perfect every single time.
Is the teaching software compatible with any welding power source?
Most high-quality teaching software is compatible with the leading welding power sources found in Australian workshops. Whether you use Fronius, Kemppi, Miller, or Lincoln Electric, the software communicates through a digital interface to control wire feed and voltage. This integration means you don't have to change your preferred welding gear to start teaching a cobot to weld; the system simply adapts to your existing setup.
Can I save and reuse taught paths for future jobs?
Yes, every path you create can be saved into a job library for future use. When a repeat order comes in six months later, you simply load the file, set up your jigs, and start production immediately. This makes teaching a cobot to weld highly efficient for small-batch manufacturers who need to switch between different part designs multiple times a week without wasting time on re-programming.
How do I adjust the weld path if I notice a defect during a run?
Adjusting a path is a straightforward process that doesn't require starting from scratch. If you notice a defect, you can pause the run and select the specific waypoint on the touchscreen. You then nudge the point in millimetre increments or physically move the arm to a new position. Once you save the change, the cobot updates the entire path instantly, allowing you to refine the weld quality on the fly.
Is it safe to be near the cobot while I am teaching it a path?
It is safe to be near a cobot during the teaching phase, provided you follow the relevant Australian safety standards. Collaborative robots are equipped with force-limiting sensors that stop the arm instantly if they detect an unexpected contact. When you are in freedrive mode or using the lead-through method, the robot moves only under your direct physical guidance, ensuring you remain in total control of the machine's movement.