
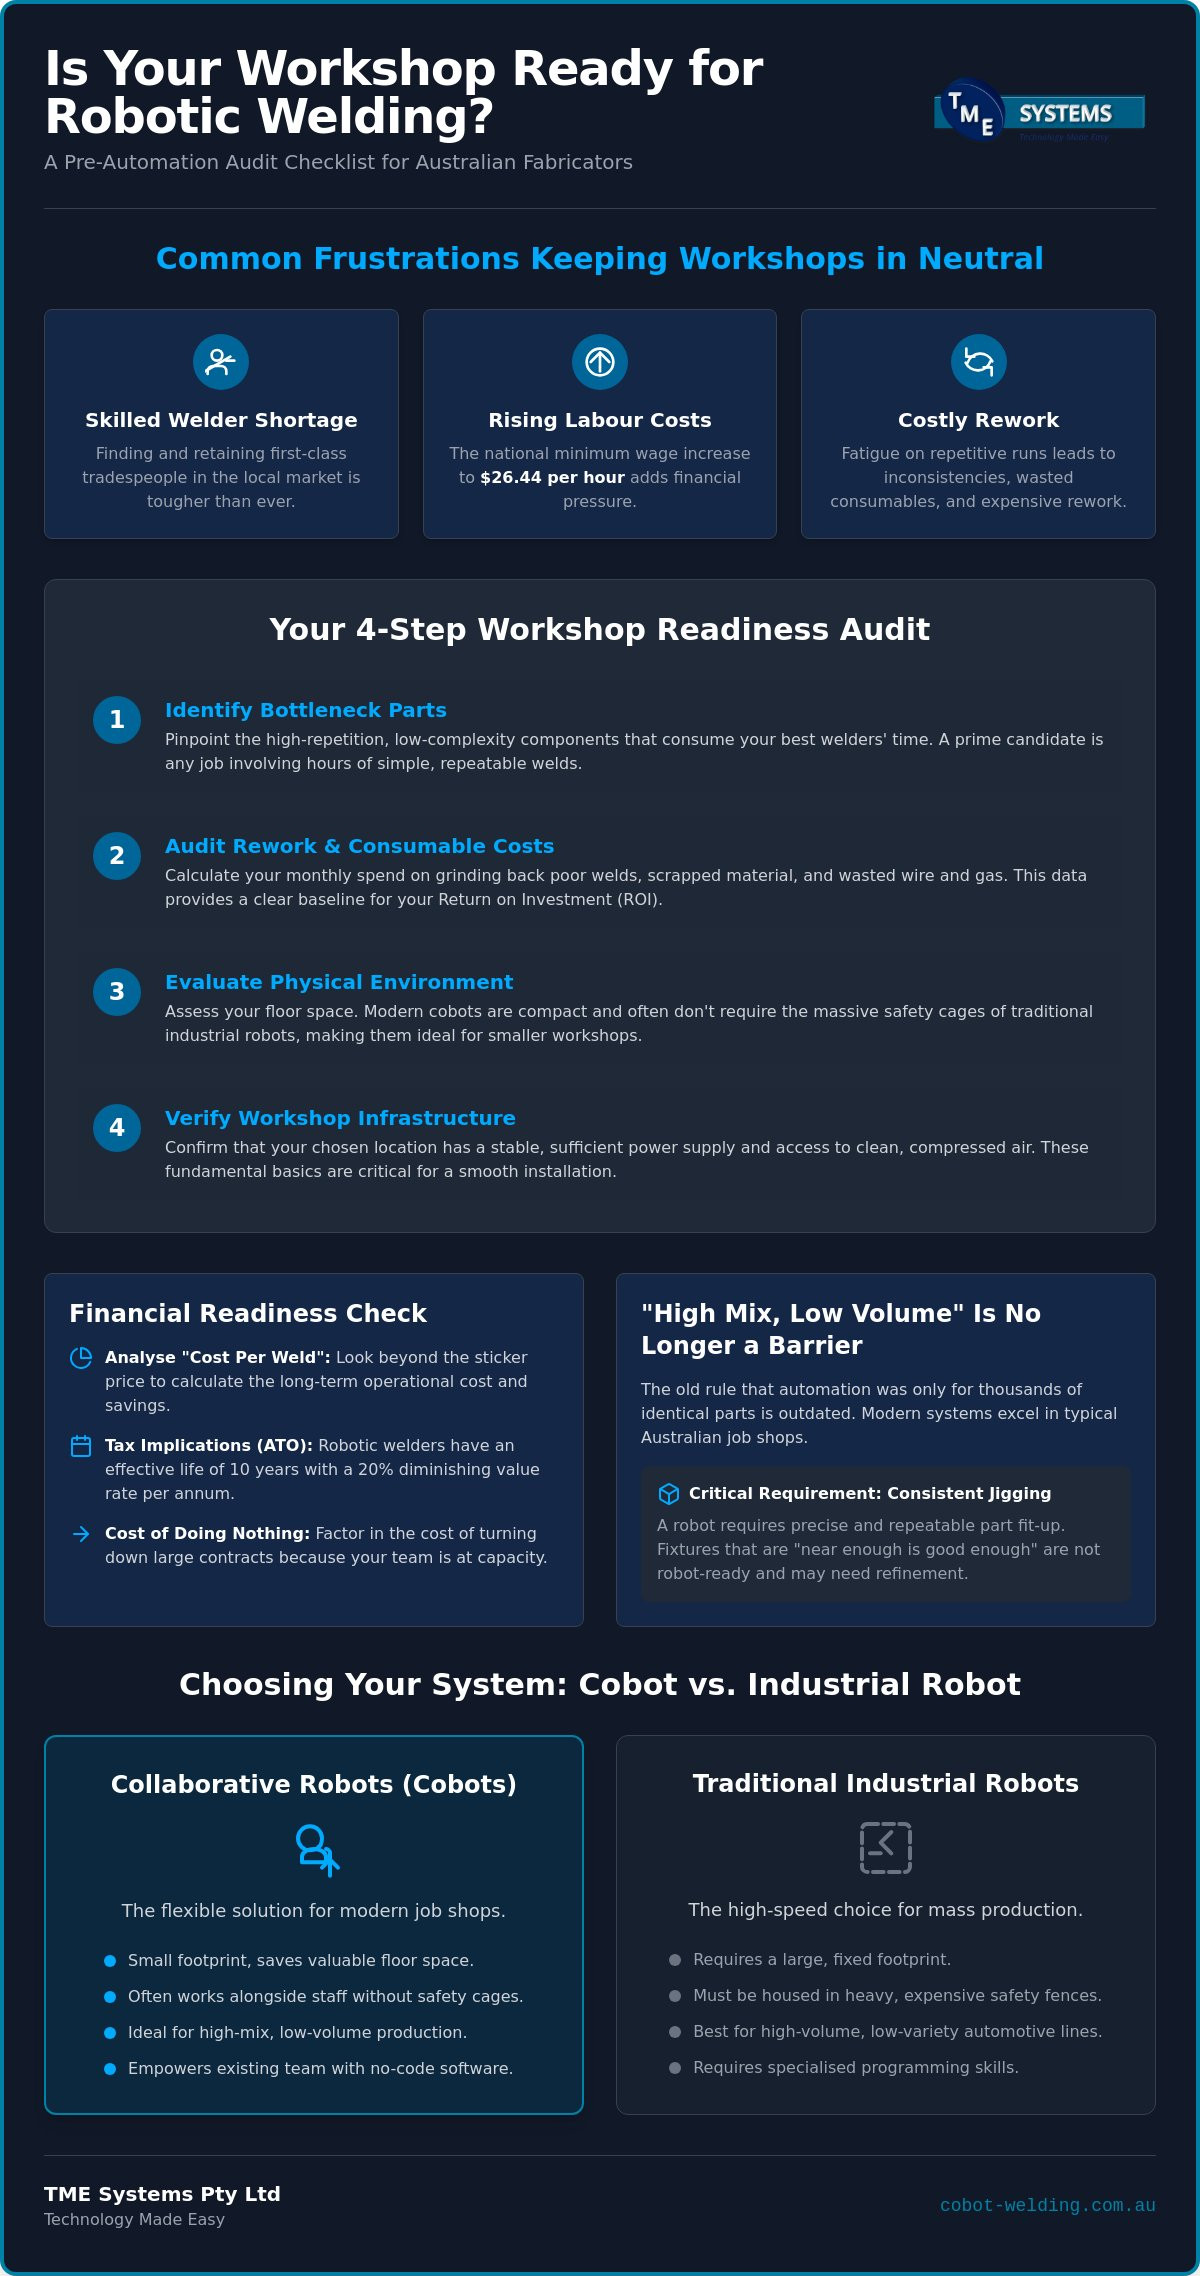
What if the solution to your missing first-class welders isn't found in a recruitment ad, but in a piece of tech your existing team can learn in a single afternoon? It's no secret that finding skilled tradespeople in the local market is tougher than ever, especially with the national minimum wage rising to $26.44 this July. You are likely tired of seeing repetitive jobs lead to costly rework or watching your best blokes get bogged down in mundane tasks when they should be focused on complex custom fabrication. It is a common frustration, and the fear that automation is too complex for small batches often keeps Australian workshops stuck in neutral.
This guide provides a workshop-ready roadmap to help you transition to robotic welding without the technical headaches or the need for a computer science degree. We'll show you how to empower your current staff to run the latest collaborative systems with confidence and precision. We will walk through a practical checklist covering everything from assessing your workshop floor to organising operator training, ensuring your move toward automation improves throughput and delivers consistent weld quality from the very first spark.
Key Takeaways
- Identify the high-repetition jobs that are currently consuming your best tradespeople's time and causing unnecessary rework.
- Learn how no-code software removes the programming hurdle, allowing your team to teach the robot paths manually.
- Follow a practical roadmap to ensure your transition to robotic welding fits seamlessly into your existing workshop layout.
- Discover how to turn your most tech-curious staff into "Automation Champions" by framing the robot as a tool for the welder.
- Understand how to measure success through increased arc-on time and reduced waste of consumables like wire and gas.
Assessing Workshop Readiness: The Pre-Automation Audit Checklist
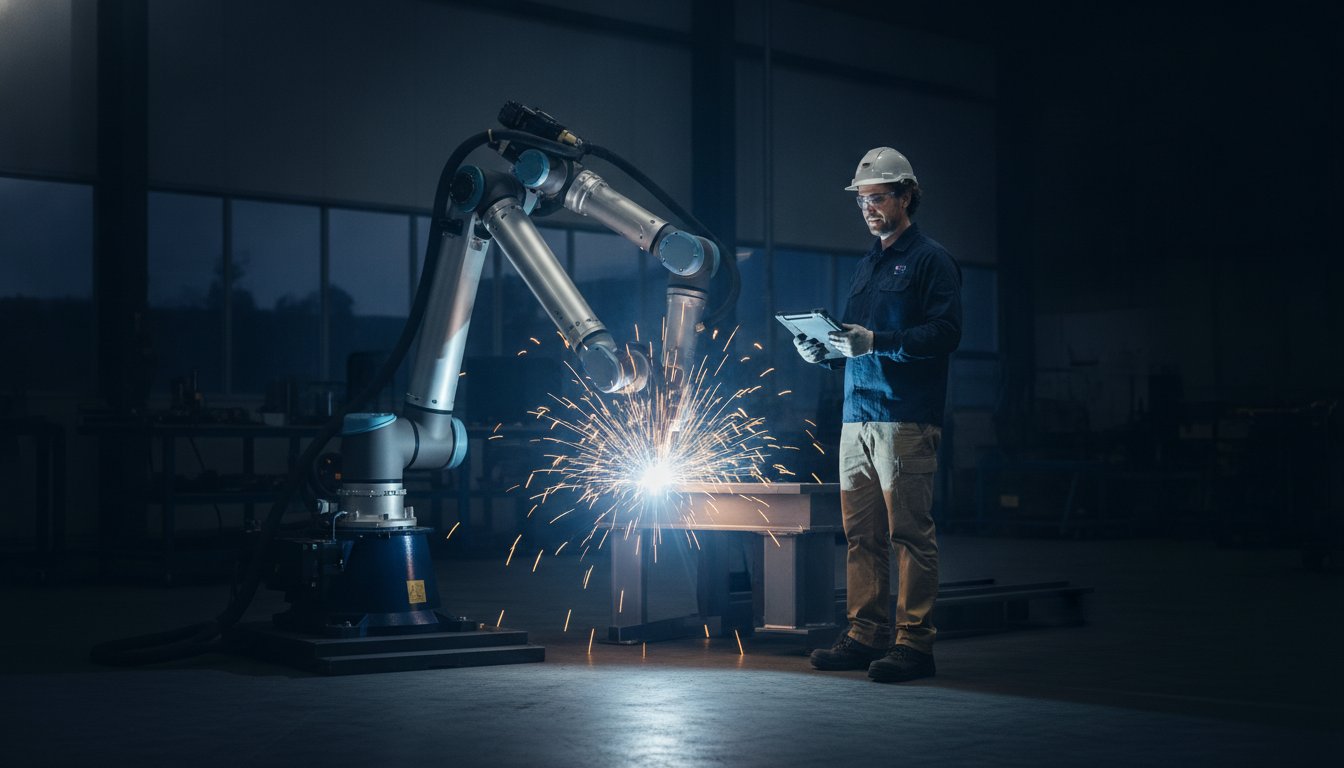
Before you commit to a transition to robotic welding, it's vital to take a cold, hard look at your current shop floor operations. Automation isn't a silver bullet that fixes a messy workflow; it's a tool that amplifies efficiency where the foundations are already solid. Start by identifying the "bottleneck" parts. These are usually high-repetition, low-complexity components that currently consume your best tradespeople's time. If a welder is spending four hours a day on simple fillet welds for a repetitive bracket, that's a prime candidate for a robotic cell.
Next, you should audit your current weld quality and the actual cost of rework. Many Australian fabricators find that manual welding on repetitive runs leads to fatigue, which inevitably causes inconsistencies. Calculate how much you spend each month on grinding back poor welds or scrapping material. This data gives you a baseline for your return on investment. You also need to look at your physical environment. Unlike traditional industrial robots that require massive safety cages and fixed footprints, cobots are often much more compact. For a foundational robotic welding overview, it's helpful to understand how these systems have evolved to fit into smaller, more flexible workspaces. Finally, verify your infrastructure. Does your chosen spot have stable power supply and clean, compressed air? These basics are often overlooked until the day of installation.
Evaluating Volume vs. Variety for Local Job Shops
The old rule was that you only automated for thousands of identical parts. That's no longer the case. In the Australian market, "high mix, low volume" is the reality for most job shops. Modern systems allow you to switch between different parts quickly, provided you've categorised them by weld type, such as MIG or TIG. You should also evaluate your current jigs. A robot requires consistent part fit-up every single time. If your current fixtures are "near enough is good enough," they aren't robot-ready. You may need to refine your jigging to ensure every part sits in the exact same coordinate space.
The Financial Readiness Check
Looking at the sticker price of a system is only the first step. To see the full picture, you must calculate the "cost per weld" over the life of the machine. Professional cobot welding integration helps lower long-term overheads by reducing gas and wire waste while increasing arc-on time. It's also worth looking at the tax implications. The Australian Taxation Office (ATO) has set an effective life of 10 years for robotic welding equipment, with a diminishing value rate of 20% per annum. Don't forget the hidden costs of staying purely manual. If you're turning down large contracts because your team is at capacity with basic work, the "cost of doing nothing" might be the most expensive part of your transition to robotic welding.
Choosing Your System: Cobots, Industrial Robots, and No-Code Software
Selecting the right hardware is the most critical step in your transition to robotic welding. For a long time, the only option was a high-speed industrial robot housed behind a heavy safety fence. While these systems are excellent for high-volume automotive lines, they often lack the flexibility and ease of use required by local fabricators. This is where collaborative robots, or cobots, have changed the game. They occupy a fraction of the floor space and can often work alongside your team without the need for restrictive, expensive safety cages. This makes them a practical choice for workshops where every square metre counts.
When you evaluate your options, you must decide between a turnkey cell and a bespoke integration. Turnkey solutions are pre-engineered and ready to weld almost immediately, which usually offers the fastest path to ROI for a busy shop. However, you must perform a compatibility check to ensure the robot's power source integrates seamlessly with your existing MIG or TIG gear. If you want to see how these systems fit into a real workshop, you can explore collaborative robot welding cells to see the footprint and setup for yourself. The goal is to find a system that adapts to your current workflow rather than forcing you to rebuild your entire shop around a machine.
Why No-Code Software is the "Game Changer"
The biggest barrier to automation used to be the "tech headache" of complex programming. Modern no-code robot welding software has effectively removed this hurdle. Instead of hiring a specialised software engineer, your welder simply moves the robot arm by hand to teach the path. It is a lead-through process that takes minutes. For example, if a batch of steel arrives slightly warped, your operator can adjust the weld path on the fly. This keeps the control in the hands of the person who understands the metal, not someone behind a computer screen.
The Cobot Advantage in Tight Australian Workshops
Most Australian workshops don't have the luxury of spare space. Cobots excel here because they don't require the "iron curtain" of traditional safety guarding. Many units are mounted on mobile bases, letting you wheel the cell between different work centres as your production needs change. Despite this portability, you can still maintain high precision cobot welding that rivals fixed industrial systems. This flexibility is what makes the transition to robotic welding a viable reality for small to medium fabricators who previously thought automation was out of reach.
The Integration Roadmap: Preparing Your Floor for a Robotic Cell
Once you have chosen your system, the focus shifts to the physical reality of your workshop floor. A successful transition to robotic welding requires more than just plugging in a machine; it demands a logical integration roadmap. Start by finalising the cell location based on material flow and power access. You don't want your robot station to become an island that creates bottlenecks. Instead, it should sit naturally between your preparation and finishing areas. Standardising your prep work is the next vital step. While a human welder can compensate for a 2mm gap or a slightly skewed edge, a robot requires consistent part fit-up to deliver its best results. If your upstream cutting and folding aren't precise, the robot's performance will suffer.
Managing Material Flow and Logistics
Organising the "In" and "Out" zones is essential to keep the arc on for as many hours as possible. You should place wire spools and gas bottles where they are easily accessible for maintenance without stopping production. Safety and health are equally important. As of 1 July 2026, the new "Code of Practice: Welding Processes" is legally binding in Australia. This means your new cell must have robust fume management to meet the workplace exposure limit of 1 mg/m³. Integrating local exhaust ventilation or high-vacuum extraction at the torch ensures you stay compliant while protecting your team. Clear logistics prevent the "hurry up and wait" scenario that often kills productivity in newly automated shops.
Jigging and Fixturing for Robotic Success
There is a significant difference between "manual-tight" and "robot-precise" fixturing. In manual fabrication, a few G-clamps and a steady eye might suffice. For a robot, you need modular jigging systems that use toggle clamps and locating pins to ensure every part sits in the exact same coordinate space every single time. This consistency allows you to minimise changeover time between different jobs. If you work with families of similar parts, consider building "universal" jigs with adjustable stops. This approach lets you switch from one part size to another in minutes rather than hours. Proper fixturing is the foundation of consistent weld quality and high throughput.
Before you strike the first arc, conduct a thorough dry run of the weld path. This involves moving the robot through the entire program at a slow speed without the wire feeding. It allows you to check for torch interference or reach issues that might not be obvious on a screen. A dry run is the final safety check that ensures your fixtures, parts, and robot arm all work in harmony. Taking this extra hour to verify the setup prevents costly damage to the torch or the workpiece once full production begins. This methodical approach ensures your transition to robotic welding is smooth and predictable.
The People Strategy: Upskilling Your Team for Collaborative Welding
The most successful workshops understand that a transition to robotic welding is as much about people as it is about hardware. In many Australian lunchrooms, there is an underlying fear that automation means job losses. You should address this "replacement myth" early and honestly. A robot is a tool, much like a CNC plasma cutter or a high-end power source. It is designed to handle the repetitive, back-breaking runs that lead to fatigue and boredom, freeing up your trade-qualified welders to focus on the complex, custom fabrication where their skill is actually required. When your team sees the robot as a "helper" that takes the grunt work off their plate, the culture shifts from resistance to curiosity.
To lead this shift, identify your internal "Automation Champions." These are often your most tech-curious tradespeople who are always looking for a more efficient way to get a job done. By involving them in the integration process from day one, you create a sense of ownership. Training should not focus on computer coding or complex PLC logic. Instead, it should focus on "weld logic"—the volts, travel speeds, and torch angles that your team already knows by heart. Establishing a feedback loop is also essential. Your operators are the ones on the tools every day, and they will often suggest workflow improvements that an engineer might miss. If you are ready to start this journey with your team, you can book a session for operator training and onboarding to get your staff up to speed quickly.
Onboarding for Non-Coders
Modern collaborative systems have replaced the old-fashioned "teach pendant" with intuitive, mobile tablet interfaces. This makes onboarding straightforward for anyone who has used a smartphone. The "lead-through" method is the real breakthrough here. A welder simply puts the robot into a free-drive mode and physically moves the arm to the weld start and end points. You should start with "small wins," such as simple straight-line fillet welds on non-critical parts. This builds immediate confidence and proves to the team that they can control the technology without a degree in computer science.
Safety Standards and Compliance (AS/NZS)
While the tech is more accessible, your transition to robotic welding must still comply with Australian safety standards, specifically AS/NZS 4024.1. Collaborative doesn't mean "no safety rules." You must conduct a thorough risk assessment for your specific application. This includes managing UV light exposure, sparks, and potential crush points between the robot and the jigging. Proper operator training is the most effective safety measure you can implement. It ensures that everyone on the floor understands how to interact with the cell safely, maintaining a productive environment that meets all local regulatory requirements.
Measuring Success: ROI and Productivity Gains for Local Manufacturers
Measuring the success of your transition to robotic welding goes beyond just looking at the initial investment. You need to track the "Arc-On Time" increase to see the real impact on your bottom line. While a manual welder is essential for complex tasks, they naturally require breaks, smoko, and time for setup. A robot maintains a consistent pace throughout the entire shift, even at 3 PM when fatigue usually sets in for the crew. For a single-shift operation, industry data suggests a typical payback period of 18 to 24 months when replacing one full-time manual position. This shift allows you to reallocate your skilled tradespeople to higher-value custom work while the robot handles the repetitive runs.
Precise control also leads to a noticeable reduction in consumables waste. Robots use the exact amount of wire and gas required for each joint, which eliminates the over-welding that often occurs with manual processes. You should also measure the "Quality Dividend." This is the time saved on grinding and rework after the weld is finished. Because the robot delivers a consistent bead every time, the need for post-weld cleanup drops significantly. This reduction in hidden labour costs is often what makes the financial case for adding a second or third cell to your workshop layout. Tracking these metrics turns automation from a technical experiment into a proven business strategy.
The Long-Term Partnership Model
Uptime is everything in a busy workshop. This is why ongoing technical support from an Australian-based team is critical for your long-term success. You should schedule regular firmware updates and preventative maintenance for the robot arm to ensure it continues to perform at peak precision. Scaling your automation becomes much easier once you have a successful first unit in place. That first cell provides the data and the workflow template you need to roll out similar systems across the rest of your shop, creating a standardised approach to every job that comes through the door.
Closing the Productivity Gap
Australian fabricators often struggle to compete with high-volume overseas manufacturers due to higher local labour costs, especially with the national minimum wage reaching $26.44 this year. A successful transition to robotic welding levels the playing field. By reducing your lead times and ensuring every part is identical, you can offer a level of reliability that wins repeat business. Your customers value consistency as much as you do. When they know a batch of 500 components will be perfect every time, they have no reason to look elsewhere for their fabrication needs. Ready to see it in action? Book a mobile welding robot demonstration at your workshop today.
Future-Proofing Your Workshop Floor
Your transition to robotic welding is no longer a matter of "if" but a strategic step toward staying competitive in a demanding market. By auditing your workflow for repetitive tasks and selecting flexible, no-code systems, you can empower your current staff to achieve higher throughput without the technical headache. It's about providing your tradespeople with a tool that handles the mundane work, allowing them to focus on the high-skill fabrication that defines your business.
As no-code software specialists with Australian-owned and operated support, we understand the specific hurdles local fabricators face. We provide mobile demo units for on-site testing, ensuring you can see exactly how the technology performs on your own workshop floor before making a commitment. This hands-on approach removes the uncertainty and builds confidence across your entire team from the very first day.
Ready to see the results for yourself? Request a Free Workshop Audit and Mobile Demo today to begin your journey toward a more efficient, productive future. You've already built a solid foundation of craftsmanship; now it's time to give your workshop the technological edge it deserves.
Frequently Asked Questions
How long does a typical transition to robotic welding take?
A typical transition to robotic welding usually takes between two to four weeks from the moment the cell arrives on your floor. Because modern systems use intuitive software, you don't spend months in setup. The first few days focus on installation and basic training, followed by a week or two of refining your jigs and part programs. By the end of the first month, most shops are running production jobs at full speed.
Do I need to hire a programmer to run a collaborative welding robot?
You don't need to hire a specialised programmer or a computer scientist to run a collaborative system. Modern no-code software allows your existing trade-qualified welders to teach the robot by physically moving the arm. If your team understands weld logic, such as travel speeds and torch angles, they already have the core skills needed. This keeps the control on the workshop floor rather than in an office.
Can a cobot handle both MIG and TIG welding processes?
Yes, collaborative robots are highly versatile and can handle both MIG and TIG processes. The robot itself acts as the arm, while the power source and torch are selected based on your specific application. While MIG is common for high-speed production, high-spec TIG systems are used for precision work on stainless steel or aluminium. You just need to ensure your system integration supports the specific process you require.
Is my workshop too small for a robotic welding cell?
Most small to medium Australian workshops have plenty of space for a collaborative cell. Unlike traditional industrial robots that require large safety enclosures, cobots have a compact footprint, often taking up no more room than a standard manual welding bench. Because they are designed to work safely alongside people, you can often tuck them into existing production lines without a major floor plan overhaul.
What happens if my parts have slightly different fit-ups every time?
Robots thrive on consistency, so if your fit-ups vary wildly, you will likely see quality issues. However, no-code software allows operators to make quick, on the fly adjustments for minor variations. To get the best results, you should focus on standardising your upstream cutting and folding. Using modular jigging with precise locating pins ensures every part sits in the same spot, which is the foundation of robotic success.
How much training does my existing staff need to operate the robot?
Your existing staff can usually learn the basics of operating and teaching the robot in just two to three days. The training focuses on using the tablet interface and the lead-through teaching method. Since your team already understands welding parameters, they aren't learning a new trade; they are just learning how to apply their expertise to a new tool. Confidence grows quickly after the first few successful runs.
What are the specific Australian safety standards for welding cobots?
Collaborative systems must comply with the AS/NZS 4024.1 series for machinery safety. You also need to adhere to the new Code of Practice: Welding Processes, which became legally binding in July 2026. This includes managing hazards like UV radiation, sparks, and fume exposure limits of 1 mg/m³. Even though cobots are designed to be safer, a thorough risk assessment for your specific application is a legal and practical requirement.
Can I move the robot between different stations or is it fixed in place?
You can absolutely move the robot if you opt for a system mounted on a mobile base. This is a major advantage for job shops that need to shift the transition to robotic welding between different work centres. Instead of a fixed asset that sits idle, a mobile cell can be wheeled to where the work is. You simply need to ensure the new location has the required power and compressed air connections.
