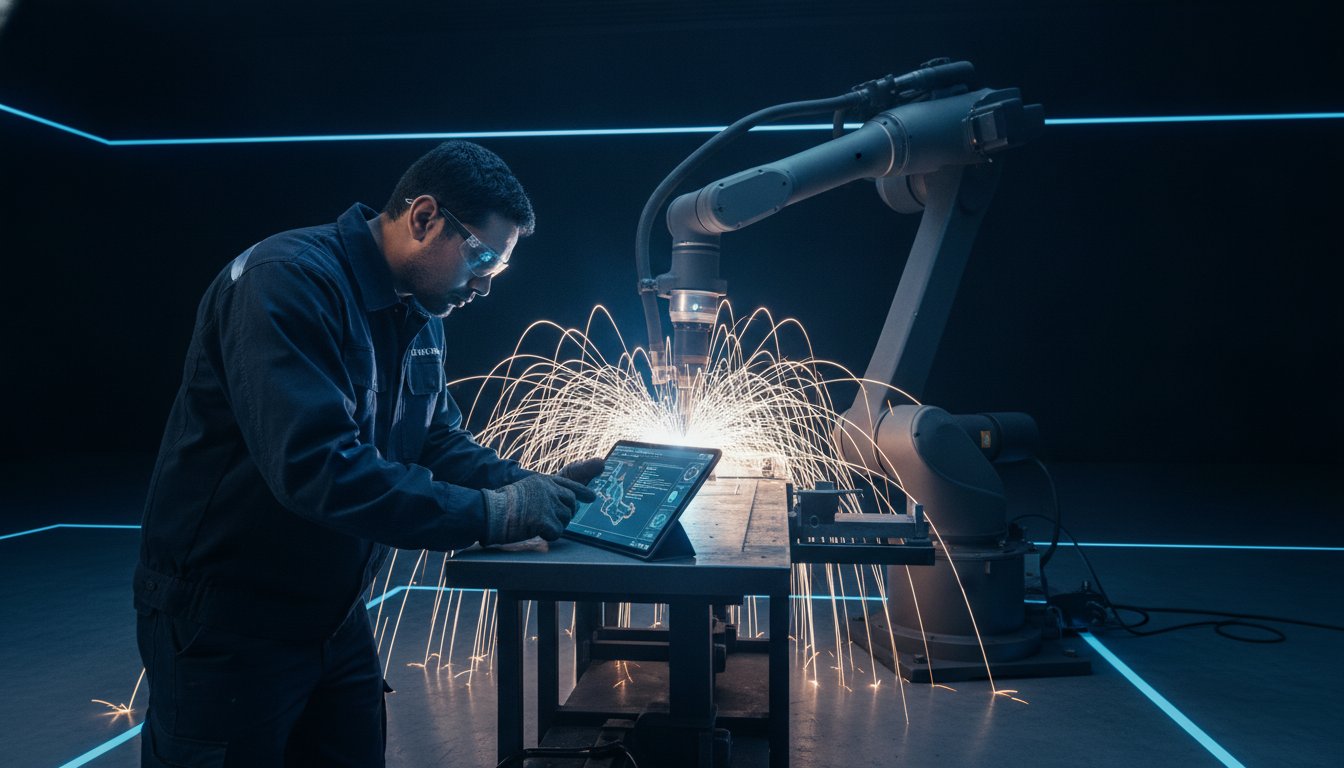
Recently, a production lead in an Australian workshop discovered that even a perfectly programmed sequence couldn't prevent a sudden surge in porosity, bringing an entire afternoon shift to a halt. It is a frustrating reality for many Australian manufacturers where the promise of automation can sometimes feel overshadowed by unexplained downtime or inconsistent weld quality. We understand that when production stalls, it isn't just about the machine; it's about the missed deadlines and the mounting pile of scrap that eats into your margins.
This robotic welding troubleshooting guide is designed to take the drama out of these moments. We provide a practical, hands-on framework to help you diagnose and fix faults quickly, ensuring your production line keeps moving. You don't need to be a software engineer to get back on track. We will walk through a clear checklist to identify root causes, help you distinguish between hardware glitches and software hiccups, and give you the confidence to manage your cobot independently. By the end of this guide, you will have the tools to reduce rework and maintain the high standards your customers expect.
Key Takeaways
- Learn to distinguish between systematic programming errors and random hardware faults to stop chasing ghosts in your production line.
- This robotic welding troubleshooting guide provides a 5-step diagnostic process to isolate variables and identify root causes like silica buildup or poor grounding.
- Master the common triggers for 'Protective Stops' and learn how no-code software simplifies path-teaching for your workshop team.
- Discover why professional integration and on-site training can eliminate up to 70% of common operational faults before they even occur.
The Robotic Paradox: Why Automated Welding Systems Fail
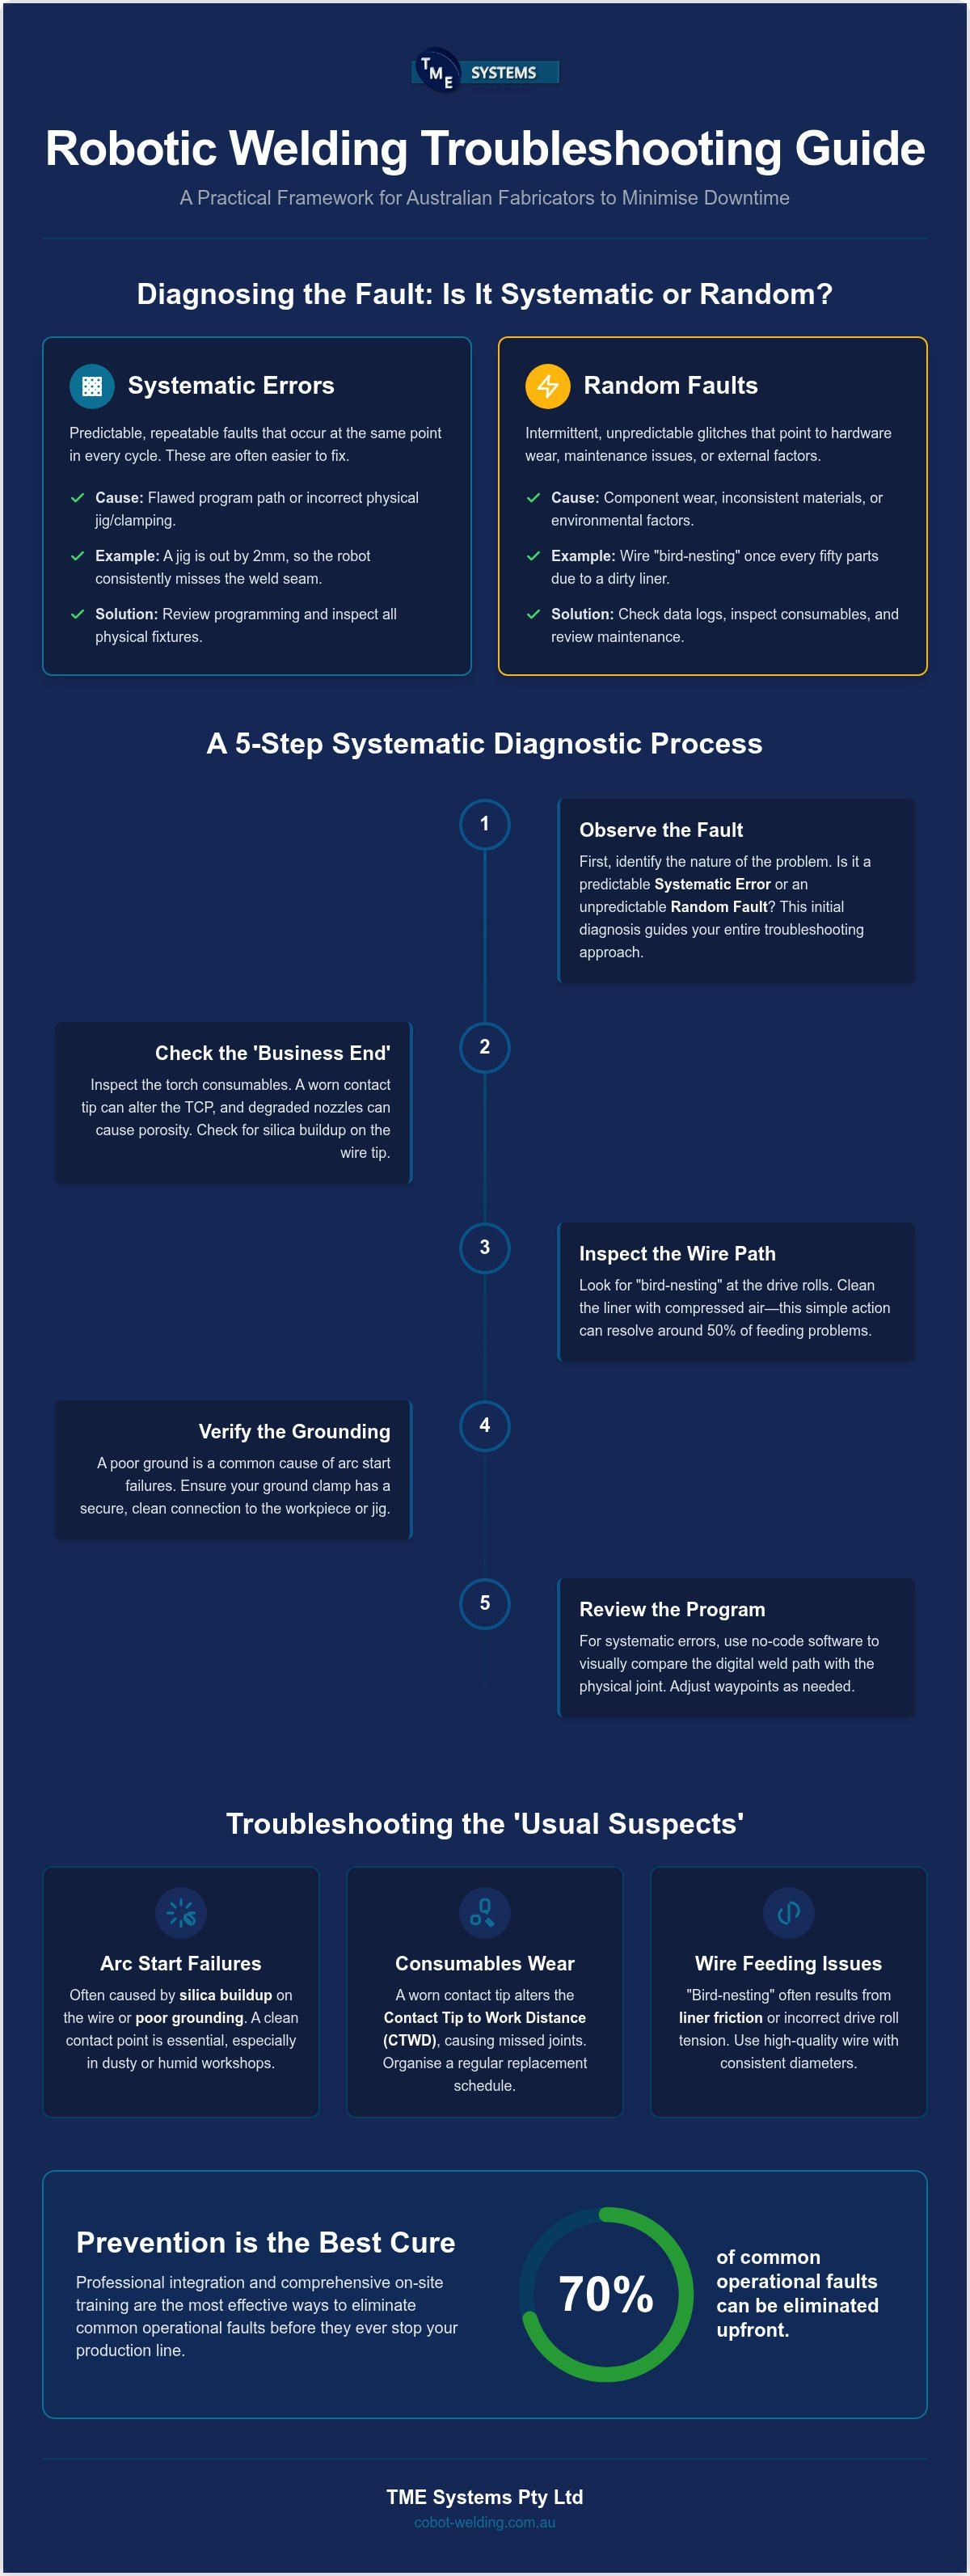
The greatest strength of a robot is its ability to repeat a task with absolute precision. However, this becomes a liability when the initial setup is flawed. If a jig is out by two millimetres, the robot will miss that weld every single time with "perfect" consistency. This Robotic welding overview highlights how automation has transformed the modern workshop, but it also introduces a new kind of failure: the consistent defect. Most issues aren't actually robot failures. They are often "unseen" variables like subtle material deviations or inconsistent gas flow that the robot simply isn't programmed to feel. Understanding this paradox is the first step in any effective robotic welding troubleshooting guide.
Systematic vs. Random Defects
A systematic error is easier to fix because it is predictable. If the weld fails at exactly the same point in every cycle, the issue is likely in the program path or the physical clamping. Random failures are trickier. These intermittent glitches, like wire bird-nesting once every fifty parts, usually point to hardware wear or external factors. Your cobot’s data logs are vital here. They help you spot trends, such as a specific axis drawing more current, before a component actually fails. The human operator remains the most important diagnostic tool. They can "sanity-check" the output and notice if the arc sound has changed or if the spatter pattern looks different than usual.
The 'No-Code' Advantage in Diagnostics
Traditional industrial robots often require a specialist to decipher lines of complex code just to find a path error. With no-code teaching software, troubleshooting becomes a visual task. You can move the robot arm to a specific point and see exactly where the digital path deviates from the physical joint. This intuitive approach means you don't need to be a computer programmer to read an error message or adjust a waypoint. It allows a skilled welder to apply their trade knowledge directly to the machine. When you can see the misalignment on a screen, fixing it is a matter of seconds rather than hours of downtime. This transition from code-heavy debugging to hands-on adjustment keeps your production line moving without the drama. Using a robotic welding troubleshooting guide becomes much simpler when the software speaks the language of the shop floor.
Arc and Wire Feeding: Troubleshooting the 'Usual Suspects'
When a cobot stops mid-weld, the culprit is rarely a complex software glitch. Most often, the issue lies at the "business end" of the torch. Arc start failures are a common headache for fabricators. These are frequently caused by silica buildup on the wire tip or poor grounding at the workpiece. In a typical Australian workshop, dust and humidity can exacerbate these electrical path issues, making a clean contact point essential. Ensuring your ground clamp is secure and the wire is free from contaminants is the first step in any effective robotic welding troubleshooting guide.
Consumables and Contact Tip Wear
The Contact Tip to Work Distance (CTWD) is a critical variable for a robot. Unlike a manual welder who can adjust their hand position on the fly, a robot relies on a fixed distance to maintain arc stability. If your contact tip is worn, the wire may "wander" within the tip. This shifts your Tool Centre Point (TCP) and causes the bead to miss the joint entirely. Our harsh local conditions, particularly high ambient heat, can degrade diffusers and nozzles faster than expected. You should organise a regular replacement schedule to avoid mid-shift failures. Signs of a worn nozzle include an unstable gas envelope or increased spatter, which eventually leads to porosity in your welds.
Wire Delivery System Maintenance
Wire feeding issues often manifest as "bird-nesting" at the drive rolls. This mess usually happens when there is too much friction in the liner or the drive roll tension is set incorrectly. A simple fix is to clean your liner with compressed air; this often resolves about 50% of feeding problems. High-quality wire is also non-negotiable for automation. Cheap wire frequently has inconsistent diameters or coatings that clog liners and drive rolls quickly. Insights from a welding robotics training facility suggest that many perceived "robot errors" are actually basic maintenance oversights. If you're seeing persistent feeding issues, it might be time to review your tension settings. You can find more resources on optimising your cell setup at cobot-welding.com.au.
Maintaining your wire delivery system is about more than just avoiding stops. It's about ensuring the robot can do its job without the operator having to intervene every ten minutes. A well-maintained system, supported by a clear robotic welding troubleshooting guide, keeps your production line moving and your scrap bin empty.
Cobot-Specific Issues: Sensors, Stops, and Software
While traditional industrial robots are often isolated behind cages, collaborative robots (cobots) operate in the thick of the workshop floor. This proximity is a massive advantage for flexibility, but it introduces a unique set of challenges. The most common "fault" a new operator encounters isn't a mechanical failure, but a Protective Stop. This occurs when the cobot's internal safety system detects an unexpected force and halts movement to prevent injury or damage. Before you assume the hardware is broken, check for physical obstructions or path teaching errors. Understanding these nuances is a core part of any modern robotic welding troubleshooting guide.
Navigating the No-Code Interface
One of the biggest benefits of modern systems is the use of no-code robot welding software. It allows welders to teach paths by physically moving the arm rather than typing lines of logic. However, common mistakes still happen, such as teaching a waypoint too close to a heavy fixture. If the cobot "stutters" during a move, it's often because the software is trying to reconcile a physical path that violates its internal joint limits. You can usually adjust weld parameters like voltage and wire feed speed on the fly through the tablet interface. This immediate feedback loop is essential for refining the process without stopping the entire run. Only update your firmware when you have a clear window of downtime, as these updates can occasionally reset custom sensitivity thresholds.
Collaborative Safety Sensors
Have you ever seen your cobot stop in "open air" with no visible obstacle? These ghost collisions are a common frustration in heavy-duty fabrication. They often happen because the sensitivity settings are too high for the weight of the welding torch or because a stiff power cable is fighting against the robot's movement. Citing industry troubleshooting and best practices can help you find the right balance between safety and production uptime. You may need to recalibrate the payload settings if you change torch components or add a wire feeder to the robot arm.
If a minor collision does occur, don't panic. You don't need to restart the entire job from scratch. Most systems allow for a quick recalibration of the Tool Centre Point (TCP) and a reset of the safety state. This keeps your job setup intact and ensures you're back under the hood in minutes. This level of independence is exactly why this robotic welding troubleshooting guide focuses on empowering the operator rather than relying on external technicians. By mastering these sensor-driven quirks, you turn a potential production drama into a simple two-minute adjustment.
A 5-Step Systematic Diagnostic Process for Fabricators
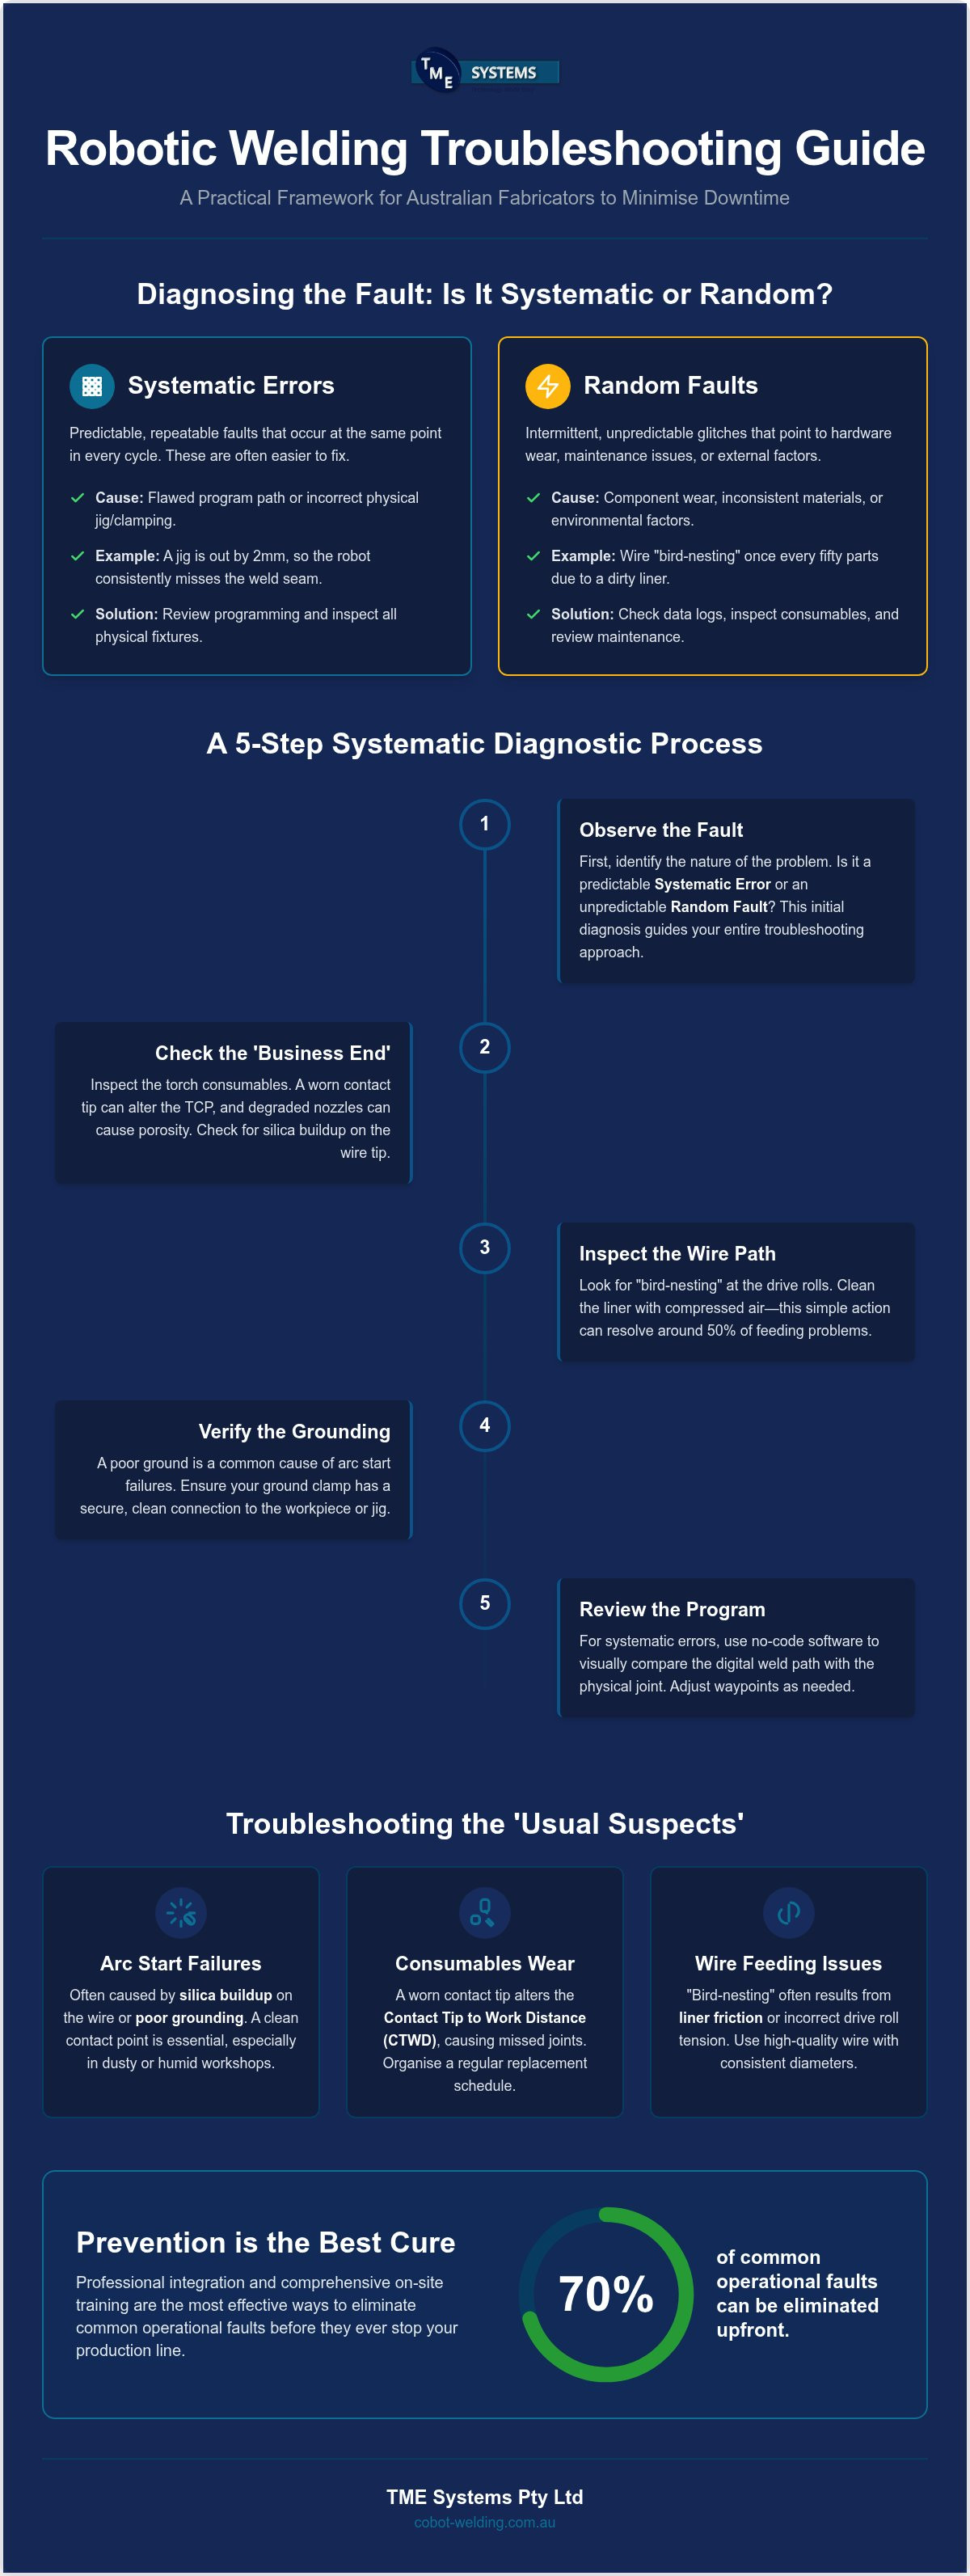
When a cell stops performing, the temptation is to change three things at once. Don't do it. Follow this systematic robotic welding troubleshooting guide to find the root cause without creating new problems. By approaching the issue methodically, you ensure that a simple fix doesn't turn into an afternoon of lost production and mounting frustration.
Step 1 & 2: The Quick Wins
The 'Rule of One' is your best friend on the workshop floor. Only change one factor at a time during your tests. If you swap the contact tip and adjust the gas flow simultaneously, you will never know which one was the culprit. Start with a visual inspection of the arc. The colour and sound of the spark tell a story. A sharp, crackling sound usually indicates good penetration, while a wandering arc often points to a worn contact tip or poor grounding. Always check your gas flow at the nozzle with a manual flow meter. A regulator might show a perfect 18 litres per minute, but a pinched lead or a loose fitting can starve the weld pool of protection, leading to instant porosity.
Step 3, 4 & 5: Deep Dive Diagnostics
If the consumables are fine, it is time to verify the path. Run a 'Dry Run' with the wire feeder off. This allows you to watch the torch move along the joint without wasting wire or creating scrap. It is the fastest way to see if a jig has been bumped or if part tolerances have shifted. Next, perform a software audit in your no-code app. Review your path points and weld parameters to ensure no one has accidentally nudged a waypoint on the tablet interface. Finally, look at the environment. During an Australian summer, ambient temperatures in the shed can exceed 40 degrees, which can lead to controller overheating. Check that your cooling fans are clear of dust. In rural industrial zones, be aware of power grid fluctuations that can cause the controller to trip or behave erratically. If you want to ensure your team is prepared for these variables, you can optimise your welding cell for maximum uptime with our integration support.
Preventing Future Downtime: Integration and Training
The most effective way to manage production drama is to stop it from occurring in the first place. While the diagnostic steps provided in this robotic welding troubleshooting guide are essential for daily operations, long term success depends on the quality of your initial setup. Professional cobot welding integration can reduce up to 70% of common operational faults. By ensuring the power supply, gas delivery, and robot pathing are harmonised from day one, you eliminate the "ghost" errors that often plague DIY installations. A well integrated cell acts as a reliable partner rather than a source of constant adjustment.
Building Operator Confidence
Staff empowerment is the secret to a smooth production line. Comprehensive on-site cobot welder training turns your skilled welders into automation experts who can "read" the machine's behaviour. We recommend creating a physical troubleshooting log for your workshop. When an operator solves a specific pathing error or wire feeding glitch, recording the solution ensures that the whole team learns from the event. This builds a proactive maintenance culture where small issues are caught before they cause a shift stopping failure. When your team feels confident managing collaborative robot welding cells, the transition to automation feels like a natural evolution of their craftsmanship.
The TME Systems Pty Ltd Support Model
Maintaining a strict preventative maintenance schedule is the final piece of the puzzle. This includes daily checks of contact tips and monthly inspections of torch liners and cable tension. Even with the best preparation, you might encounter a complex fault that sits outside the scope of a standard robotic welding troubleshooting guide. Knowing when to call in the experts saves you from wasting valuable hours on a deep software glitch or a rare hardware failure. TME Systems Pty Ltd provides dedicated remote and on-site assistance to ensure Australian fabricators stay moving.
If you are still exploring how automation fits into your workflow, a mobile welding robot demonstration allows you to test your specific parts on your own shop floor. We are committed to being your long term partner in productivity. Whether you need a quick diagnostic over the phone or hands-on support for a new project, we've got your back. Contact TME Systems Pty Ltd for expert support and let's keep your production line moving without the drama.
Master Your Automation for Long-Term Success
We have explored how a methodical approach can turn a production-stopping fault into a minor adjustment. By understanding the 'Robotic Paradox' and following the 5-step diagnostic process, you can isolate variables like contact tip wear or path obstructions before they ruin a batch. This robotic welding troubleshooting guide is your first line of defence against unexplained downtime, but the real power lies in empowering your team through knowledge and the right tools.
TME Systems Pty Ltd is here to ensure your transition to automation remains seamless. With our expert Australian-based technical support and no-code software that simplifies troubleshooting, you are never left to figure it out alone. We provide the hands-on training your local team needs to manage collaborative cells independently. Get your workshop back on track with TME Systems Pty Ltd expert support and keep your production line moving with confidence. Automation is a tool to enhance your craftsmanship, not a hurdle to overcome. You have the skills; we have the support to help you scale.
Frequently Asked Questions
Why is my welding robot stopping mid-path for no apparent reason?
A sudden halt is most likely a 'Protective Stop' triggered by the cobot’s internal safety sensors. This happens when the robot detects an unexpected force, such as a stiff power cable fighting the arm or a minor path obstruction. You should check your sensitivity settings and ensure the cable management system allows for a full range of motion without pulling against the joints.
How often should I change the contact tips on my robotic welder?
You should typically replace contact tips every 4 to 8 hours of arc-on time, depending on your wire type and amperage. While a manual welder can adjust their hand to compensate for a worn tip, a robot cannot. Even slight 'key-holing' in the tip causes wire wander, which leads to off-centre beads and inconsistent weld quality in automated cells.
What causes porosity in automated MIG welding but not in manual welding?
Porosity in automated welding often stems from gas shielding issues that a manual operator would normally compensate for by changing their torch angle. Check for leaks in the torch lead, loose fittings at the machine, or even strong drafts in the shed. Because the robot follows a fixed path, any disruption to the gas envelope will result in immediate weld defects.
My robot’s welds are off-centre; how do I recalibrate the Tool Centre Point (TCP)?
You can recalibrate your Tool Centre Point (TCP) by using the built-in calibration routine in your teaching software. This usually involves touching the wire tip against a known fixed point from four or more different angles. This process tells the robot exactly where the wire tip is in 3D space, which is essential after a tip change or a minor bump.
Can no-code software really help me fix welding errors faster?
No-code software simplifies diagnostics by replacing complex lines of logic with a visual, touch-based interface. This robotic welding troubleshooting guide emphasises that a welder can adjust weld parameters or path waypoints on a tablet in real-time. You don't need to be a computer programmer to fix a path error, which significantly reduces the time spent on troubleshooting and keeps production moving.
What should I do if my cobot has a minor collision with a jig?
If a minor collision occurs, first clear the obstruction and reset the safety state on your control pendant. Most modern cobots allow you to resume the program from the last known good waypoint after a quick safety check. You should also verify your TCP to ensure the torch hasn't shifted in the bracket before restarting the production run.
How do I prevent 'bird-nesting' in the wire feeder of my robot?
Preventing bird-nesting requires a combination of correct drive roll tension and regular liner maintenance. Ensure you are using the right drive roll profile for your wire type and that the tension is not so high that it deforms the wire. Cleaning the liner with compressed air every time you change a spool can resolve many common feeding issues before they start.
Does the Australian climate affect robotic welding performance?
The Australian climate can introduce variables like high ambient heat and humidity that lead to controller overheating or inconsistent arc starts. In rural industrial zones, power grid fluctuations are also a known issue that can trip sensitive electronics. We recommend ensuring your cell has adequate ventilation and using a power conditioner if you're operating in areas with unstable electricity supply.