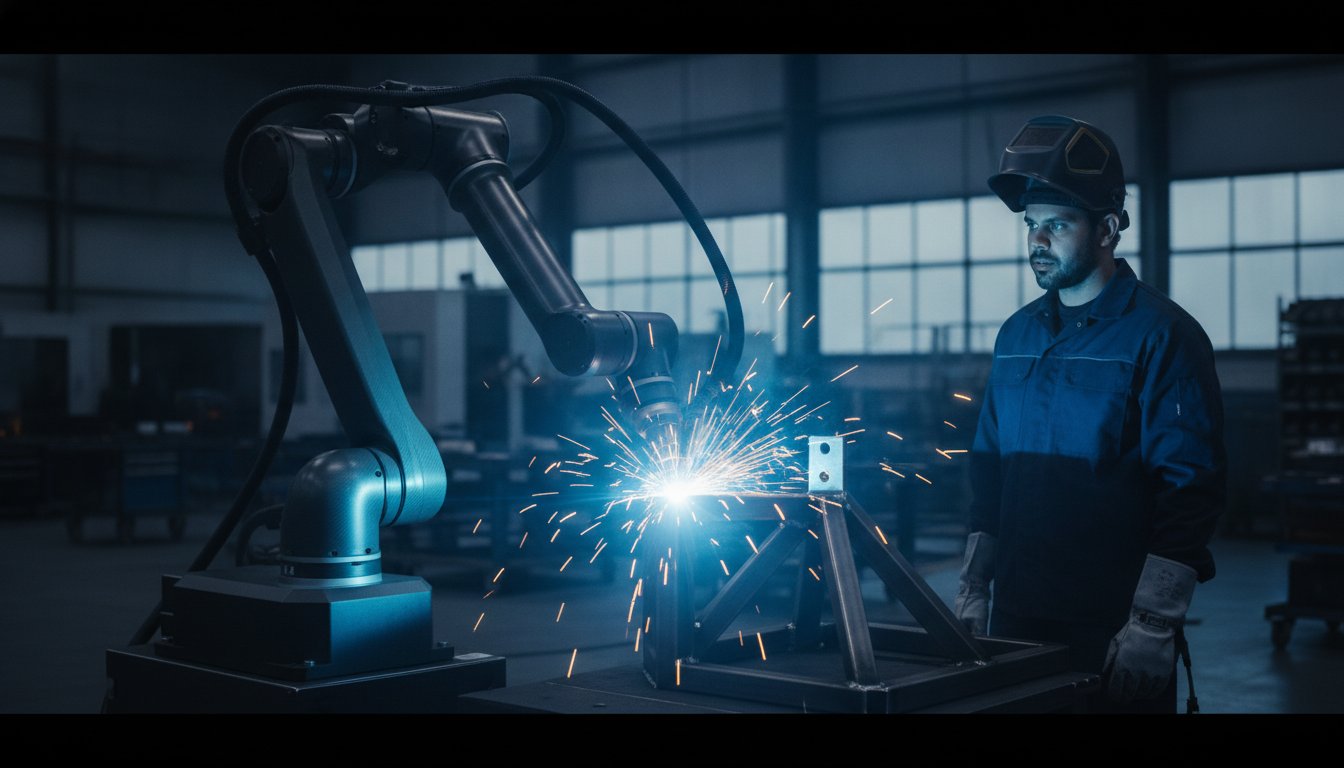
With the Australian industrial robotics market projected to reach over USD $1.8 billion by 2034, more local fabricators are looking to automation to bridge the gap left by a chronic shortage of skilled welders. You've likely felt the pressure of a growing backlog and wondered if a mobile welding robot demonstration could finally provide a practical solution without the massive upfront risk of traditional systems. It's common to worry that "no-code" software might still be too complex for your team or that the investment won't pay off on your specific workshop floor.
This guide explains how an on-site proof of concept works so you can see a cobot weld your own aluminium or steel parts before making a decision. We'll explore how to measure real-world ROI and why these systems are designed to empower your existing staff rather than replace them. By the end, you'll have a clear roadmap for testing automation in your own environment to ensure it delivers the results your business needs.
Key Takeaways
- Understand why a live trial on your own workshop floor is the most effective way to de-risk your investment in automation.
- Learn how to book a mobile welding robot demonstration that brings the latest no-code technology directly to your site, even in regional areas.
- Discover the specific metrics, such as cycle and setup times, you should track during the trial to calculate a realistic ROI for your workshop.
- Get a practical checklist for preparing your workspace, including power requirements and floor space, to ensure a smooth on-site proof of concept.
- Find out how your current team can operate the system using no-code teaching software, proving you don't need a robotics expert on the payroll.
Why an On-Site Mobile Welding Robot Demonstration is Vital for Australian Fabricators
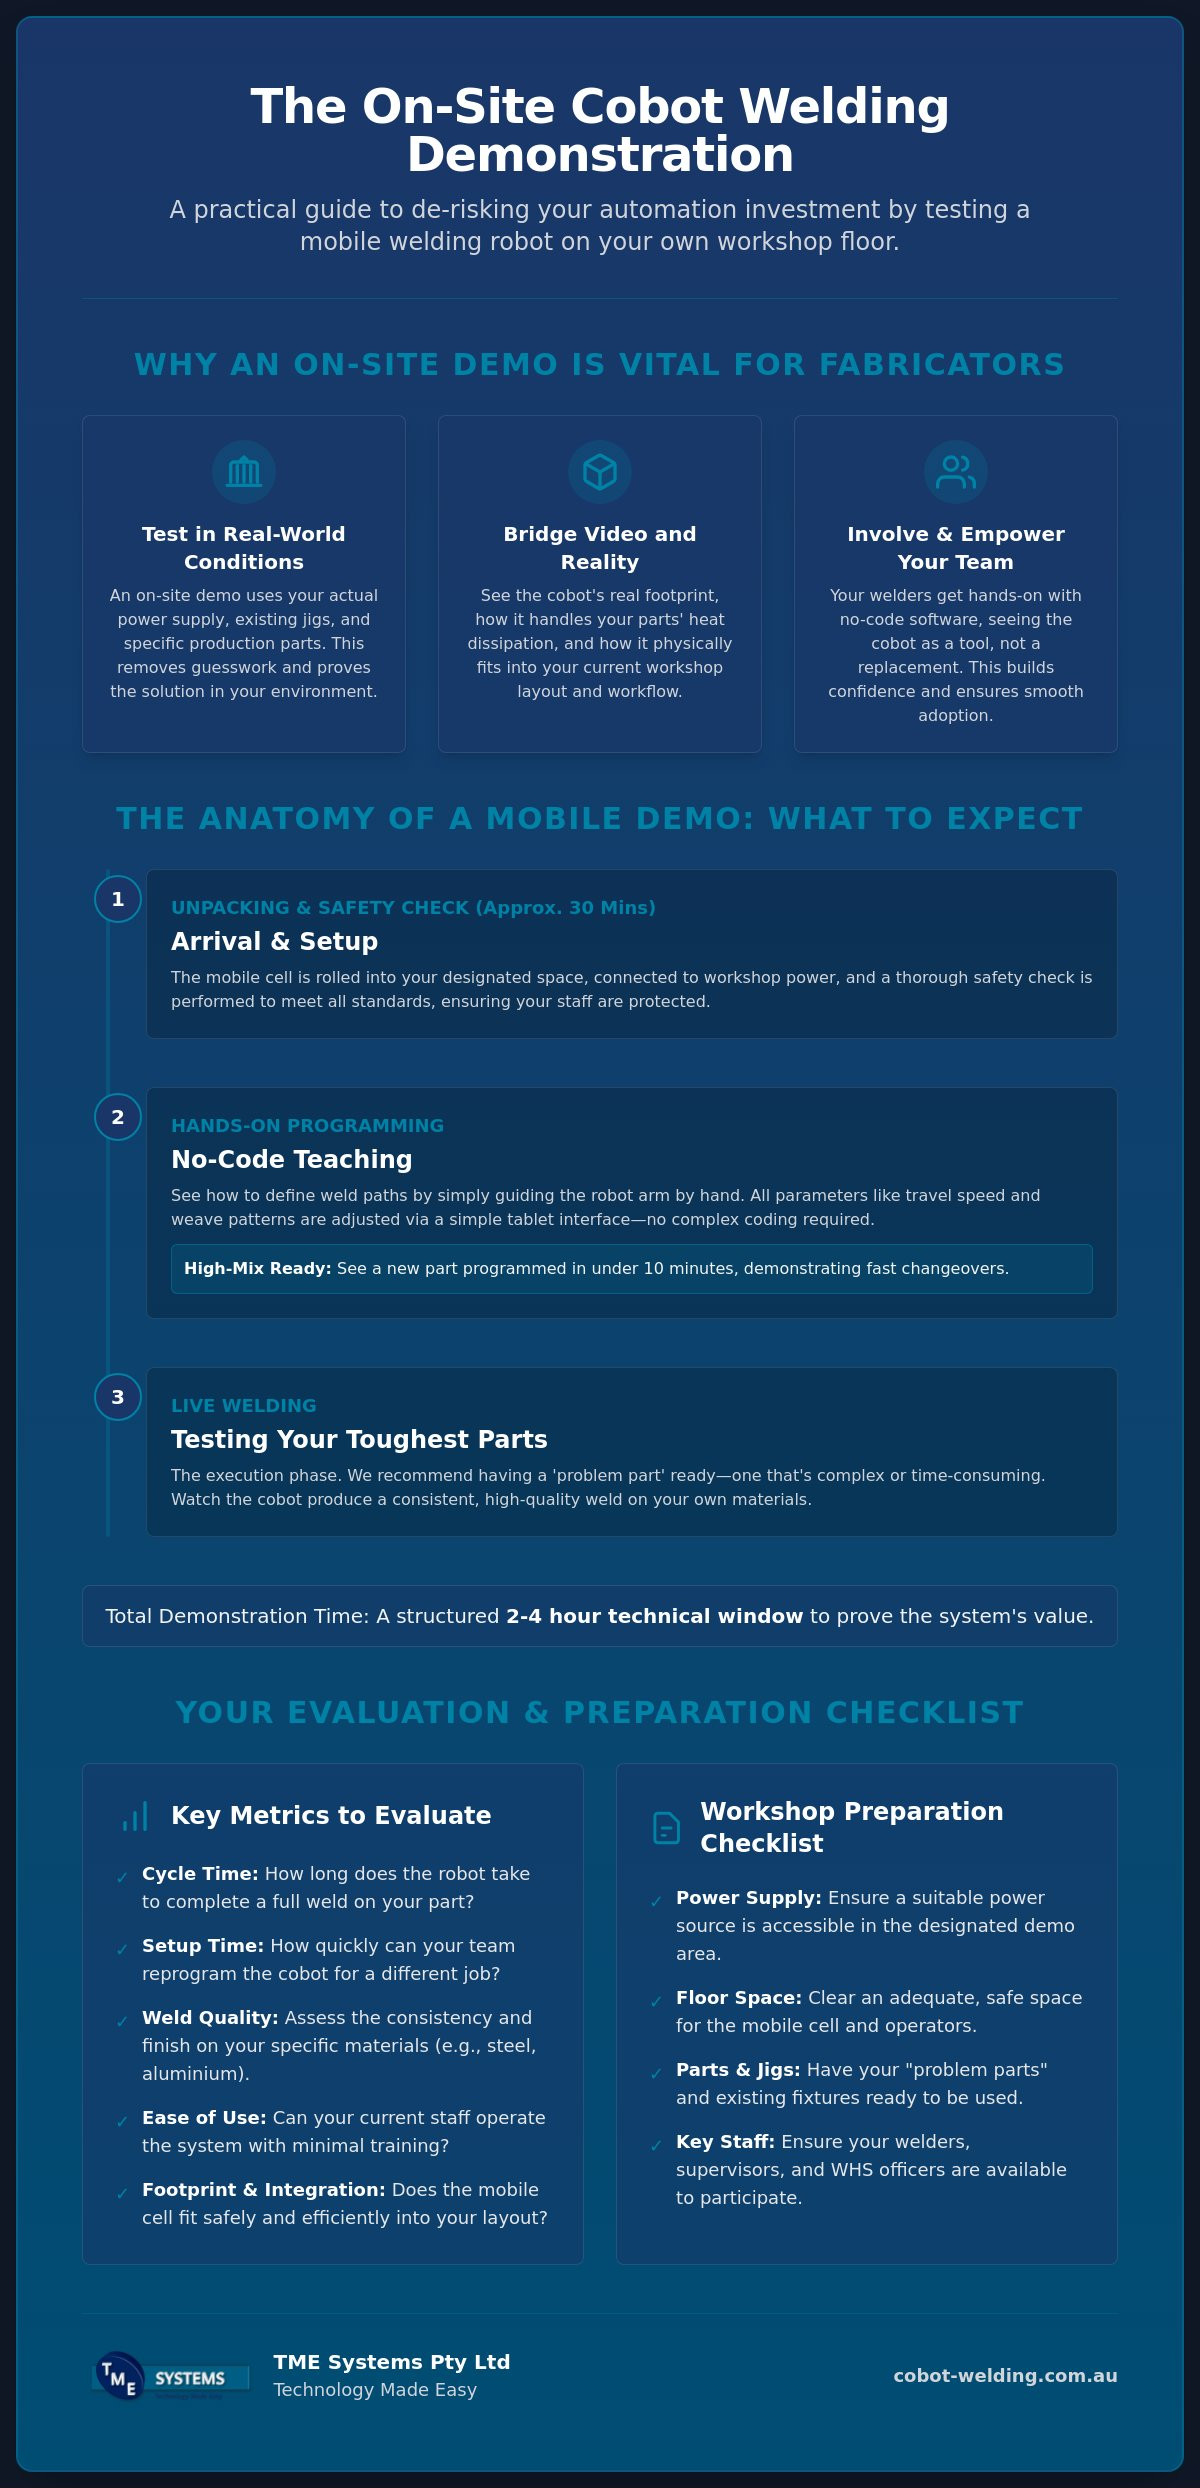
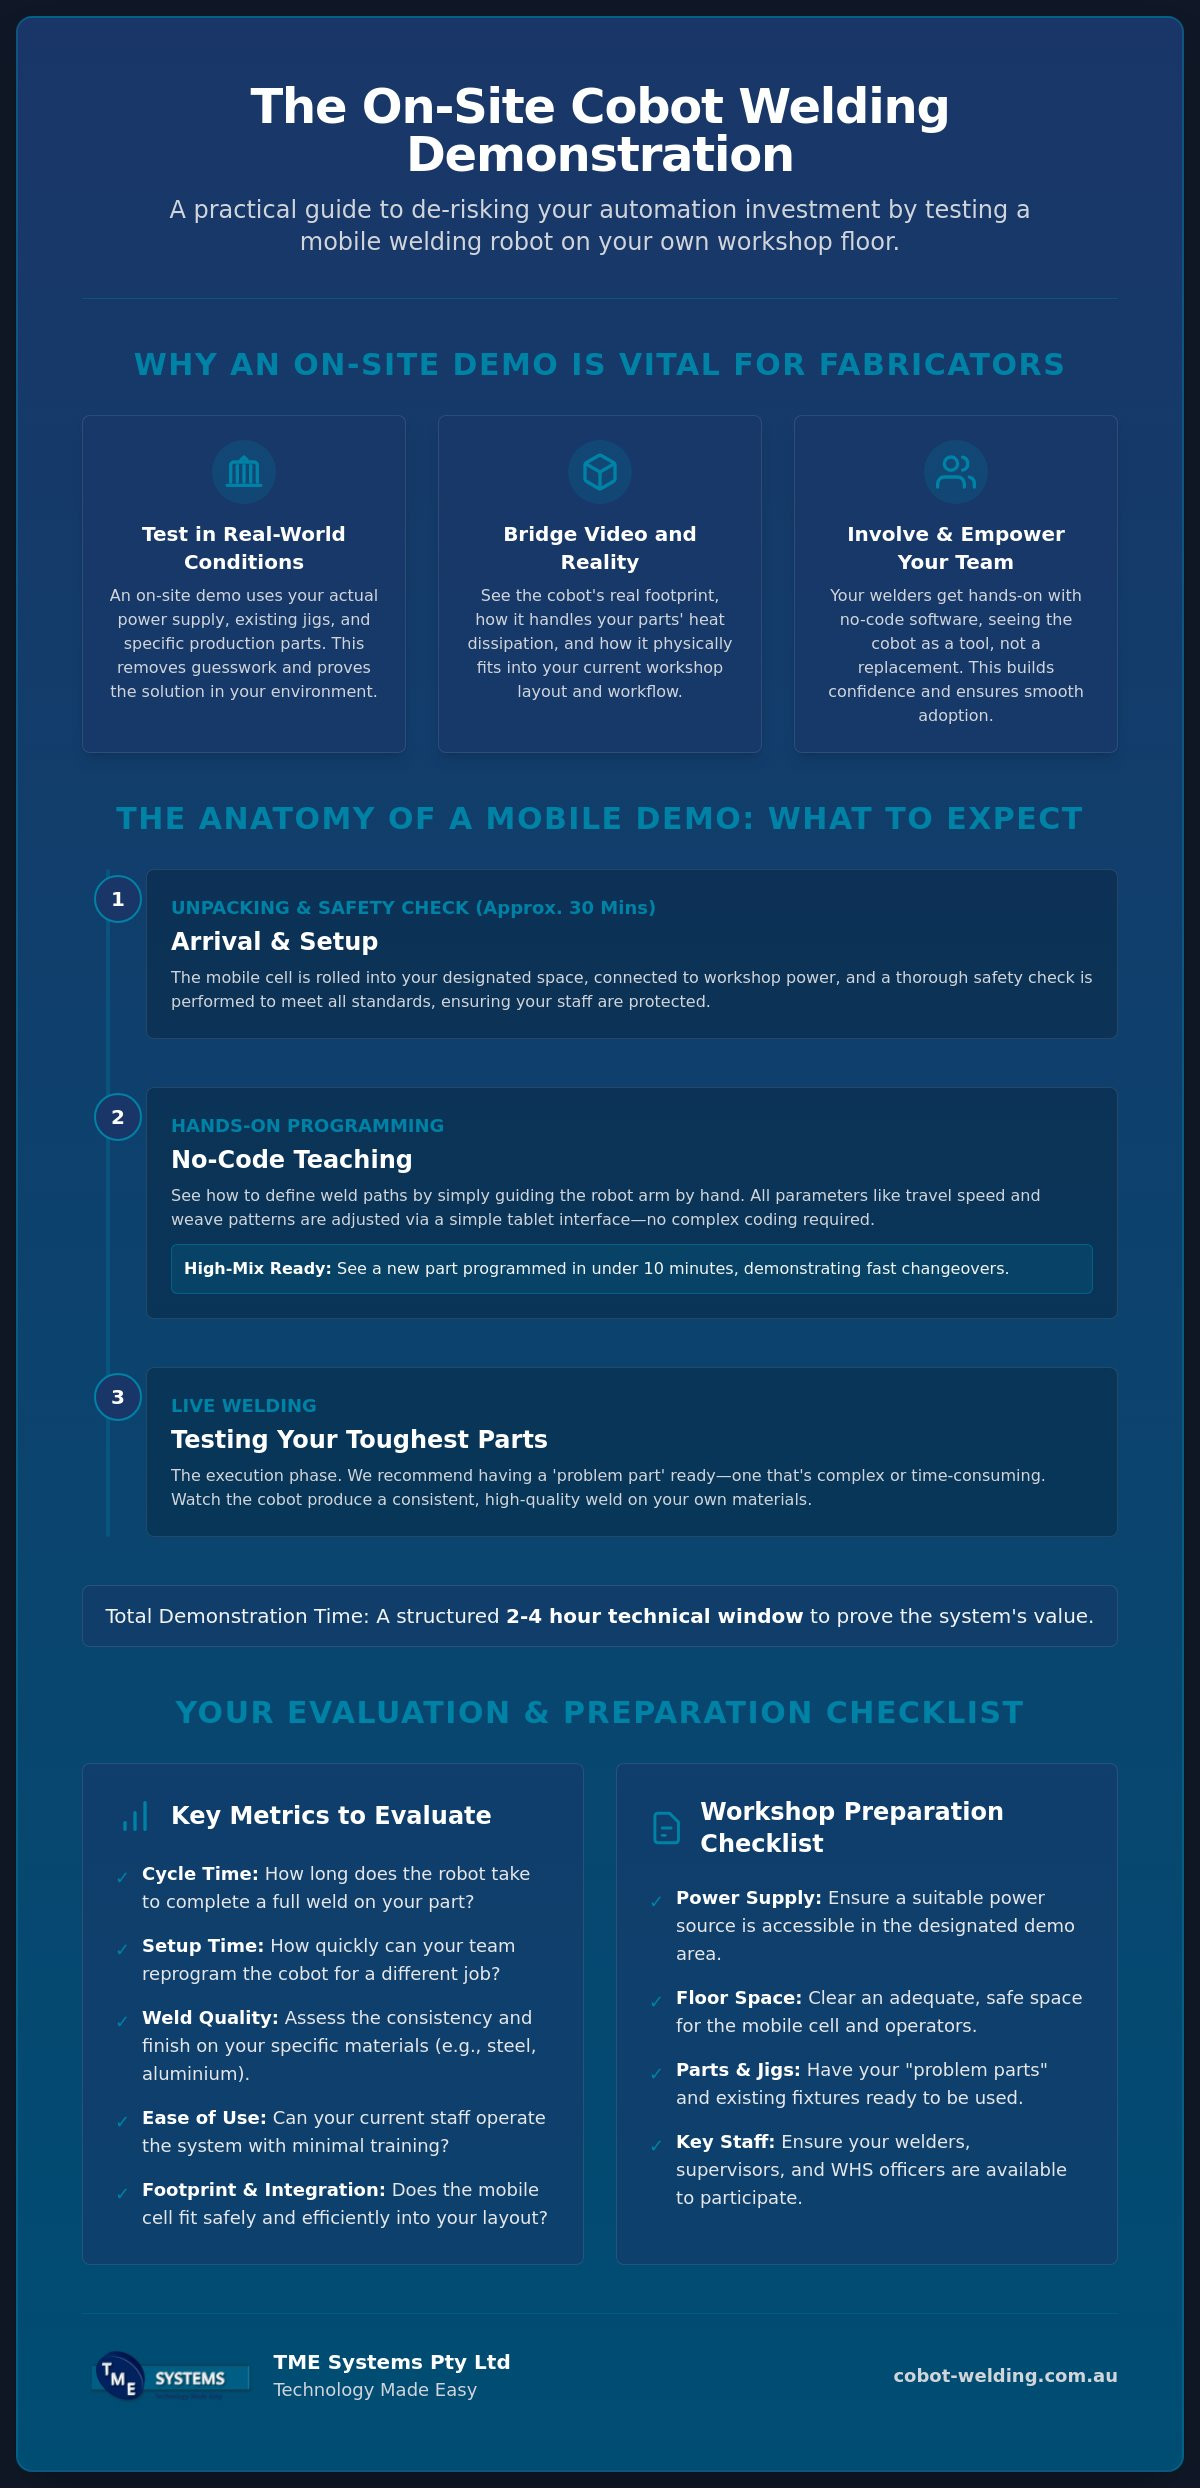
A mobile welding robot demonstration is more than just a quick look at a new machine. It's a genuine proof of concept that takes place exactly where the work happens: on your workshop floor. Unlike a sterile showroom environment, an on-site demo uses your actual power supply, your existing jigs, and your specific production parts. This approach removes the guesswork. You aren't just watching a robot weld; you're watching it solve your specific production bottlenecks under real-world conditions.
For many Australian fabricators, the "tyranny of distance" has historically made adopting new technology difficult. If you're based in regional Victoria or the outskirts of Perth, losing two days of production to visit a city-based supplier isn't always feasible. Mobile demonstrations bring innovation to your gate. This accessibility ensures that regional workshops can evaluate robotic welding technology without the logistical headaches of travel. It also allows you to test the system on challenging materials, such as cobot welding for aluminium, where heat management and wire feed consistency are critical for a quality finish.
Bridging the Gap Between Video and Reality
YouTube videos often make automation look like a "plug and play" miracle. They rarely show the nuances of arc stability or the physical footprint required for safe operation in a busy shed. A live trial allows you to see how the cobot handles the specific heat dissipation of your parts, which is often very different from a generic test piece. You can also physically measure how the collaborative cell fits into your current layout. Does it obstruct a forklift path? Can your operators move around it easily? Seeing the system in your own space answers these practical questions immediately.
Involving Your Team from Day One
Success in automation depends heavily on your staff. Bringing a robot into the workshop can cause anxiety among experienced tradespeople who fear their skills are being replaced. A mobile welding robot demonstration changes that narrative. It allows your best welders to get hands-on with the "no-code" software, showing them that the robot is a tool to make their jobs easier, not a replacement. Your WHS officers can also assess the safety features in real-time, ensuring the system meets your site-specific requirements. This early exposure is actually the first step in on-site cobot welder training, building confidence long before the final crate arrives.
The Anatomy of a Mobile Cobot Welding Demo: What to Expect
A typical mobile welding robot demonstration isn't a rushed sales pitch. It's a structured, 2–4 hour technical window designed to prove the system's worth on your specific jobs. We don't just show you what the robot can do; we show you what your team can achieve with it. The process is transparent and methodical, moving from a cold start to a finished weld in less time than a standard lunch break.
The session begins with the "Unpacking" phase. The mobile cell is rolled off the van on integrated castors and positioned in your designated workspace. Once connected to your workshop power, we perform a thorough safety check. This includes verifying that the setup meets current robotic safety standards to ensure your staff remain protected throughout the trial. Within about 30 minutes of arriving, the system is powered up and ready for the teaching phase.
Hands-On No-Code Teaching
This is where you'll see the real power of no-code robot welding software. You can watch as the specialist "leads-through" the robot arm by hand, physically moving the torch to define the weld path. There's no complex programming or script writing involved. You'll see travel speeds, weave patterns, and arc parameters adjusted on the fly via a simple tablet interface. We frequently challenge our specialists to reprogram the robot for a completely different part in under 10 minutes to demonstrate how quickly you can switch between jobs in a high-mix production environment.
Testing Your Toughest Parts
We always suggest having a "problem part" ready for the execution phase. This should be a component that currently causes a bottleneck or requires high levels of consistency that are difficult to maintain manually. We'll evaluate torch access and reach for complex geometries using your own jigs and fixtures. For shops cobot welding stainless steel, this is the perfect time to inspect the bead profile and heat tint against your manual standards. Seeing the robot handle your actual material provides the grounded evidence you need to justify the investment. If you want to see how the hardware handles your specific floor conditions, you can view our mobile system specifications before we arrive.
Key Metrics to Evaluate During Your Live Welding Trial
Watching a mobile welding robot demonstration is a great way to see the hardware in action, but the real value comes from the data you collect during the trial. To make an informed decision, you need a framework for evaluation that goes beyond visual appeal. You're looking for measurable improvements in your current workflow that justify the transition to automation. Focus on the numbers that actually impact your bottom line.
Start with cycle time. Record the duration from "arc on" to "arc off" for a standard part and compare it to your manual baseline. While the robot might move at a similar speed to a skilled human, its ability to maintain that pace without fatigue over an eight-hour shift is where the true gains happen. Next, evaluate the setup time. Ask the specialist to switch between two different "recipes" or parts. If the transition takes more than a few minutes, the system might not be the right fit for a high-mix, low-volume workshop where flexibility is king.
Weld quality is the next critical pillar. Inspect the finished bead for penetration, spatter levels, and aesthetic consistency. Robotic systems offer a level of uniformity that's hard to match by hand, especially on repetitive long runs. Finally, put the "no-code" claim to the test. Let your junior apprentice or a senior welder spend time with the interface. If they can't grasp the basics of moving the arm and setting a weld point within 15 minutes, the software might be too complex for your team to manage without constant outside help.
Productivity vs Manual Welding
The goal is a significant increase in your "arc-on time" percentage. Manual welders often spend a large portion of their day on positioning, cleaning, and prep work. By improving welding productivity with cobots, you allow your skilled staff to focus on high-value tasks while the robot handles the repetitive runs. This precision control also leads to a reduction in consumables. You'll likely notice less shielding gas waste and fewer wire stubs, as the robot executes the exact same path every single time, drastically reducing the need for expensive rework.
The Operator Experience
A mobile welding robot demonstration should also be an ergonomic assessment. Evaluate how the teaching pendant feels in the hand and whether the lead-through handle is intuitive to move. The software interface needs to be clear for non-programmers, using industry-standard terms that your welders already understand. This is also the time to determine the level of ongoing support you'll need. A successful trial should leave you feeling confident that your team can troubleshoot basic path adjustments themselves, rather than needing to call a technician for every minor change.
Preparing Your Workshop Floor for a Successful Robotic Demonstration
To get the most out of a mobile welding robot demonstration, you should treat your workshop floor like a temporary production cell. A bit of preparation ensures that the specialist's time is spent welding your parts rather than moving pallets or hunting for extension leads. By setting up a dedicated zone, you allow the system to perform under the exact conditions it would face if it were a permanent fixture in your shed.
Follow these four practical steps to ready your site:
- Step 1: Clear a 3m x 3m area of level concrete. The mobile cell needs a stable, flat surface to ensure the robot's reach and accuracy remain consistent throughout the trial.
- Step 2: Confirm your power access. Most mobile units require standard workshop power, typically 15A or 32A 3-phase. You'll need to verify the specific requirements with TME Systems Pty Ltd before the van arrives to avoid any connection delays.
- Step 3: Prepare clean test pieces. Don't waste your demonstration window grinding rust or cleaning mill scale. Have your parts tacked and ready to go, along with any existing jigs you currently use for manual welding.
- Step 4: Organise your team's schedule. Ensure your key welding staff are available for the full session so they can see the setup, teaching, and execution phases first-hand.
Power and Gas Requirements
The logistics of a live demo often hinge on the small details. Double-check the specific plug types required for the demo unit to ensure they match your workshop outlets. You'll also need to provide the correct shielding gas for your specific material, such as the standard Argon/CO2 mixes used for steel. Safety remains the priority, so make sure your existing fume extraction or ventilation systems are active and accessible in the demo area. Having these basics sorted means the robot can be up and running within minutes of arrival.
Selecting the Right Test Jobs
Picking the right parts to test is essential for a realistic evaluation. We recommend selecting a high-volume "bread and butter" job that represents your typical daily output. This provides the best data for your ROI calculations. At the same time, don't be afraid to pick a "tricky" part to test the limits of the cobot mig welding for fabricators system. However, try to avoid parts with extreme fit-up gaps. While robots are precise, they can't always compensate for poor upstream fabrication as well as a manual welder can. If you're ready to see how these systems handle your specific production challenges, you can request a site-readiness checklist from TME Systems Pty Ltd today.
Taking the Next Step: Booking Your Custom TME Systems Pty Ltd Proof-of-Concept
Booking a mobile welding robot demonstration is the start of a collaborative partnership rather than a one-off transaction. TME Systems Pty Ltd organises regional demo tours across Australia to ensure that workshops from Townsville to Traralgon have access to the same technology as city-based firms. These tours are scheduled to maximise time on-site with local fabricators, allowing our technical team to focus on the unique production hurdles found in different regional industries. It is a methodical way to bring innovation directly to your workshop gate.
Before the van arrives at your site, we conduct a thorough pre-demo consultation. This stage is vital for identifying your specific bottlenecks and ensuring the trial is as productive as possible. Once the session concludes, you won't just be left with a few welded samples. TME Systems Pty Ltd provides a post-demo report that includes a data-backed summary of the results, including cycle times and path repeatability. This documentation provides the grounded evidence needed to justify the transition to a permanent collaborative robot welding cell installation.
The Consultation Process
We start by reviewing your current workflow. Sharing your CAD files or part photos early allows our specialists to perform a preliminary feasibility check. We discuss your current production targets and the specific labour challenges you're facing, such as the difficulty in finding ticketed welders for repetitive runs. This allows us to customise the demo to your specific material needs. Whether you're working with thin-gauge aluminium, stainless steel, or heavy carbon steel, the trial is tailored to prove the system's capability on your actual production jobs.
Your Road Map to Automation
A successful proof of concept is the bridge between seeing the technology and doing the work. TME Systems Pty Ltd provides a tailored integration plan that outlines the exact steps for a full-scale rollout. This includes comprehensive operator training and onboarding support to ensure your staff are confident from the first day of production. We don't just drop off a machine; we stay involved to refine your processes and support your team as they master the new system. It is a steady, supportive approach designed to build long-term productivity and quality in your workshop.
Enquire about the next mobile welding robot demonstration in your area today.
De-Risking Your Workshop's Move to Automation
Transitioning to robotic systems doesn't have to be a leap of faith. By seeing the technology perform on your own floor, you can evaluate exactly how it handles your specific production parts and existing jigs. You've seen how a mobile welding robot demonstration provides a no-obligation technical proof-of-concept, allowing you to gather real-world data on cycle times and weld quality before committing. This hands-on approach ensures your team feels involved and confident in operating the no-code software from day one.
Automation is a practical tool to empower your skilled tradespeople; it's about refining your output and staying competitive in a challenging labour market. If you're ready to see how these collaborative systems can transform your production line, the next step is simple. We're here to help you build a more productive and sustainable future for your business.
Book Your On-Site Mobile Welding Robot Demonstration and test your own parts under real-world conditions today.
Frequently Asked Questions
Do I need to pay for a mobile welding robot demonstration?
Most demonstrations are offered as a pre-sales activity to ensure the technology is a practical fit for your specific workshop needs. While we don't list a standard fee, the primary goal is to provide a technical proof of concept that helps you justify the investment. You should contact our team to discuss your site location and production goals to confirm the arrangements for your specific region.
Will the robot work with my existing MIG or TIG power source?
Our collaborative cells are typically supplied as turnkey systems with high-quality integrated power sources to ensure consistent results. However, we also offer welding system integration services for workshops with specific equipment requirements. During your initial consultation, we can evaluate your current MIG or TIG setup to determine the most reliable and efficient way to automate your production line.
How much space do I need to clear in my workshop for the demo?
You should clear a level area of approximately 3m x 3m to accommodate the mobile welding robot demonstration unit and allow your staff to move around it safely. This space ensures we can roll the cell into position and connect it to your power supply without obstructing your usual forklift paths. A clear perimeter also makes it easier for your WHS officers to assess the safety boundaries.
Can the robot weld aluminium and stainless steel during the same demo?
Yes, we can demonstrate welding on multiple materials like aluminium and stainless steel during a single visit. You'll just need to let us know your requirements beforehand so we can bring the correct shielding gases and wire types. This allows you to see how the system handles different heat settings and pulse parameters on your actual workshop floor using your own test pieces.
Do my staff need any prior programming experience to try the software?
No prior programming or robotics experience is required for your team to get hands-on with the system. The mobile welding robot demonstration highlights our no-code teaching software, which uses a simple "lead-through" method. Your welders can physically move the robot arm to set points, and most operators can learn to adjust travel speeds or weave patterns within about 15 minutes of the session starting.
What happens if my workshop floor isn’t perfectly level?
While a level concrete floor provides the best base for accuracy, we can usually manage minor imperfections using the adjustable levelling feet on the mobile cart. If your floor has significant slopes or deep cracks, it's a good idea to mention this during the pre-demo consultation. We'll help you pick the most stable spot in your shed to ensure the robot performs with precision.
How long does it take to set up the robot once the demo team arrives?
It typically takes about 30 minutes to have the system powered up and ready to strike the first arc. Once the van arrives, we roll the mobile cell into your designated area and connect it to your 15A or 32A 3-phase power. Because our systems are designed for rapid integration, we spend the majority of the session focused on welding your parts rather than fiddling with cables.
Can we test the robot on our own production parts or just sample pieces?
We strongly encourage you to test the robot on your actual production parts rather than generic samples. Seeing the cobot handle your specific geometries and jigging provides the most accurate proof of concept for your ROI calculations. This trial helps you identify exactly which high-volume jobs are the best candidates for automation, giving you confidence that the system can handle your real-world workload.